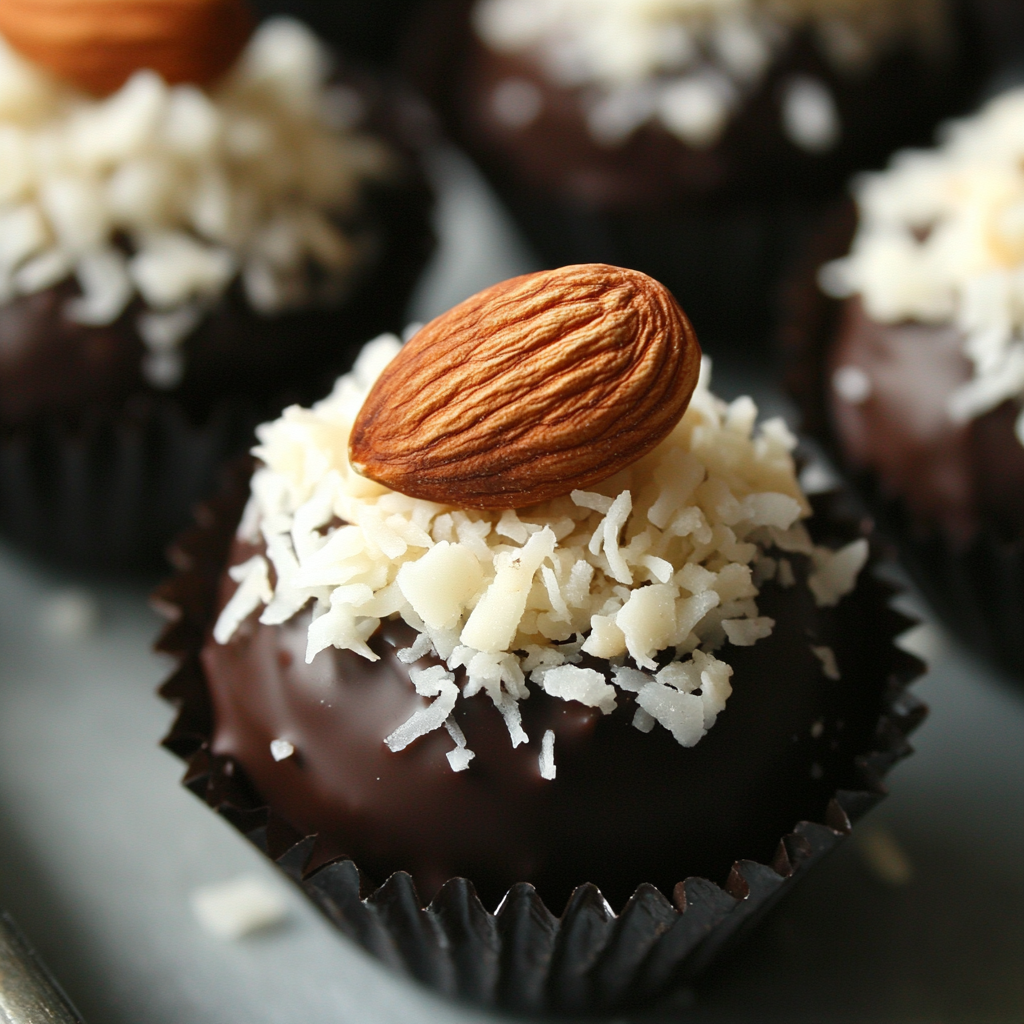
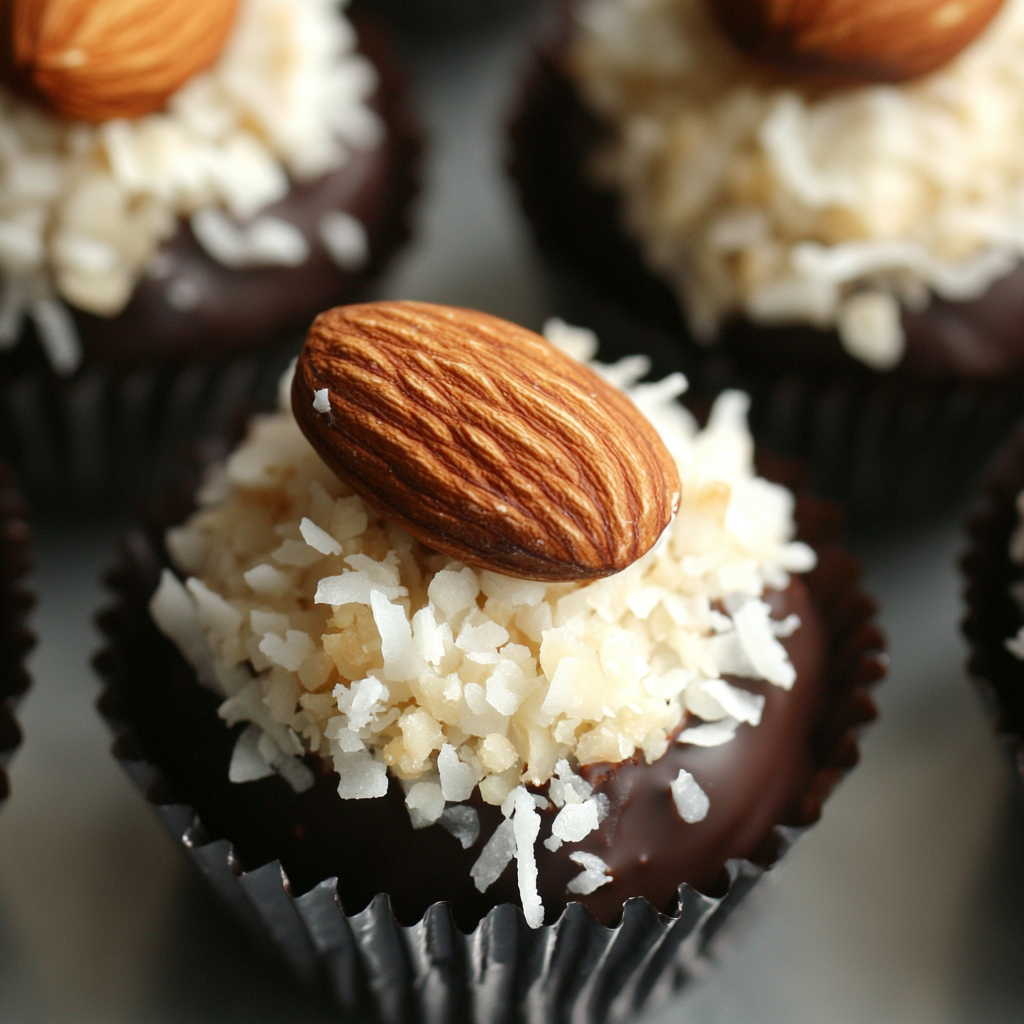
As a passionate home cook, I find joy in creating sweet treats that not only satisfy my cravings but also bring smiles to the faces of my loved ones. One of my all-time favorites is the Almond Joy Truffles Recipe. These delightful little bites are a heavenly combination of rich chocolate, crunchy almonds, and sweet coconut. They remind me of the classic candy bar, but with a homemade twist that makes them even more special.
Ingredients for Almond Joy Truffles Recipe
Before diving into the delightful world of making Almond Joy Truffles, let’s gather our ingredients. Each component plays a vital role in creating that perfect balance of flavors and textures. I always find it exciting to lay everything out on my kitchen counter, like a painter preparing their palette. Here’s what you’ll need:
- 🌰 Whole almonds – 24 pieces: These crunchy gems are the heart of our truffles, adding a satisfying crunch and nutty flavor.
- 🥥 Shredded coconut – 2 cups (sweetened): This is where the magic happens! The sweet coconut gives our truffles that signature taste reminiscent of tropical paradise.
- 🥛 Sweetened condensed milk – 1 cup: This creamy ingredient binds everything together, adding sweetness and richness that makes each bite melt in your mouth.
- 🍫 Dark chocolate – 8 oz (chopped or chocolate chips): The star of the show! Choose a high-quality dark chocolate for a deep, luscious flavor that complements the sweetness of the coconut.
- 🍦 Vanilla extract – 1 teaspoon: A splash of vanilla enhances the overall flavor, making the truffles taste even more decadent.
As I gather these ingredients, I can’t help but feel a sense of anticipation. Each item brings its own unique character to the truffles, and I can already imagine the delightful aroma wafting through my kitchen as they come together. Remember, using fresh ingredients can make a world of difference in the final product. So, let’s make sure everything is top-notch!
Once you have everything ready, we can move on to the next step of our truffle-making journey. Trust me, the end result will be worth every moment spent in the kitchen!
Tools Needed for Almond Joy Truffles Recipe
Before we dive into the delightful process of making Almond Joy Truffles, it’s essential to gather the right tools. Having everything at your fingertips makes the cooking experience smoother and more enjoyable. I always feel like a chef in a fancy kitchen when I have my tools organized and ready to go. Here’s what you’ll need:
- Mixing bowl: A large mixing bowl is crucial for combining the coconut, sweetened condensed milk, and vanilla extract. I love using a glass bowl because I can see the beautiful mixture come together.
- Measuring cups and spoons: Accurate measurements are key to achieving the perfect balance of flavors. I always keep my measuring cups handy, as they help me avoid any guesswork.
- Cookie scoop or tablespoon: This handy tool helps me portion out the coconut mixture evenly. It’s like having a little helper in the kitchen, ensuring each truffle is just the right size!
- Parchment paper: Lining my baking sheet with parchment paper prevents the truffles from sticking. Plus, it makes cleanup a breeze, which is always a win in my book!
- Microwave-safe bowl or double boiler: I use this for melting the dark chocolate. If you’re like me and love chocolate, having a good melting method is essential to avoid any burnt bits.
- Fork: A simple fork is perfect for dipping the truffles into the melted chocolate. It allows me to lift them out easily and lets any excess chocolate drip off.
- Refrigerator: While not a tool in the traditional sense, my fridge is my best friend during this process! It helps the truffles firm up and sets the chocolate perfectly.
With these tools at the ready, I feel like I’m about to embark on a delicious adventure. Each item plays a role in crafting these delightful truffles, and I can already envision the joy they’ll bring to my family and friends. So, let’s gather our tools and get ready to create some magic in the kitchen!
Step-by-Step Preparation of Almond Joy Truffles Recipe
Step 1: Prepare the Base Mixture
Let’s kick off our truffle-making adventure! The first step is to prepare the base mixture, which is the heart of our Almond Joy Truffles Recipe. I love this part because it’s where the magic begins. In a large mixing bowl, I combine the shredded coconut and sweetened condensed milk. The sweetened condensed milk is like a hug for the coconut, binding everything together in a creamy embrace.
As I add a teaspoon of vanilla extract, I can already smell the delightful aroma wafting through the air. It’s like a warm invitation to indulge! I mix everything together until the coconut is evenly coated, and I can see the beautiful blend of textures. It’s a bit sticky, but that’s what makes it fun! I often find myself sneaking a taste at this stage—just to make sure it’s as delicious as I remember.
Step 2: Form the Truffles
Now comes the fun part—forming the truffles! I take about a tablespoon of the coconut mixture and roll it into a ball in my hands. It’s like crafting little edible treasures! Once I have a nice round shape, I press a whole almond into the center. This is where the surprise element comes in, and I can’t help but smile at the thought of that crunchy almond waiting to be discovered.
After pressing the almond in, I reshape the ball around it, ensuring it’s completely enclosed. I place each formed truffle on a parchment-lined baking sheet, and I can’t help but admire my handiwork. The sight of those little coconut balls lined up is so satisfying! I repeat this process until all the mixture is used, and I feel a sense of accomplishment with each truffle I create.
Step 3: Chill the Truffles
With the truffles formed, it’s time to chill them. I pop the baking sheet into the refrigerator for about 30 minutes. This step is crucial because it helps the truffles firm up, making them easier to coat in chocolate later. While I wait, I often find myself daydreaming about how delicious they’ll be. It’s like waiting for a surprise gift to be unwrapped!
Step 4: Coat the Truffles
Once the truffles are nice and firm, it’s time to coat them in chocolate. I melt the dark chocolate in a microwave-safe bowl, stirring every 30 seconds until it’s smooth and glossy. The rich aroma of melted chocolate fills my kitchen, and I can hardly contain my excitement! I dip each truffle into the melted chocolate, ensuring it’s completely coated. Using a fork, I lift the truffle out, letting any excess chocolate drip off. It’s like giving each truffle a luxurious chocolate bath!
As I place the coated truffles back on the parchment-lined baking sheet, I can’t help but admire their shiny, chocolatey exterior. They look so tempting already! I often find myself sneaking a piece of chocolate at this stage—after all, it’s a chef’s privilege!
Step 5: Garnish and Final Touches
Now for the finishing touches! While the chocolate is still wet, I sprinkle a little extra shredded coconut on top of each truffle. It adds a lovely texture and makes them look even more inviting. I also place a whole almond on top for decoration, giving each truffle a charming little personality. It’s like dressing them up for a party!
Finally, I return the coated truffles to the refrigerator for about 15-20 minutes, allowing the chocolate to set completely. As I wait, I can hardly contain my excitement. I know that soon, I’ll be indulging in these delightful Almond Joy Truffles, and I can’t wait to share them with my family and friends!
Serving Suggestions for Almond Joy Truffles Recipe
Now that our Almond Joy Truffles are beautifully coated and ready to go, it’s time to think about how to serve them. Presentation can elevate any dish, and these truffles are no exception! I love to get creative when it comes to serving, and I have a few delightful ideas that will make your truffles the star of the show.
First, consider using a decorative plate or a beautiful cake stand. Placing the truffles on a vibrant platter adds a pop of color and makes them look even more enticing. I often arrange them in a circular pattern, like a little chocolate treasure trove, and it never fails to impress my guests. You can even sprinkle some extra shredded coconut around the base for a touch of whimsy!
If you’re hosting a party, why not create a truffle bar? Set out your Almond Joy Truffles alongside a variety of toppings like crushed nuts, sprinkles, or even a drizzle of caramel sauce. This interactive approach allows guests to customize their treats, and it’s always a hit! I remember one gathering where everyone had a blast creating their own unique truffle combinations. It turned into a fun and delicious activity!
For a more elegant touch, consider serving the truffles in mini cupcake liners. This not only adds a charming flair but also makes them easy to grab and enjoy. I love using colorful liners that match the theme of the occasion. Whether it’s a birthday party or a cozy family gathering, these little details make a big difference.
Lastly, don’t forget about pairing! These truffles go wonderfully with a cup of coffee or a glass of dessert wine. The rich chocolate and sweet coconut flavors complement the bitterness of coffee beautifully. I often serve them alongside a steaming cup of my favorite brew, and it creates a delightful experience for everyone at the table.
With these serving suggestions, your Almond Joy Truffles will not only taste amazing but also look stunning. I can’t wait for you to try these ideas and see the joy they bring to your gatherings. So, gather your friends and family, and let the truffle celebration begin!
Tips for Perfect Almond Joy Truffles Recipe
As I’ve journeyed through the delightful world of making Almond Joy Truffles, I’ve picked up a few tips and tricks that can elevate your truffle-making experience. These little nuggets of wisdom have helped me create truffles that are not only delicious but also visually stunning. So, let’s dive into some of my favorite tips to ensure your truffles turn out perfectly every time!
First and foremost, always use fresh ingredients. The quality of your coconut and chocolate can make a world of difference. I remember the first time I used fresh, sweetened coconut instead of the stale stuff from the back of my pantry. The flavor was like a tropical breeze, and it made my truffles taste so much better! So, don’t skimp on freshness—your taste buds will thank you.
Next, when it comes to melting chocolate, patience is key. I’ve learned that melting chocolate in short intervals, stirring in between, prevents it from burning. There’s nothing worse than a batch of truffles ruined by burnt chocolate! I often set a timer for 30 seconds and keep a close eye on it. The smooth, glossy finish of perfectly melted chocolate is worth the wait!
Another tip is to chill your truffles before dipping them in chocolate. This step not only makes them easier to handle but also helps the chocolate adhere better. I find that when the truffles are firm, they hold their shape beautifully, resulting in a more polished look. Plus, it’s a great excuse to take a little break while you wait for them to chill!
Don’t forget about the garnishing! While it’s tempting to skip this step, adding a sprinkle of shredded coconut or a whole almond on top can transform your truffles from ordinary to extraordinary. It’s like giving them a little crown! I love to get creative with my garnishes, sometimes even adding a drizzle of white chocolate for an elegant touch.
Lastly, if you’re feeling adventurous, experiment with flavors! You can add a pinch of sea salt to the chocolate for a delightful contrast or even a splash of almond extract to enhance the nutty flavor. I once tried adding a hint of orange zest, and it took my truffles to a whole new level. The possibilities are endless, and that’s what makes cooking so much fun!
With these tips in your back pocket, you’re well on your way to creating the most scrumptious Almond Joy Truffles imaginable. Remember, cooking is all about enjoying the process and sharing the love with others. So, roll up your sleeves, get creative, and let your kitchen be filled with the sweet aroma of homemade truffles!
FAQs About Almond Joy Truffles Recipe
Can I use different nuts in the Almond Joy Truffles Recipe?
Absolutely! While almonds are the star of the show, you can easily switch things up. I’ve experimented with walnuts and pecans, and they add a delightful twist. Just remember, the nut you choose should complement the sweet coconut and rich chocolate. So, feel free to get creative and use your favorite nuts!
How long do Almond Joy Truffles last?
When stored properly, your Almond Joy Truffles can last up to a week in the refrigerator. I always keep them in an airtight container to maintain their freshness. However, I can guarantee they won’t last that long in my house! They tend to disappear quickly, especially when I have guests over.
Can I make Almond Joy Truffles ahead of time?
Yes, you can! In fact, making them ahead of time is a great idea. I often prepare a batch a day or two before a gathering. Just make sure to store them in the fridge until you’re ready to serve. This way, you can enjoy the festivities without worrying about last-minute preparations!
What is the best way to store Almond Joy Truffles?
The best way to store your Almond Joy Truffles is in an airtight container in the refrigerator. This keeps them fresh and prevents them from absorbing any unwanted odors. If you want to keep them for longer, you can also freeze them! Just make sure to separate layers with parchment paper to avoid sticking.
Conclusion on Almond Joy Truffles Recipe
As I wrap up this delightful journey through the world of Almond Joy Truffles, I can’t help but feel a sense of satisfaction. These little bites of joy are not just a treat; they’re a celebration of flavors and memories. Each truffle is a testament to the joy of cooking and the happiness it brings to those we love.
Print
Almond Joy Truffles: Discover the Secret Recipe Today!
- Total Time: 1 hour
- Yield: 24 truffles
- Diet: Vegetarian
Description
Almond Joy Truffles are a delightful combination of rich chocolate, crunchy almonds, and sweet coconut, reminiscent of the classic candy bar but with a homemade twist.
Ingredients
- 🌰 Whole almonds – 24 pieces
- 🥥 Shredded coconut – 2 cups (sweetened)
- 🥛 Sweetened condensed milk – 1 cup
- 🍫 Dark chocolate – 8 oz (chopped or chocolate chips)
- 🍦 Vanilla extract – 1 teaspoon
Instructions
- In a large mixing bowl, combine shredded coconut, sweetened condensed milk, and vanilla extract until evenly mixed.
- Take about a tablespoon of the coconut mixture and roll it into a ball, then press a whole almond into the center.
- Chill the formed truffles in the refrigerator for about 30 minutes to firm up.
- Melt the dark chocolate in a microwave-safe bowl, stirring every 30 seconds until smooth.
- Dip each truffle into the melted chocolate, ensuring it is completely coated, and place it back on a parchment-lined baking sheet.
- While the chocolate is still wet, sprinkle extra shredded coconut on top and place a whole almond for decoration.
- Return the coated truffles to the refrigerator for 15-20 minutes to allow the chocolate to set completely.
Notes
- Use fresh ingredients for the best flavor.
- Chill truffles before dipping to make handling easier.
- Experiment with different nuts for variety.
- Store truffles in an airtight container in the refrigerator.
- Prep Time: 20 minutes
- Cook Time: 10 minutes
- Category: Dessert
- Method: No-bake
- Cuisine: American
Nutrition
- Serving Size: 1 truffle
- Calories: 150
- Sugar: 10g
- Sodium: 30mg
- Fat: 8g
- Saturated Fat: 5g
- Unsaturated Fat: 3g
- Trans Fat: 0g
- Carbohydrates: 18g
- Fiber: 2g
- Protein: 2g
- Cholesterol: 5mg
Keywords: Almond Joy, Truffles, Chocolate, Coconut, Dessert
")
")
")
")