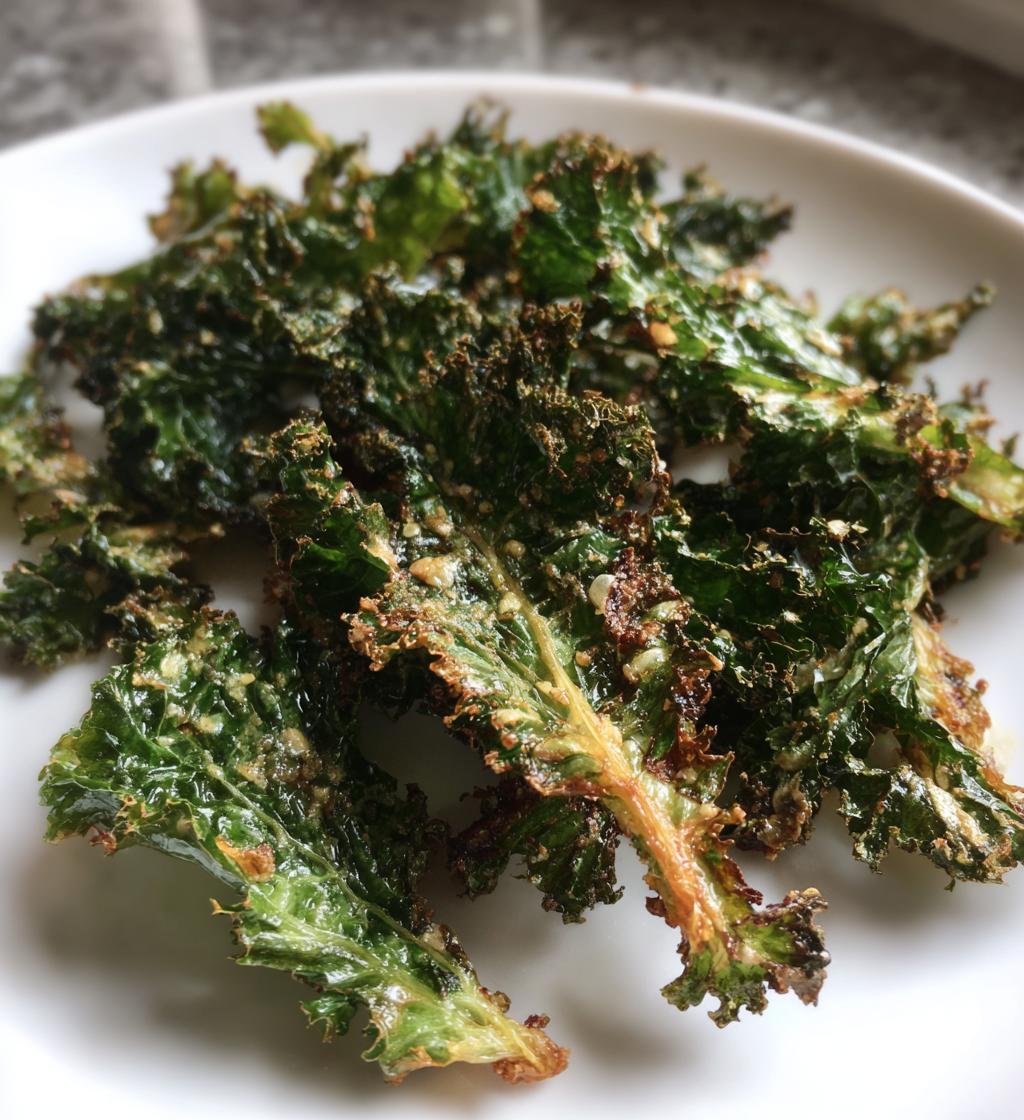
Okay, I’ll admit it—I was totally skeptical the first time someone told me about baked kale chips. “Crispy kale? Really?” I thought it sounded like one of those sad “healthy” snacks that taste like cardboard. But then my friend Jess practically forced a handful into my mouth at a potluck, and wow—I was hooked! That perfect crunch, the salty goodness, the way they practically melt in your mouth… I couldn’t believe something so simple could be so addictive.
Now these baked kale chips are my go-to when that 3pm snack craving hits. They’re ridiculously easy (like, 10 minutes of prep easy), packed with vitamins, and way cheaper than buying those tiny overpriced bags at the health food store. Plus, my kids actually eat them without complaining—which, if you have picky eaters, you know is basically a miracle.
The secret is in the baking technique (low and slow!) and getting the kale properly dry before it hits the oven. Trust me, once you try these, you’ll never look at kale the same way again.
Why You’ll Love These Baked Kale Chips
Let me count the ways these crispy little wonders will steal your heart (and your snack cravings):
- That addicting crunch – When baked just right, they shatter like potato chips but with none of the grease. The first bite will make you do a happy dance!
- Guilt-free munching – Packed with vitamins A, C, and K, these are snacks you can actually feel good about eating by the handful.
- Foolproof simplicity – Just kale, oil, salt, and 15 minutes in the oven. Even my kitchen-disaster-prone cousin can’t mess these up.
- Endless flavor options – Once you master the basic recipe, you can go wild with spices. My personal favorite? A sprinkle of nutritional yeast for a cheesy vibe.
Ingredients for Baked Kale Chips
Here’s the beautiful thing about this recipe—you probably have everything you need already! Just a handful of simple ingredients transform humble kale into crispy magic. I’ve made these so many times I could probably do it in my sleep, but I always double-check these staples first:
- 1 bunch curly kale (about 6-8 cups torn leaves, stems removed)
- 1 tablespoon olive oil – the good stuff, since we’re using so little!
- 1/2 teaspoon kosher salt – or sea salt if you’re feeling fancy
- 1/4 teaspoon freshly ground black pepper
- 1/4 teaspoon garlic powder (optional but SO good—my secret weapon!)
See? Nothing weird or hard-to-find. Pro tip: Grab the freshest kale you can find—look for crisp, dark green leaves without any yellow spots. The better your kale, the more amazing your chips will turn out. And don’t even think about skipping the oil! That’s what makes them crisp up beautifully instead of turning into sad little kale jerky.
How to Make Baked Kale Chips
Alright, let’s turn that bunch of kale into crispy perfection! I’ve burned my fair share of batches (oops) before nailing the perfect method, so follow these steps closely. Trust me – it’s worth the extra few minutes of prep to get these just right.
Preparing the Kale
First things first – we’ve got to treat our kale right. Don’t skip this part! I learned the hard way that wet kale = soggy chips. Here’s how I get mine ready:
- Wash it like you mean it – Kale can be sneaky with dirt hiding in those curly leaves. I swish mine in a big bowl of cold water, then give each leaf a quick rinse under the faucet just to be sure.
- Dry like your chips depend on it (because they do!) – I spread the leaves out on clean kitchen towels and pat them completely dry. Sometimes I’ll even let them air dry for 10 minutes if I’m being extra. Your salad spinner works great here too!
- De-stem with care – Grab each leaf and run your fingers along the stem to strip off the leafy parts. The stems are too tough for chips, but save them for smoothies or stir-fries!
- Tear, don’t cut – I tear the leaves into about 2-inch pieces. They shrink while baking, so don’t go too small. The uneven edges actually help them get extra crispy in spots – that’s where the magic happens!
Baking the Kale Chips
Now for the fun part! Preheat that oven to 300°F (150°C) – low and slow is the name of the game here. Here’s my foolproof method:
- Massage that oil in – In a big bowl, drizzle your dry kale with olive oil and use your hands to gently rub it into every nook and cranny. You want each piece lightly coated but not drowning – too much oil makes them greasy.
- Season generously – Sprinkle on your salt, pepper, and that optional garlic powder (do it, trust me!). I like to toss everything with my hands again to distribute the seasonings evenly.
- Single layer is key! – Spread the kale on a baking sheet in one layer with NO overlapping. I use two sheets if needed – overcrowding leads to steaming instead of crisping. Not what we want!
- Watch like a hawk – Bake for 10 minutes, then start checking every 2 minutes. The edges will crisp up first, and you want them just lightly golden – not brown! They go from perfect to burnt crazy fast.
- Cool completely – Let them sit on the pan for 5 minutes after baking – they’ll crisp up even more as they cool. Try not to eat them all straight from the pan (but no judgment if you do!).
Tips for Perfect Baked Kale Chips
After making more batches of kale chips than I can count (and yes, burning a few along the way), I’ve picked up some foolproof tricks to get them crispy every single time. These are the little things that make all the difference between “meh” and “wow!”
- Dry, dry, dry! – I can’t stress this enough – moisture is the enemy of crispiness. After washing, I actually spin my kale in the salad spinner, then lay it out on clean kitchen towels to air dry for at least 15 minutes. Pat it down one more time just to be safe!
- Give them space to breathe – Overcrowding the baking sheet is the #1 mistake I see. The kale needs room for hot air to circulate, so use two pans if you have to. If the leaves are touching, they’ll steam instead of crisp up.
- Set a timer (and then some) – These go from golden to charcoal in what feels like seconds. I set my oven timer for 8 minutes, then check every 90 seconds after that. The moment you see the edges turning brown, they’re done – even if some pieces still look a bit green.
- Season after baking (sometimes) – While I love tossing everything together before baking, some seasonings (like nutritional yeast or parmesan) can burn. For those, I sprinkle them on right when the chips come out of the oven so they stick to the warm oil.
Want to mix up the flavors? Here are my favorite seasoning combos to try once you’ve mastered the basic recipe:
- Smoky paprika + a pinch of cayenne for heat
- Lemon zest + garlic powder (my personal obsession)
- Everything bagel seasoning for that deli-style crunch
- Taco night special – chili powder, cumin, and a touch of lime juice
Remember – the first batch is always a test run! Ovens vary, so don’t be discouraged if your first try isn’t perfect. Adjust the timing next time, and soon you’ll be making kale chips like a pro.
Variations for Baked Kale Chips
Once you’ve mastered the basic recipe (and trust me, you’ll know because you’ll be eating them straight off the baking sheet), it’s time to play with flavors! I love experimenting with different seasonings depending on my mood—here are my absolute favorite ways to jazz up these crispy greens:
- “Cheesy” Nutritional Yeast – My vegan friends turned me onto this miracle powder! Just sprinkle 1-2 tablespoons over the kale after oiling (but before baking) for a nutty, cheesy flavor that’ll make you forget all about Doritos.
- Spicy Chili Lime – Toss with 1/4 teaspoon chili flakes and the zest of half a lime before baking. The citrus makes the flavors pop—perfect with margaritas on taco night!
- Garlic Parmesan – After baking, while still warm, shower the chips with finely grated parmesan and an extra pinch of garlic powder. It melts slightly and sticks to every nook and cranny. (Not vegan, but oh-so-delicious.)
The beauty is you can mix and match based on what’s in your pantry—a little smoked paprika here, some curry powder there. Just remember: if you’re adding dry spices, mix them with the oil first so they stick better. And for fresh ingredients like citrus zest or fresh herbs, add them after baking so they keep their bright flavors. Happy experimenting!
Storing Baked Kale Chips
Okay, here’s the hard truth—these crispy little wonders are absolutely best eaten fresh from the oven when they’re at their crunchiest. I mean, try telling that to my willpower when an entire batch is cooling on the counter! But if you somehow manage not to devour them all immediately (no judgment if you do), here’s how to keep them as fresh as possible:
Airtight is the way to go – I stash mine in glass containers with tight-fitting lids or those fancy silicone bags with the double zipper. Plastic containers work too, just make sure you press out as much air as possible. Those cute little kale crinkles love to trap moisture, and moisture is their arch-nemesis!
Counter or pantry—not the fridge! – I learned this the hard way after ruining a perfectly good batch. Refrigeration turns them from crisp to soggy almost instantly because of all the humidity. They’ll keep at room temperature for about 3 days… if they last that long in your house!
The paper towel trick – If I notice any slight softness the next day, I’ll lay them out on a baking sheet and pop them back in a 250°F oven for 5 minutes. Sometimes I’ll even tuck a folded paper towel into the storage container to absorb any sneaky moisture that tries to creep in.
Pro tip from my many kale chip experiments: Store different flavors separately! That garlic parmesan might taste amazing fresh, but you don’t want it making your chili lime chips taste funky the next day. Small mason jars work perfectly for keeping flavors distinct.
Nutritional Information for Baked Kale Chips
Now let’s talk about why you can feel *really* good about inhaling an entire batch of these (not that I’ve ever done that… okay maybe once or twice). Here’s the nutritional lowdown per serving—just remember these are estimates since kale bunch sizes can vary a bit.
- Calories: 60 (basically nothing for how satisfying they are!)
- Fat: 4g (the good kind from olive oil)
- Saturated Fat: Only 0.5g – woohoo!
- Carbs: 5g (with 2g fiber – that’s 8% of your daily need)
- Protein: 2g (not bad for a leafy green!)
- Sodium: 300mg (easy to reduce if you’re watching salt)
But here’s what *really* gets me excited—each serving packs a serious vitamin punch! We’re talking vitamin A for your eyes, vitamin C for immunity, and vitamin K for bone health. And because we’re baking instead of frying, you get all that goodness without any greasy aftertaste or guilt.
My nutritionist friend always reminds me that these values can shift slightly depending on how much oil sticks to your kale and exactly how big your “serving” is (let’s be real, who stops at just one handful?). But whether you’re tracking macros or just want a healthy snack, these chips are absolute winners in my book.
Frequently Asked Questions
After sharing this recipe with countless friends (and fielding their frantic texts when things go slightly wrong), I’ve answered every kale chip question imaginable. Here are the big ones that come up again and again—consider this your crispy kale troubleshooting guide!
“Can I use frozen kale for chips?”
Oh honey, no. I made this mistake early on, and it was a soggy disaster. Frozen kale holds onto way too much moisture, no matter how much you pat it dry. Fresh, crisp kale leaves are the only way to achieve that perfect chip-like crunch. If your grocery store only has pre-washed bagged kale, just make sure to dry it extra thoroughly!
“Why did my kale chips turn out limp instead of crispy?”
Nine times out of ten, it’s one of three things: 1) Not drying the leaves enough before baking (I can’t stress this enough!), 2) Overcrowding the baking sheet (give those leaves space to breathe!), or 3) Underbaking them (they should be completely dry and crisp to the touch). If they’re still flexible when hot, they won’t magically crisp up as they cool.
“Can I make these in an air fryer?”
Absolutely! My air fryer is actually my secret weapon for small batches. Just reduce the temperature to 275°F and cook for 6-8 minutes, shaking the basket halfway. They cook faster, so keep a close eye—I’ve burned more than one batch when I got distracted by my phone!
“How do I keep the seasoning from falling off?”
The trick is to massage the oil onto the kale first, then immediately sprinkle the seasonings while the leaves are still tacky. I like to toss everything with my hands rather than a spoon—it helps the spices cling better. For extra stubborn seasonings (looking at you, nutritional yeast), a quick spritz of oil spray after baking helps them stick.
“My chips burned in some spots but are still soft in others—what gives?”
This usually means your kale pieces were unevenly sized. The smaller bits cook faster and burn while the big pieces are still drying out. Next time, try to tear your leaves into more uniform 2-inch pieces, removing any particularly thick stem portions that might cook slower. And rotate your baking sheet halfway through for even browning!
Final Thoughts
Well, there you have it—my complete obsession with baked kale chips laid bare! What started as a skeptical snack experiment has turned into my go-to crunchy fix for movie nights, lunchboxes, and those late-afternoon “must eat something now” moments. The best part? You can whip these up so fast that cravings don’t stand a chance.
I’d love to hear how your kale chip adventures turn out! Did you stick with the classic garlic version or get wild with some crazy seasoning combo? Maybe you discovered the perfect baking time for your particular oven (everyone’s seems to be different!). Drop me a note in the comments—I’m always looking for new flavor ideas to try.
One last pro tip before you race to your oven: Make a double batch. Seriously. These disappear faster than you’d believe, and nothing’s sadder than reaching into an empty bowl after smelling that heavenly kale aroma fill your kitchen. Happy baking, fellow crispy green enthusiasts!
Print
15-Minute Crispy Baked Kale Chips That Simply Addicting
- Total Time: 25 mins
- Yield: 2 servings 1x
- Diet: Vegan
Description
Crispy baked kale chips make a healthy and delicious snack. They are easy to prepare and packed with nutrients.
Ingredients
- 1 bunch kale
- 1 tbsp olive oil
- 1/2 tsp salt
- 1/4 tsp black pepper
- 1/4 tsp garlic powder (optional)
Instructions
- Preheat oven to 300°F (150°C).
- Wash kale and dry thoroughly.
- Remove stems and tear leaves into bite-sized pieces.
- Toss kale with olive oil, salt, pepper, and garlic powder.
- Spread kale in a single layer on a baking sheet.
- Bake for 10-15 minutes until crisp.
- Let cool before serving.
Notes
- Store in an airtight container to keep crispy.
- Check frequently to avoid burning.
- Add other seasonings like paprika or nutritional yeast for variety.
- Prep Time: 10 mins
- Cook Time: 15 mins
- Category: Snack
- Method: Baking
- Cuisine: American
Nutrition
- Serving Size: 1/2 recipe
- Calories: 60
- Sugar: 0g
- Sodium: 300mg
- Fat: 4g
- Saturated Fat: 0.5g
- Unsaturated Fat: 3g
- Trans Fat: 0g
- Carbohydrates: 5g
- Fiber: 2g
- Protein: 2g
- Cholesterol: 0mg
Keywords: baked kale chips, healthy snack, vegan recipe
")
")
")
")