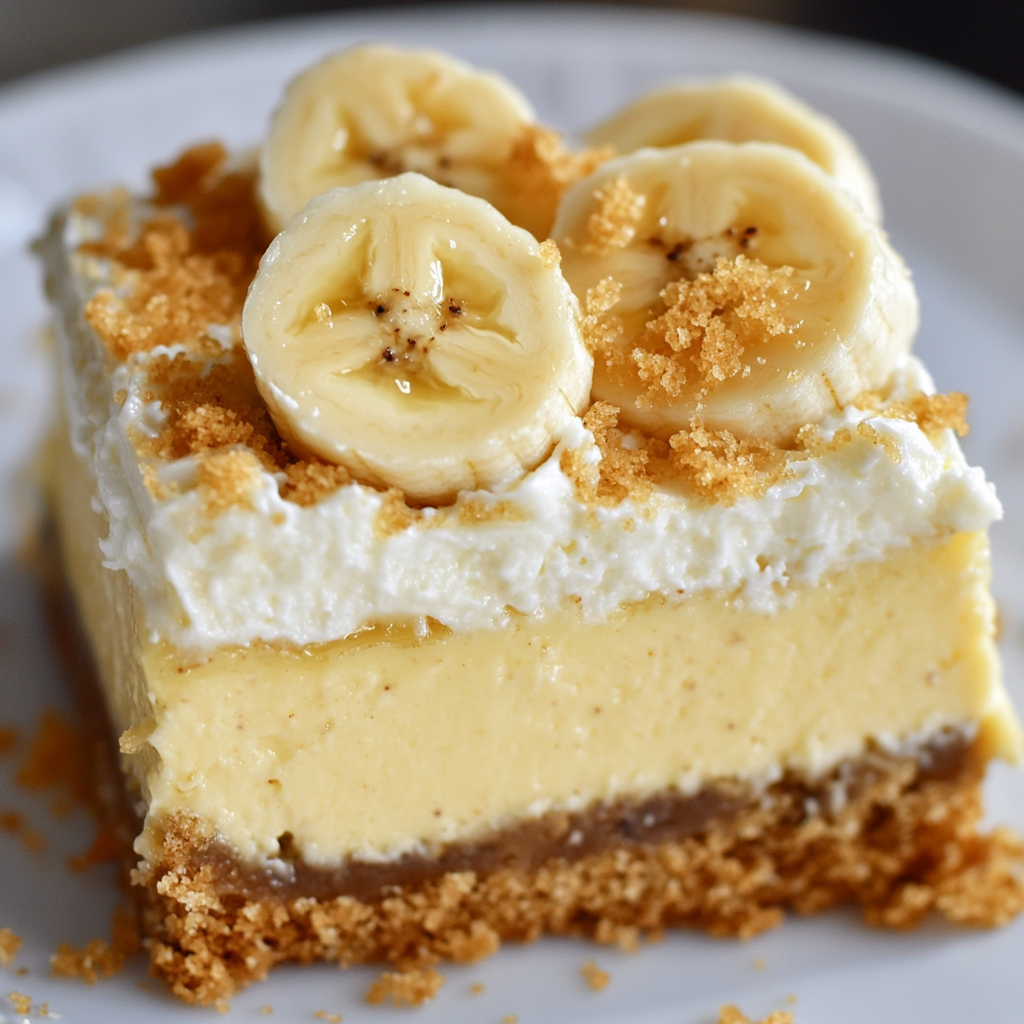
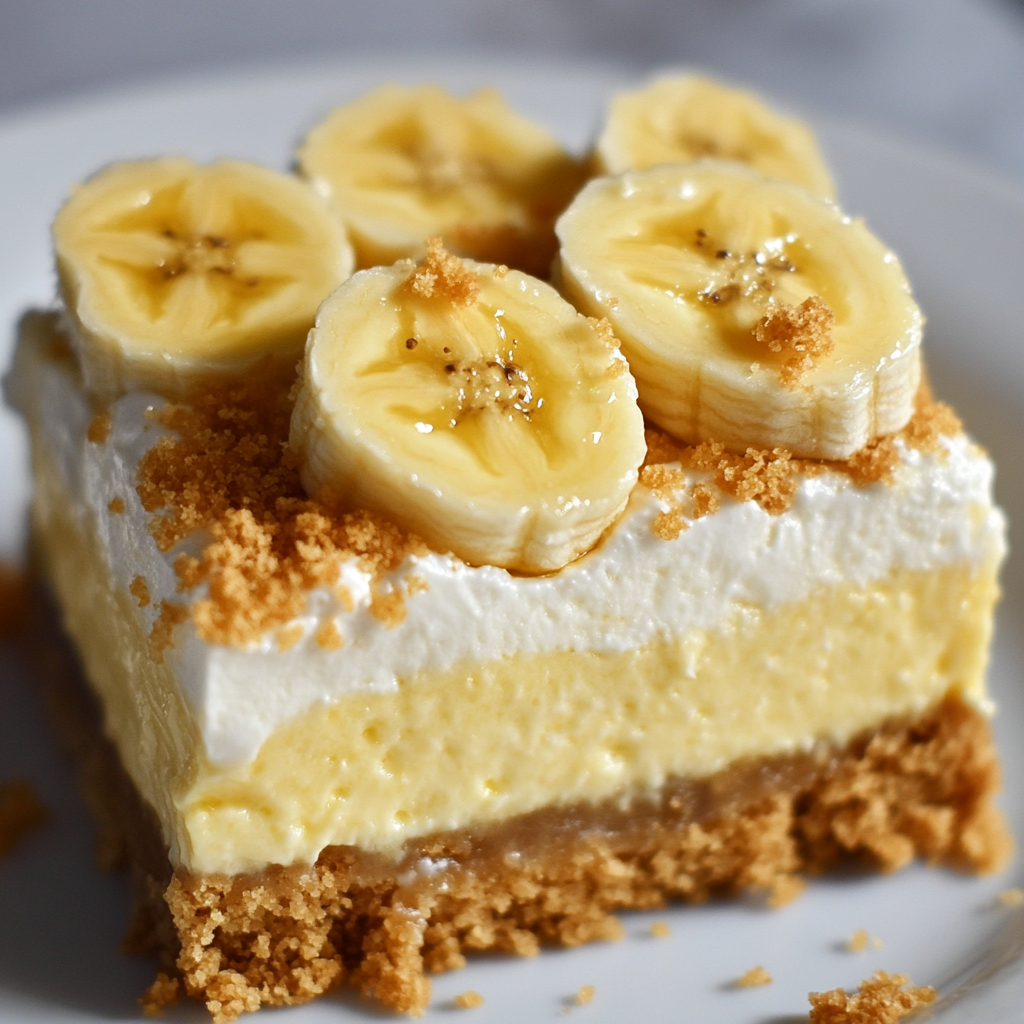
As a passionate home cook, I find joy in creating desserts that not only taste amazing but also bring a smile to the faces of my loved ones. One of my all-time favorite treats is the Banana Pudding Cheesecake Bars Recipe. These delightful bars combine the creamy richness of cheesecake with the nostalgic flavors of banana pudding, making them a perfect dessert for any occasion. Whether it’s a family gathering, a potluck, or just a cozy night in, these bars are sure to impress!
Ingredients for Banana Pudding Cheesecake Bars Recipe
Before we get our hands dirty in the kitchen, let’s gather all the ingredients needed for this delightful Banana Pudding Cheesecake Bars Recipe. Each component plays a vital role in creating that perfect balance of flavors and textures. Trust me, having everything ready makes the cooking process so much smoother and more enjoyable!
- Graham cracker crumbs: 1 ½ cups – This will form the deliciously crunchy base of our bars.
- Butter: ½ cup (1 stick, melted) – It adds richness and helps bind the crust together.
- Cream cheese: 16 oz (softened) – The star of the show! It gives our cheesecake that creamy, dreamy texture.
- Sugar: 1 cup – Sweetness is key! It balances the flavors beautifully.
- Eggs: 3 large – They help set the filling, giving it that perfect cheesecake consistency.
- Vanilla extract: 1 teaspoon – A splash of vanilla adds warmth and depth to the flavor.
- Ripe bananas: 2 medium (mashed) – The heart and soul of this recipe! They bring natural sweetness and a lovely banana flavor.
- Banana pudding mix: 1 package (3.4 oz) – This is the secret ingredient that enhances the banana flavor and adds creaminess.
- Whipped cream: 2 cups (for topping) – A fluffy cloud of goodness to crown our bars!
- Banana slices: for garnish – These not only look pretty but also add a fresh touch.
As I gather these ingredients, I can’t help but feel excited. Each one brings its own magic to the table. I remember the first time I made these bars; I was a bit nervous about the cream cheese. But once I saw how it transformed into a smooth filling, all my worries melted away. It’s moments like these that remind me why I love cooking so much!
Now that we have our ingredients ready, let’s move on to the tools we’ll need to whip up these scrumptious bars!
Tools Needed for Banana Pudding Cheesecake Bars Recipe
Before we dive into the delightful process of making our Banana Pudding Cheesecake Bars Recipe, it’s essential to gather the right tools. Having everything at your fingertips not only makes cooking easier but also adds to the fun! I always find that being organized in the kitchen helps me channel my inner chef. So, let’s take a look at what you’ll need!
- 9×13 inch baking dish: This is where the magic happens! A sturdy baking dish is perfect for holding all those delicious layers.
- Parchment paper: Lining the baking dish with parchment paper makes it super easy to lift the bars out once they’re set. Trust me, it’s a game changer!
- Mixing bowls: You’ll need a couple of mixing bowls—one for the crust and another for the cheesecake filling. I love using glass bowls because I can see the beautiful colors of my ingredients.
- Electric mixer: A hand mixer or stand mixer will make whipping the cream cheese a breeze. It’s like having a little helper in the kitchen!
- Rubber spatula: This handy tool is perfect for scraping down the sides of the bowl and ensuring every bit of goodness is mixed in.
- Measuring cups and spoons: Accurate measurements are key to a successful recipe. I always double-check my measurements to avoid any surprises!
- Cooling rack: Once the bars are baked, a cooling rack helps them cool evenly. It’s also a great place to let them chill before serving.
- Knife or pizza cutter: For cutting the bars into perfect squares, a sharp knife or pizza cutter works wonders. I love the satisfaction of slicing through those creamy layers!
As I gather these tools, I can’t help but feel a sense of excitement. Each item plays a role in creating something truly special. I remember the first time I made these bars; I was so eager to get started that I almost forgot to preheat the oven! It’s those little moments that make cooking an adventure.
Now that we have our tools ready, let’s move on to the step-by-step preparation of our delicious Banana Pudding Cheesecake Bars!
Step-by-Step Preparation of Banana Pudding Cheesecake Bars Recipe
Now that we have our ingredients and tools ready, it’s time to roll up our sleeves and dive into the step-by-step preparation of these delightful Banana Pudding Cheesecake Bars Recipe. I love this part because it’s where the magic truly happens! Each step brings us closer to that creamy, dreamy dessert that everyone will adore. Let’s get started!
Step 1: Preparing the Crust
The first step is to create the crust, which is the foundation of our bars. In a medium bowl, I combine the graham cracker crumbs and melted butter. The smell of melted butter is like a warm hug, isn’t it? I mix them together until the crumbs are evenly coated. Then, I press this mixture firmly into the bottom of my prepared baking dish. It’s important to make it even, so every bite has that delightful crunch!
After pressing the crust down, I pop it into the oven for about 10 minutes. The aroma of toasting graham crackers fills my kitchen, and I can hardly wait to move on to the next step. Once it’s done, I take it out and let it cool slightly. This crust is going to be the perfect base for our creamy filling!
Step 2: Making the Cheesecake Filling
Next up is the star of the show: the cheesecake filling! In a large mixing bowl, I beat the softened cream cheese with my electric mixer until it’s smooth and creamy. It’s like magic watching it transform! Gradually, I add the sugar, mixing until everything is well combined. The sweetness of the sugar balances the tanginess of the cream cheese beautifully.
Then, I add the eggs one at a time, mixing well after each addition. This step is crucial because it helps create that perfect cheesecake consistency. After that, I mix in the vanilla extract and the mashed ripe bananas. The bananas add a lovely natural sweetness and flavor that makes my heart sing!
Step 3: Layering the Banana Pudding
Now comes the fun part! I sprinkle the banana pudding mix over the cream cheese mixture. As I fold it in, I can already imagine how creamy and delicious this filling will be. It’s like adding a secret ingredient that takes everything to the next level! I mix until everything is smooth and well combined, and I can’t help but sneak a taste. Yum!
Step 4: Baking the Bars
With the filling ready, I pour it over the cooled graham cracker crust, spreading it evenly. The colors are so inviting! I place the baking dish in the preheated oven and bake for 30-35 minutes. As it bakes, I can see the edges setting while the center remains slightly jiggly. That’s exactly what we want! The smell wafting through my kitchen is heavenly, and I can hardly contain my excitement.
Step 5: Cooling and Setting
Once the bars are done baking, I remove them from the oven and let them cool at room temperature for about 30 minutes. This is the hardest part—waiting! After they’ve cooled, I pop them into the refrigerator for at least 4 hours, or even overnight if I can resist the temptation. This chilling time allows the bars to set completely, making them easier to cut into perfect squares.
As I wait, I can’t help but daydream about how delicious they’ll be topped with whipped cream and banana slices. It’s all part of the anticipation that makes cooking so rewarding!
Serving Suggestions for Banana Pudding Cheesecake Bars Recipe
Now that our Banana Pudding Cheesecake Bars Recipe is ready to shine, it’s time to think about how to serve these delightful treats! Presentation can elevate any dessert, and I love getting creative with how I serve my bars. Here are some fun and delicious ideas to make your serving experience even more enjoyable!
Creative Ways to Serve
When it comes to serving these bars, I like to think outside the box. One of my favorite ways is to cut them into fun shapes using cookie cutters. Imagine heart-shaped or star-shaped bars at a party! It adds a whimsical touch that’s sure to delight both kids and adults alike.
Another idea is to serve them in individual cups. I layer a square of the cheesecake bar with some whipped cream and banana slices in a clear cup. It looks beautiful and makes for an easy grab-and-go dessert. Plus, it’s a great way to showcase those lovely layers!
If you’re feeling extra fancy, consider drizzling some caramel or chocolate sauce over the top before serving. The rich sauce complements the creamy cheesecake and adds a touch of elegance. I remember the first time I did this; it felt like I was serving a dessert straight from a gourmet restaurant!
Lastly, don’t forget about garnishing! A sprinkle of crushed graham crackers or a dusting of powdered sugar can make your bars look even more inviting. It’s those little details that make a big difference!
Pairing with Beverages
Now that we’ve got our serving ideas down, let’s talk about what to sip alongside these delicious bars. A well-paired beverage can enhance the flavors of your dessert and create a delightful experience. I love serving my Banana Pudding Cheesecake Bars with a tall glass of cold milk. There’s something so comforting about the classic combination of milk and cheesecake!
If you’re looking for something a bit more festive, try pairing these bars with a sweet iced coffee or a creamy latte. The coffee’s rich flavor complements the sweetness of the bars beautifully. I often enjoy this combination during brunch gatherings with friends.
For a non-caffeinated option, a refreshing glass of iced tea with a hint of lemon works wonders too. The citrusy notes cut through the richness of the cheesecake, making each bite feel light and delightful.
As you can see, there are endless possibilities for serving and pairing your Banana Pudding Cheesecake Bars. I love experimenting with different ideas, and it always brings a smile to my face when I see my family and friends enjoying the treats I’ve created. Now, let’s move on to some tips for perfecting your bars!
Tips for Perfecting Your Banana Pudding Cheesecake Bars Recipe
As a passionate home cook, I’ve learned that even the simplest recipes can have their quirks. To ensure your Banana Pudding Cheesecake Bars Recipe turns out perfectly every time, I’m excited to share some tips that I’ve gathered from my own kitchen adventures. Let’s dive into some common mistakes to avoid and how to store any leftovers you might have!
Common Mistakes to Avoid
First things first, let’s talk about some common pitfalls that can happen when making these delicious bars. One mistake I’ve made in the past is not allowing the cream cheese to soften properly. If it’s too cold, it won’t blend smoothly, and you’ll end up with lumps in your filling. Trust me, nobody wants that! So, be sure to take it out of the fridge ahead of time.
Another thing to watch out for is overmixing the batter. While it’s tempting to keep mixing until everything is perfectly smooth, overmixing can introduce too much air into the filling. This can lead to cracks in your cheesecake once it’s baked. I’ve learned that mixing just until combined is the way to go!
Also, don’t skip the chilling time! I know it’s hard to wait, especially when the aroma of banana and vanilla fills the air. But letting the bars chill in the fridge is crucial for them to set properly. If you cut into them too soon, they might fall apart, and that’s just heartbreaking.
Lastly, be mindful of your oven temperature. Every oven is different, and sometimes they can run hotter or cooler than expected. I recommend using an oven thermometer to ensure accuracy. This little tool has saved me from many baking mishaps!
Storage Tips for Leftovers
If you’re lucky enough to have leftovers (which is rare in my house!), storing them properly is key to keeping them fresh. I like to cut the bars into squares and place them in an airtight container. This helps maintain their creamy texture and prevents them from drying out.
When storing, I always make sure to place a piece of parchment paper between layers if I’m stacking them. This prevents the whipped cream from sticking to the bars above. I’ve learned this the hard way, and it’s not a pretty sight!
These bars can be stored in the refrigerator for up to five days. If you want to keep them longer, you can freeze them! Just wrap each square tightly in plastic wrap and then place them in a freezer-safe container. They can last up to three months in the freezer. When you’re ready to enjoy them, simply thaw them in the fridge overnight.
With these tips in your back pocket, you’re well on your way to mastering the art of making Banana Pudding Cheesecake Bars. I can’t wait for you to experience the joy of sharing these delightful treats with your family and friends!
FAQs About Banana Pudding Cheesecake Bars Recipe
Can I make Banana Pudding Cheesecake Bars ahead of time?
Absolutely! In fact, I often make these Banana Pudding Cheesecake Bars Recipe a day in advance. This not only saves time but also allows the flavors to meld beautifully. After baking and cooling, simply cover the bars with plastic wrap or foil and refrigerate them. They’ll be perfectly set and ready to serve when you need them. I love the convenience of having a delicious dessert ready to go, especially during busy weeks or special occasions!
What can I substitute for cream cheese in the recipe?
If you’re looking for a cream cheese alternative, there are a few options you can try. One of my favorites is using Greek yogurt. It provides a similar creamy texture and tangy flavor, making it a great substitute. You can also use mascarpone cheese for a richer taste. Just keep in mind that the flavor and texture may vary slightly, but it will still be delicious! I remember experimenting with Greek yogurt once, and it turned out surprisingly well!
How do I know when the cheesecake bars are done baking?
Knowing when your cheesecake bars are done can be a bit tricky, but I’ve got a simple trick! When you take them out of the oven, the edges should be set, while the center will still have a slight jiggle. This means they’re perfectly baked! If the center looks too firm, they might be overcooked. I always set a timer and keep an eye on them during the last few minutes of baking. It’s all about finding that sweet spot!
Can I use other fruits in this recipe?
Absolutely! While bananas are the star of this Banana Pudding Cheesecake Bars Recipe, you can definitely get creative with other fruits. I’ve tried using strawberries and blueberries, and they added a lovely burst of flavor. Just make sure to adjust the sweetness if you’re using tart fruits. You can also mix in some crushed pineapple for a tropical twist! The possibilities are endless, and I love how versatile this recipe can be!
Conclusion on Banana Pudding Cheesecake Bars Recipe
As I wrap up this delightful journey through the Banana Pudding Cheesecake Bars Recipe, I can’t help but feel a sense of satisfaction. These bars are more than just a dessert; they’re a celebration of flavors, memories, and the joy of sharing something special with loved ones. Each bite is a reminder of the sweet moments we create in the kitchen, and I hope you feel inspired to make them yourself!
Print
Banana Pudding Cheesecake Bars Recipe: A Must-Try Delight!
- Total Time: 4 hours 60 minutes
- Yield: 12 servings
- Diet: Vegetarian
Description
A delightful dessert that combines the creamy richness of cheesecake with the nostalgic flavors of banana pudding, perfect for any occasion.
Ingredients
- Graham cracker crumbs: 1 ½ cups
- Butter: ½ cup (1 stick, melted)
- Cream cheese: 16 oz (softened)
- Sugar: 1 cup
- Eggs: 3 large
- Vanilla extract: 1 teaspoon
- Ripe bananas: 2 medium (mashed)
- Banana pudding mix: 1 package (3.4 oz)
- Whipped cream: 2 cups (for topping)
- Banana slices: for garnish
Instructions
- Prepare the crust by mixing graham cracker crumbs and melted butter, then press into the bottom of a baking dish and bake for 10 minutes.
- Make the cheesecake filling by beating softened cream cheese until smooth, then gradually add sugar, eggs, vanilla extract, and mashed bananas.
- Sprinkle banana pudding mix over the cream cheese mixture and fold in until smooth.
- Pour the filling over the cooled crust and bake for 30-35 minutes until the edges are set and the center is slightly jiggly.
- Cool at room temperature for 30 minutes, then refrigerate for at least 4 hours or overnight before serving.
Notes
- Allow cream cheese to soften properly for a smooth filling.
- Avoid overmixing the batter to prevent cracks in the cheesecake.
- Do not skip the chilling time for proper setting.
- Use an oven thermometer to ensure accurate baking temperature.
- Prep Time: 20 minutes
- Cook Time: 40 minutes
- Category: Dessert
- Method: Baking
- Cuisine: American
Nutrition
- Serving Size: 1 bar
- Calories: 320
- Sugar: 22g
- Sodium: 200mg
- Fat: 18g
- Saturated Fat: 10g
- Unsaturated Fat: 8g
- Trans Fat: 0g
- Carbohydrates: 36g
- Fiber: 1g
- Protein: 4g
- Cholesterol: 80mg
Keywords: Banana Pudding, Cheesecake, Dessert, Bars, Easy Recipe
")
")
")
")