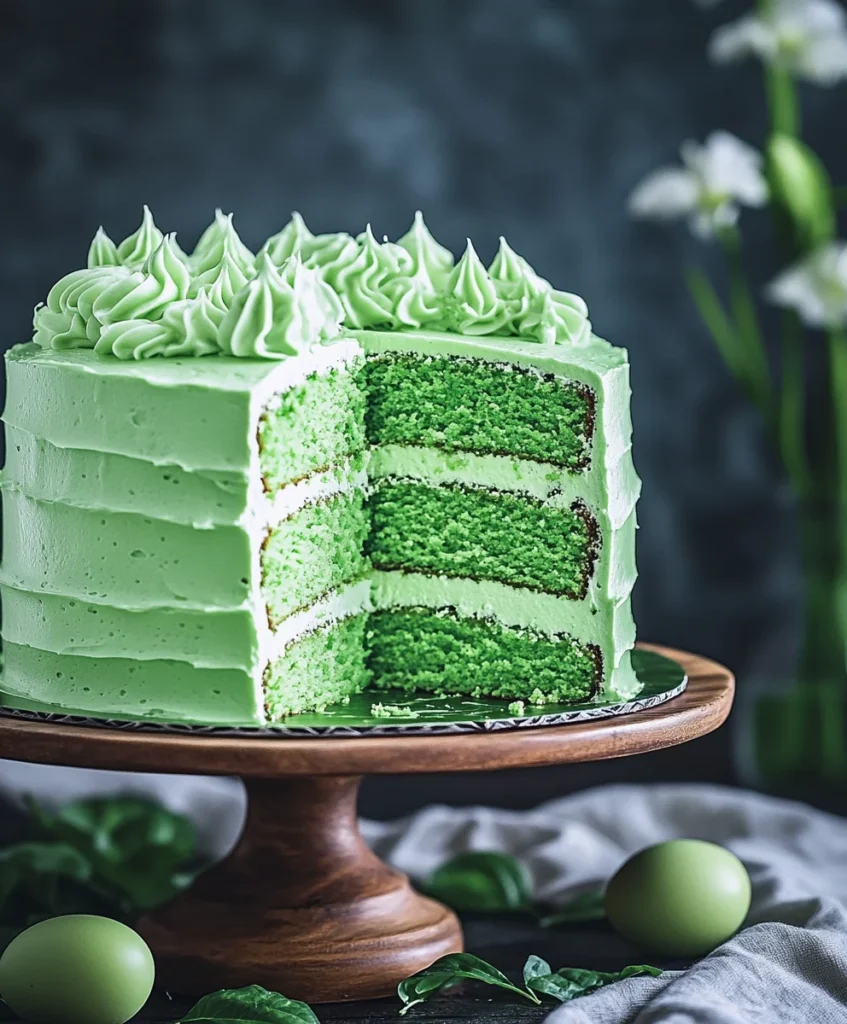
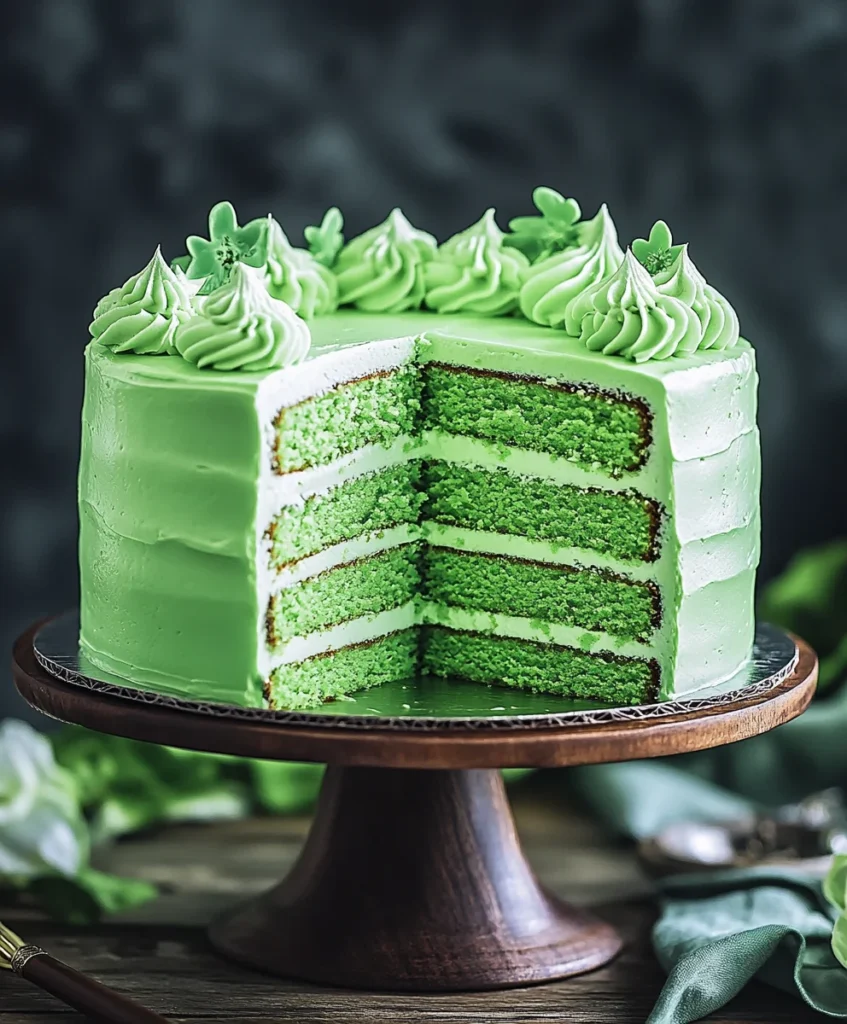
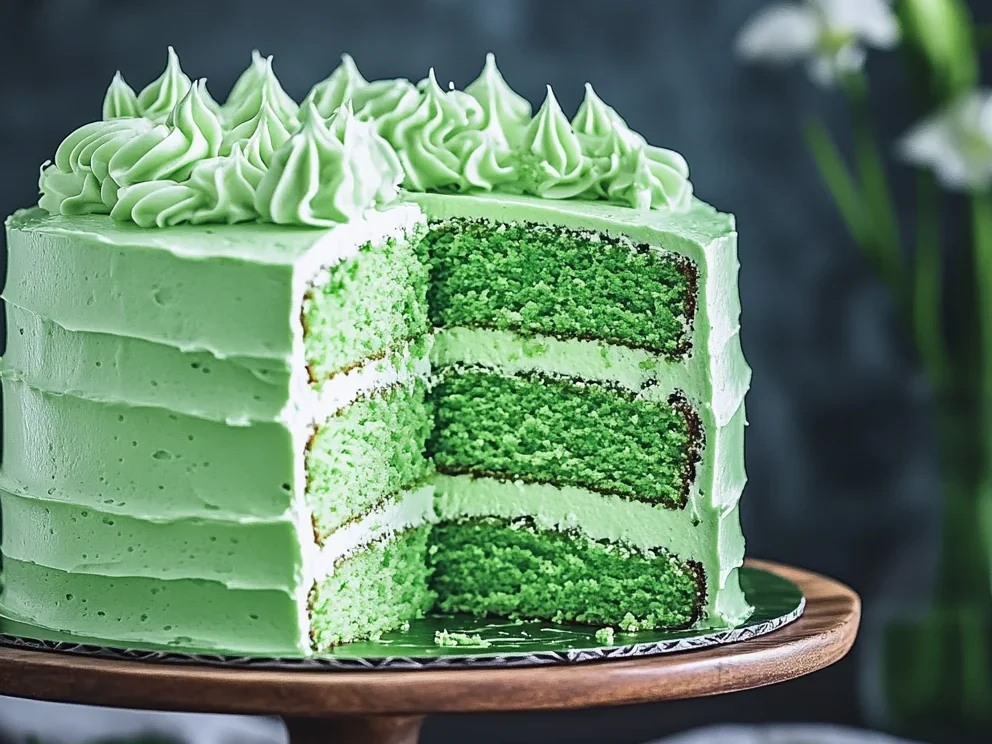
Birthday celebrations are special occasions filled with joy, laughter, and, of course, delicious treats. One of the most beloved traditions is the birthday cake. Among the many flavors and colors, the Birthday Cake Green stands out as a vibrant and festive choice. This cake not only delights the taste buds but also adds a splash of color to any celebration. Whether it’s a child’s party or an adult gathering, this cake is sure to impress.
Ingredients for Birthday Cake Green
To create the delightful Birthday Cake Green, you’ll need a selection of fresh ingredients. Each component plays a vital role in achieving the perfect flavor and texture. Here’s what you’ll need:
- All-purpose flour: 2 ½ cups (320 g) – This forms the base of your cake, providing structure.
- Granulated sugar: 2 cups (400 g) – Sugar adds sweetness and helps create a moist cake.
- Large eggs: 4 – Eggs bind the ingredients together and add richness.
- Unsalted butter: 1 cup (226 g), softened – Butter contributes to the cake’s moistness and flavor.
- Baking powder: 2 ½ teaspoons – This leavening agent helps the cake rise and become fluffy.
- Milk: 1 cup (240 ml), room temperature – Milk adds moisture and helps blend the ingredients smoothly.
- Vanilla extract: 2 teaspoons – This enhances the overall flavor of the cake.
- Green food coloring: 1-2 teaspoons – Adjust this to achieve your desired shade of green.
- Frosting: 4 cups (for decorating) – Use your favorite frosting to add a sweet finish to your cake.
These ingredients come together to create a deliciously moist and visually stunning cake. Make sure to gather everything before you start baking. This will help streamline the process and ensure you don’t miss any key components. Now that you have your ingredients ready, let’s move on to the tools you’ll need to make this delightful Birthday Cake Green.
Tools Needed for Birthday Cake Green
Creating the perfect Birthday Cake Green requires not just the right ingredients but also the right tools. Having the proper equipment can make your baking experience smoother and more enjoyable. Here’s a list of essential tools you’ll need:
- Mixing bowls: A set of mixing bowls in various sizes will help you combine ingredients easily.
- Measuring cups and spoons: Accurate measurements are crucial for baking. Use these to ensure you get the right amounts of each ingredient.
- Electric mixer: A stand or hand mixer will save you time and effort when creaming butter and sugar together.
- Spatula: A rubber spatula is perfect for scraping down the sides of the bowl and folding in ingredients.
- Whisk: Use a whisk to mix dry ingredients and ensure they are well combined.
- 9-inch round cake pans: You’ll need three of these to bake the layers of your cake evenly.
- Parchment paper: Lining your cake pans with parchment paper helps prevent sticking and makes for easier removal.
- Cooling rack: A cooling rack allows your cakes to cool evenly and prevents them from becoming soggy.
- Offset spatula: This tool is great for spreading frosting smoothly on your cake layers.
- Decorating tools: If you want to get creative, consider using piping bags and tips for decorating your cake.
Having these tools on hand will make the process of baking your Birthday Cake Green much more enjoyable. Each tool serves a specific purpose, ensuring that your cake turns out perfectly. Now that you’re equipped with the right tools, let’s move on to the step-by-step preparation of this delightful cake!
Step-by-Step Preparation of Birthday Cake Green
Now that you have your ingredients and tools ready, it’s time to dive into the exciting process of making your Birthday Cake Green. Follow these steps carefully to ensure a delicious and beautiful cake that will wow your guests!
Step 1: Preheat the Oven for Birthday Cake Green
First things first, preheat your oven to 350°F (175°C). This step is crucial as it ensures your cake bakes evenly. While the oven heats up, take a moment to grease and flour your three 9-inch round cake pans. This will help the cakes release easily once they are baked.
Step 2: Prepare the Batter for Birthday Cake Green
In a large mixing bowl, cream together the softened unsalted butter and granulated sugar. Use an electric mixer on medium speed for about 3-5 minutes. You want the mixture to be light and fluffy. This step is important as it incorporates air into the batter, making your cake light and airy.
Step 3: Add Eggs to the Birthday Cake Green Batter
Next, it’s time to add the eggs. Beat in the large eggs one at a time. Make sure each egg is fully mixed in before adding the next. This helps to create a smooth batter. Don’t forget to stir in the vanilla extract, which adds a lovely flavor to your cake!
Step 4: Mix Dry Ingredients for Birthday Cake Green
In a separate bowl, whisk together the all-purpose flour and baking powder. This ensures that the baking powder is evenly distributed throughout the flour. Gradually add this dry mixture to your wet ingredients, alternating with the milk. Start and end with the flour mixture. Mix until just combined; over-mixing can lead to a dense cake.
Step 5: Add Color to Your Birthday Cake Green Batter
Now comes the fun part! Add the green food coloring to your batter. Start with 1 teaspoon and mix well. If you want a deeper green color, feel free to add more. Just remember, a little goes a long way, so add gradually until you reach your desired shade.
Step 6: Bake the Cakes for Birthday Cake Green
Once your batter is ready, divide it evenly among the three prepared cake pans. Place them in the preheated oven and bake for 25-30 minutes. To check if they are done, insert a toothpick into the center of the cakes. If it comes out clean, they are ready!
Step 7: Cool the Cakes for Birthday Cake Green
After baking, remove the cakes from the oven and let them cool in the pans for about 10 minutes. This allows them to set. Then, carefully transfer the cakes to a wire rack to cool completely. Cooling is essential to prevent the frosting from melting when you decorate.
Step 8: Frost the Birthday Cake Green
Once the cakes are completely cool, it’s time to frost! Place one layer on a serving plate and spread a layer of frosting on top. Add the second layer and repeat the process. Finally, place the third layer on top and frost the entire cake. Make sure to cover all sides for a beautiful finish!
Step 9: Decorate Your Birthday Cake Green
Now for the creative part! Use additional frosting to pipe decorations on the cake. You can create swirls, rosettes, or any design that suits your celebration. Feel free to add sprinkles or edible decorations to make it even more festive!
Step 10: Serve the Birthday Cake Green
Finally, it’s time to slice and serve your Birthday Cake Green at your celebration. Enjoy the vibrant color and delicious flavor with your friends and family. This cake is sure to be a hit!
Serving Suggestions for Birthday Cake Green
When it comes to serving your delightful Birthday Cake Green, there are plenty of creative ways to make it even more special. Here are some serving suggestions that will enhance the experience for you and your guests:
- Pair with Ice Cream: A scoop of vanilla or mint chocolate chip ice cream complements the cake’s flavor beautifully. The cold ice cream contrasts nicely with the moist cake, creating a delightful treat.
- Fresh Fruit Garnish: Consider adding fresh fruit on the side. Slices of strawberries, kiwi, or even a handful of blueberries can add a refreshing touch and a pop of color to your dessert table.
- Whipped Cream: Serve the cake with a dollop of whipped cream. This light and airy topping enhances the cake’s sweetness and adds a creamy texture that everyone will love.
- Cake Pops: If you have leftover cake scraps, turn them into cake pops! Crumble the leftover cake, mix it with frosting, and roll into balls. Dip them in chocolate and decorate for a fun treat.
- Themed Plates and Napkins: Use colorful or themed plates and napkins that match the green color of the cake. This adds a festive touch to your birthday celebration and makes serving more fun.
- Personalized Cake Slices: For a unique twist, consider writing each guest’s name on their slice of cake with frosting. This personal touch makes everyone feel special and adds to the celebration.
These serving suggestions will not only enhance the presentation of your Birthday Cake Green but also create a memorable experience for your guests. Remember, the joy of a birthday celebration comes not just from the cake itself but from the shared moments and laughter around it. Enjoy every slice!
Tips for Perfecting Your Birthday Cake Green
Creating the perfect Birthday Cake Green is an exciting journey! To ensure your cake turns out moist, flavorful, and visually stunning, here are some helpful tips to keep in mind:
- Use Room Temperature Ingredients: Make sure your eggs, butter, and milk are at room temperature before mixing. This helps create a smoother batter and ensures even baking.
- Don’t Overmix: When combining the wet and dry ingredients, mix until just combined. Overmixing can lead to a dense cake, which is not what you want!
- Check for Doneness: Every oven is different. Start checking your cakes a few minutes before the recommended baking time. A toothpick inserted in the center should come out clean or with a few moist crumbs.
- Cool Completely: Allow your cakes to cool completely before frosting. This prevents the frosting from melting and sliding off, ensuring a beautiful finish.
- Experiment with Flavors: While vanilla is a classic choice, consider adding almond extract or lemon zest for a unique twist. These flavors can enhance the overall taste of your Birthday Cake Green.
- Use Quality Frosting: Whether you make your own or buy it, using high-quality frosting can elevate your cake. A rich buttercream or cream cheese frosting pairs wonderfully with the green cake.
- Decorate with Fresh Ingredients: Fresh fruits, edible flowers, or even chocolate shavings can add a beautiful touch to your cake. They not only enhance the look but also add extra flavor.
- Practice Piping: If you want to decorate with frosting, practice piping techniques on parchment paper first. This will help you gain confidence and create beautiful designs on your cake.
- Store Properly: If you have leftovers, store your cake in an airtight container at room temperature. This keeps it fresh and moist for up to three days.
By following these tips, you’ll be well on your way to creating a stunning and delicious Birthday Cake Green that will impress your guests. Remember, baking is as much about enjoying the process as it is about the final product. Happy baking!
FAQs About Birthday Cake Green
What can I substitute for eggs in Birthday Cake Green?
If you need to substitute eggs in your Birthday Cake Green, there are several options. You can use unsweetened applesauce, mashed bananas, or yogurt. Each of these alternatives works well to bind the ingredients together. For each egg, use 1/4 cup of applesauce or mashed banana, or 1/4 cup of yogurt. These substitutes will keep your cake moist and delicious while making it suitable for those with egg allergies or dietary restrictions.
How can I make Birthday Cake Green more colorful?
To enhance the color of your Birthday Cake Green, you can experiment with different shades of green food coloring. Start with a small amount and gradually add more until you achieve your desired hue. Additionally, consider using natural colorants like matcha powder or spirulina for a vibrant green without artificial ingredients. You can also decorate the cake with colorful sprinkles, edible glitter, or fresh fruits to add more visual appeal!
Can I make Birthday Cake Green ahead of time?
Absolutely! You can prepare your Birthday Cake Green ahead of time. Bake the cake layers a day or two in advance and store them in an airtight container at room temperature. If you want to keep them fresh for longer, wrap each layer in plastic wrap and refrigerate. Just remember to frost the cake on the day of your celebration to ensure the frosting stays fresh and beautiful!
What are some creative decoration ideas for Birthday Cake Green?
When it comes to decorating your Birthday Cake Green, the possibilities are endless! Here are a few creative ideas:
- Edible Flowers: Use fresh edible flowers like pansies or violets to add a natural touch.
- Fruit Toppings: Decorate with slices of kiwi, lime, or green grapes for a refreshing look.
- Chocolate Drizzle: A drizzle of melted white or dark chocolate can add a beautiful contrast.
- Whipped Cream Clouds: Pipe whipped cream around the edges for a fluffy finish.
- Themed Toppers: Use cake toppers that match your party theme, like mini party hats or candles.
These decoration ideas will not only make your Birthday Cake Green visually stunning but also add a personal touch to your celebration!
Conclusion: Celebrate with Birthday Cake Green
In conclusion, the Birthday Cake Green is more than just a dessert; it’s a celebration of life, joy, and creativity. This vibrant cake brings a unique flair to any birthday party, making it a memorable centerpiece that guests will adore. With its delightful flavor and stunning appearance, it’s sure to be the highlight of your celebration.
Print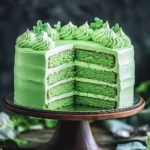
Birthday Cake Green is a delicious dessert option.
- Total Time: 1 hour
- Yield: 12 servings
- Diet: Vegetarian
Description
A vibrant and festive cake perfect for birthday celebrations, known for its rich flavor and moist texture.
Ingredients
- All-purpose flour: 2 ½ cups (320 g)
- Granulated sugar: 2 cups (400 g)
- Large eggs: 4
- Unsalted butter: 1 cup (226 g), softened
- Baking powder: 2 ½ teaspoons
- Milk: 1 cup (240 ml), room temperature
- Vanilla extract: 2 teaspoons
- Green food coloring: 1-2 teaspoons
- Frosting: 4 cups (for decorating)
Instructions
- Preheat your oven to 350°F (175°C) and grease and flour three 9-inch round cake pans.
- Cream together the softened unsalted butter and granulated sugar in a large mixing bowl.
- Beat in the large eggs one at a time, mixing well after each addition, and stir in the vanilla extract.
- In a separate bowl, whisk together the all-purpose flour and baking powder, then gradually add to the wet ingredients, alternating with the milk.
- Add the green food coloring to the batter, adjusting to your desired shade.
- Divide the batter evenly among the three prepared cake pans and bake for 25-30 minutes.
- Let the cakes cool in the pans for about 10 minutes, then transfer to a wire rack to cool completely.
- Frost the first layer of the cooled cake, add the second layer, and repeat, then frost the entire cake.
- Decorate the cake with additional frosting and any desired decorations.
- Slice and serve your Birthday Cake Green at your celebration.
Notes
- Use room temperature ingredients for a smoother batter.
- Don’t overmix the batter to avoid a dense cake.
- Check for doneness a few minutes before the recommended baking time.
- Allow cakes to cool completely before frosting.
- Experiment with flavors for a unique twist.
- Prep Time: 30 minutes
- Cook Time: 30 minutes
- Category: Dessert
- Method: Baking
- Cuisine: American
Nutrition
- Serving Size: 1 slice
- Calories: 350
- Sugar: 30g
- Sodium: 200mg
- Fat: 15g
- Saturated Fat: 9g
- Unsaturated Fat: 4g
- Trans Fat: 0g
- Carbohydrates: 50g
- Fiber: 1g
- Protein: 4g
- Cholesterol: 70mg
Keywords: Birthday Cake, Green Cake, Celebration Cake, Festive Cake
")
")
")
")