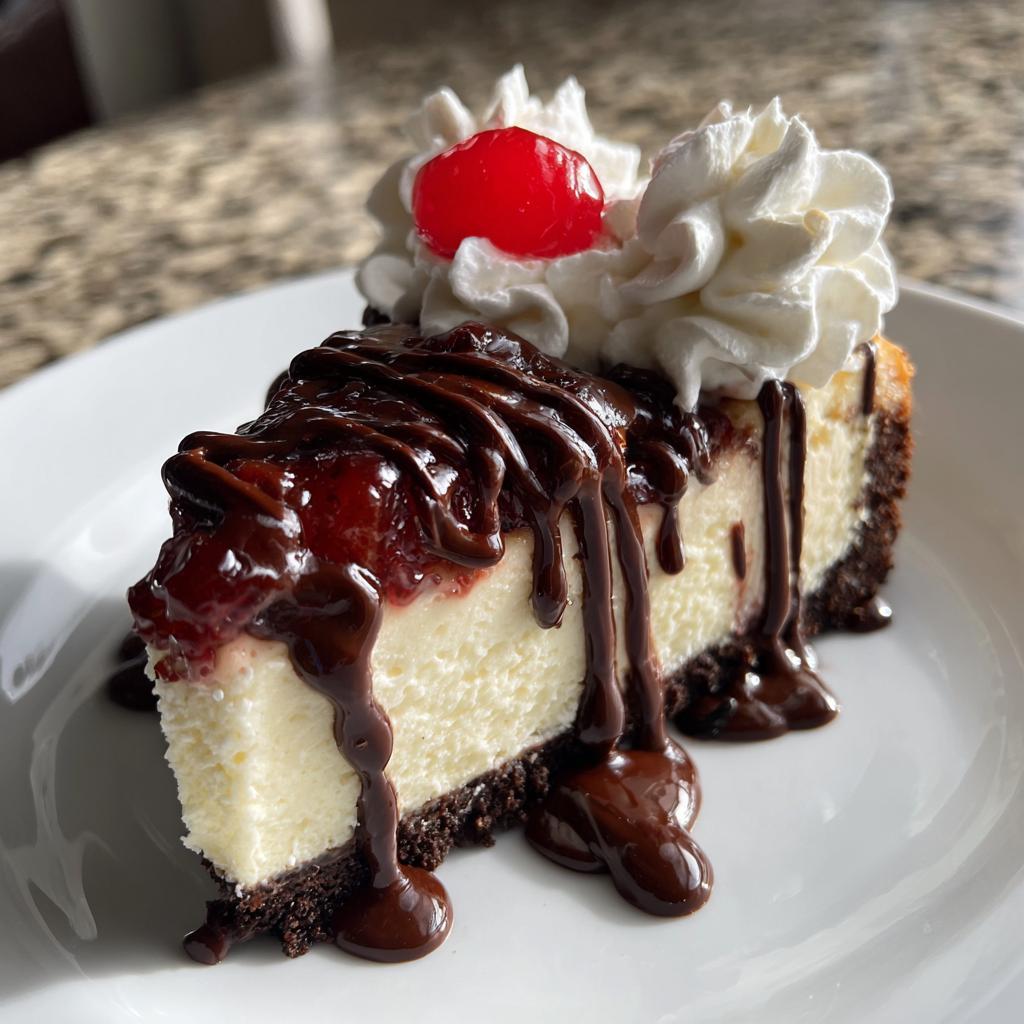
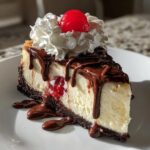
I’ll never forget the first time I tasted Black Forest Cheesecake – it was love at first bite! My friend Anna brought it to a potluck, and one forkful of that creamy chocolate filling swirled with tart cherries had me begging for the recipe. Turns out Anna’s grandmother brought this decadent dessert tradition from Germany, where the classic Black Forest cake inspired this even richer cheesecake version.
What makes this dessert so special is how the flavors play together – the smooth cream cheese filling gets depth from melted chocolate, while the cherry swirl cuts through the richness with its bright fruity tang. It’s like your favorite chocolate-covered cherries got transformed into the most indulgent cheesecake imaginable. The chocolate cookie crust adds this wonderful crunch that makes every bite exciting.
After tweaking Anna’s recipe for years (and eating way too many test batches), I’ve perfected my Black Forest Cheesecake method. The secret? Room temperature ingredients and patience – letting it chill overnight makes all the difference. Now it’s my go-to dessert when I want to impress guests or treat myself. Just wait until you try it!
Why You’ll Love This Black Forest Cheesecake
This isn’t just any cheesecake – it’s a showstopper that will have everyone begging for seconds! Here’s why my Black Forest Cheesecake recipe wins hearts every time:
- Creamiest texture imaginable – The perfect blend of cream cheese, eggs, and sour cream creates a luxuriously smooth filling that melts in your mouth
- Chocolate and cherry heaven – Rich chocolate cookie crust meets tart cherry swirls and dark chocolate drizzle for flavor fireworks
- Stunning presentation – The marbled cherry filling and chocolate decorations make it look as incredible as it tastes
- Make-ahead magic – Actually gets better overnight, so you can prepare it stress-free for parties
- Crowd-pleasing favorite – Combines everyone’s favorite dessert elements into one unforgettable treat
Trust me, once you taste this Black Forest Cheesecake, you’ll understand why it’s my most requested recipe!
Ingredients for Black Forest Cheesecake
Gathering the right ingredients is half the battle with this stunning dessert! Here’s exactly what you’ll need to make my foolproof Black Forest Cheesecake:
For the Chocolate Crust:
- 2 cups chocolate cookie crumbs – I use Oreos (filling removed) pulsed fine in a food processor
- 1/4 cup unsalted butter, melted – The glue that holds our crunchy base together
For the Cheesecake Filling:
- 3 packages (8 oz each) cream cheese – Must be fully softened at room temperature (this is crucial!)
- 1 cup granulated sugar – Regular white sugar works perfectly here
- 3 large eggs – Also at room temperature – cold eggs will make your batter lumpy
- 1 tsp pure vanilla extract – The good stuff makes a difference
- 1/2 cup full-fat sour cream – Adds that signature creamy tang
For the Cherry Swirl & Toppings:
- 1/2 cup cherry pie filling – The canned kind works beautifully
- 1/2 cup semi-sweet chocolate chips – For melting and drizzling
- Whipped cream – Optional but gorgeous for garnish
Pro tip: Measure everything before starting – baking is chemistry, and precision matters!
Essential Equipment
You don’t need fancy gadgets for this Black Forest Cheesecake, but these tools are non-negotiable for success:
- 9-inch springform pan – The removable sides are a lifesaver for clean slices
- Electric mixer – A hand mixer works, but a stand mixer makes creaming effortless
- Food processor – For blitzing cookies into perfect crumbs (or a zip-top bag and rolling pin in a pinch!)
- Silicone spatula – To scrape every bit of that luscious batter
- Piping bag or ziplock – For artful chocolate drizzle (trust me, it’s worth it)
That’s it! Now let’s bake some magic.
How to Make Black Forest Cheesecake
Alright, let’s dive into the fun part – creating this chocolate-cherry masterpiece step by step! I promise it’s easier than it looks, especially when you follow these foolproof instructions:
Preparing the Crust
First thing’s first – we need a sturdy, chocolatey foundation for our Black Forest Cheesecake. Here’s how I get that perfect crust every time:
- Pulse your chocolate cookies into fine crumbs (no big chunks!) and mix thoroughly with melted butter until it resembles wet sand.
- Press the mixture firmly into the bottom of your springform pan – I use the bottom of a measuring cup to get even pressure.
- Important: Don’t pack it too tight! We want it to hold together but still have a slight crumble when you bite into it.
- Pop the crust in the freezer for 10 minutes while you make the filling – this helps prevent sogginess.
Making the Cheesecake Filling
This is where the magic happens! The key to silky smooth filling is patience and room temperature ingredients:
- Beat softened cream cheese with sugar on medium speed until completely smooth – about 2 minutes. No lumps allowed!
- Add eggs one at a time, mixing just until incorporated after each. Overbeating introduces too much air (hello, cracks!).
- Gently fold in vanilla and sour cream with a spatula – you should have a velvety, pourable batter now.
Layering Cherries and Baking
Here’s how we create those beautiful cherry swirls:
- Pour half the batter over the chilled crust, spreading evenly.
- Drop spoonfuls of cherry filling across the surface, then gently swirl with a knife (don’t overdo it!).
- Top with remaining batter and smooth the top.
- Bake at 325°F for 50-55 minutes until the edges are set but the center still jiggles slightly when nudged.
Chilling and Decorating
The waiting game begins – but it’s worth it!
- Let the cheesecake cool in the turned-off oven with the door cracked for 1 hour (prevents sudden temperature shocks).
- Transfer to the counter until completely cool, then refrigerate at least 4 hours (overnight is best).
- When ready to serve, melt chocolate chips and drizzle artfully over the top. Add whipped cream rosettes if you’re feeling fancy!
See? Each step is simple when taken one at a time. Now you’ve got a stunning Black Forest Cheesecake ready to wow your guests!
Pro Tips for Perfect Black Forest Cheesecake
After baking hundreds of these beauties, I’ve learned all the tricks to Black Forest Cheesecake perfection! Here are my can’t-live-without secrets:
Say goodbye to cracks!
The number one question I get is “How do you keep it from cracking?” Easy – don’t overmix after adding eggs (creates too much air) and always cool gradually (that oven-crack trick is gold). I also put a pan of water on the rack below while baking – the steam works wonders!
Flavor boosters
Want to take your cheesecake to the next level? Try these flavor hacks: add a tablespoon of kirsch (cherry brandy) to the cherry swirl, or mix a pinch of espresso powder into the chocolate drizzle. The depth it adds will blow your mind!
Remember – great cheesecake isn’t rushed. Give it the time it deserves, and you’ll be rewarded with pure chocolate-cherry bliss.
Variations and Substitutions
One of the best things about my Black Forest Cheesecake recipe is how adaptable it is! Here are some delicious twists to try:
- Gluten-free option: Swap chocolate cookies for gluten-free Oreos or almond meal mixed with cocoa powder for the crust
- Extra chocolatey: Use dark chocolate chips instead of semi-sweet for a more intense flavor
- Fresh fruit: Substitute homemade cherry compote using fresh or frozen cherries when in season
- Lighter version: Try reduced-fat cream cheese and Greek yogurt instead of sour cream (texture will be slightly less creamy)
- Nutty twist: Add chopped toasted hazelnuts to the crust for crunch
The possibilities are endless – make it your own!
Serving and Storing Black Forest Cheesecake
Here’s how to make your Black Forest Cheesecake shine when serving and keep it tasting fresh for days:
For picture-perfect slices, run a thin knife under hot water and dry it between each cut. I love garnishing with fresh cherries, extra whipped cream rosettes, and even chocolate shavings for that bakery-worthy touch. A dusting of cocoa powder works magic too!
Store leftovers covered in the fridge – it actually gets more flavorful by day two! Just press plastic wrap directly on the cut edges to prevent drying. It’ll keep beautifully for up to 5 days (if it lasts that long!). Pro tip: Freeze individual slices wrapped tightly for up to 3 months – thaw overnight in the fridge for a ready-made treat!
Nutritional Information
Here’s the scoop on what’s in each heavenly slice of my Black Forest Cheesecake (based on standard ingredients):
- Serving Size: 1 slice (1/12 of cake)
- Calories: 420
- Total Fat: 28g
- Saturated Fat: 16g
- Carbs: 38g
- Sugar: 32g
- Protein: 7g
Remember: These numbers can vary depending on your specific brands and measurements! I always say – when something tastes this good, just enjoy every bite.
Frequently Asked Questions
I’ve gotten so many great questions about my Black Forest Cheesecake over the years – here are the answers to the ones people ask most!
Can I use fresh cherries instead of pie filling?
Absolutely! I love making a quick compote with fresh or frozen cherries when they’re in season. Just simmer 2 cups pitted cherries with 1/4 cup sugar and 1 tablespoon cornstarch until thickened. Let it cool completely before swirling into the batter.
Why did my cheesecake crack?
Don’t panic – it still tastes amazing! Cracks usually happen from overmixing (creates too much air) or drastic temperature changes. That’s why I always cool mine slowly in the turned-off oven. If it does crack, just cover it with whipped cream – no one will ever know!
Can I make this gluten-free?
Yes! Simply use gluten-free chocolate cookies for the crust (I like Glutino’s version). The filling is naturally gluten-free, so just that one swap gives you the same incredible Black Forest Cheesecake flavor without the gluten.
How do I know when it’s done baking?
The edges should be set but the center should still have a slight jiggle (like Jell-O) when you gently shake the pan. It keeps cooking as it cools, so pulling it at this perfect moment ensures creamy perfection.
Can I freeze Black Forest Cheesecake?
You bet! Wrap individual slices tightly in plastic wrap, then foil, and freeze for up to 3 months. Thaw overnight in the fridge – it’s like having gourmet dessert on demand!
Final Thoughts
I can’t wait for you to experience the magic of this Black Forest Cheesecake! It’s truly one of those desserts that makes people’s eyes light up when they take the first bite. When you make it, snap a photo and tag me – I’d love to see your chocolate-cherry masterpiece!
Decadent Black Forest Cheesecake Recipe You’ll Crave Forever
- Total Time: 1 hour 15 minutes plus chilling
- Yield: 12 servings 1x
- Diet: Vegetarian
Description
A rich and creamy Black Forest Cheesecake combining the flavors of chocolate, cherries, and cream cheese for a decadent dessert.
Ingredients
- 2 cups chocolate cookie crumbs
- 1/4 cup melted butter
- 3 packages (8 oz each) cream cheese, softened
- 1 cup granulated sugar
- 3 eggs
- 1 tsp vanilla extract
- 1/2 cup sour cream
- 1/2 cup cherry pie filling
- 1/2 cup semi-sweet chocolate chips, melted
- Whipped cream for topping
Instructions
- Preheat oven to 325°F (165°C).
- Mix cookie crumbs and melted butter, press into bottom of 9-inch springform pan.
- Beat cream cheese and sugar until smooth. Add eggs one at a time, mixing well after each.
- Stir in vanilla and sour cream until blended.
- Pour half the batter over crust. Spoon cherry filling evenly over batter. Top with remaining batter.
- Bake 50-55 minutes or until center is almost set.
- Cool completely, then refrigerate 4 hours or overnight.
- Drizzle melted chocolate over top before serving. Garnish with whipped cream.
Notes
- For best results, use room temperature ingredients.
- Allow cheesecake to cool gradually to prevent cracking.
- Store leftovers covered in refrigerator up to 5 days.
- Prep Time: 20 minutes
- Cook Time: 55 minutes
- Category: Dessert
- Method: Baked
- Cuisine: German
Nutrition
- Serving Size: 1 slice
- Calories: 420
- Sugar: 32g
- Sodium: 280mg
- Fat: 28g
- Saturated Fat: 16g
- Unsaturated Fat: 9g
- Trans Fat: 0g
- Carbohydrates: 38g
- Fiber: 2g
- Protein: 7g
- Cholesterol: 110mg
Keywords: black forest cheesecake, chocolate cherry dessert, german cheesecake
")
")
")
")