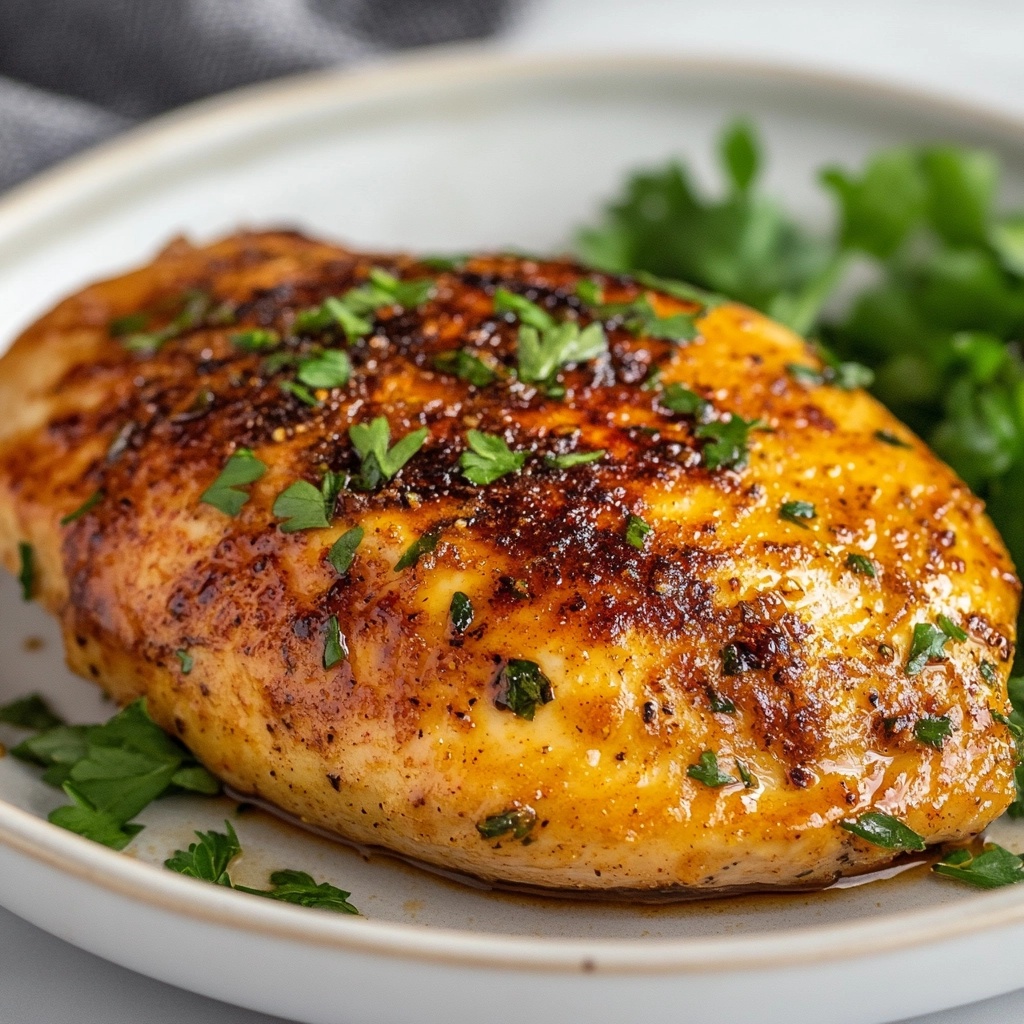
There’s something magical about cooking chicken on a Blackstone griddle—it’s where crispy, golden edges meet juicy, tender bites every single time. I’ve tried countless Blackstone chicken recipes, but this one? It’s my weeknight hero. In under 30 minutes, you’ve got a meal that feels like a cheat code: minimal prep, maximum flavor, and that satisfying sizzle that makes everyone gather around the kitchen. The secret? A simple spice rub and letting the griddle work its high-heat magic. Trust me, once you taste that perfect sear, you’ll never go back to boring baked chicken again. Let’s get cooking!
Why You’ll Love These Blackstone Chicken Recipes
This recipe isn’t just dinner—it’s a game-changer. Here’s why:
- Speed demon: From fridge to plate in under 30 minutes? Yes please! Perfect for those "what’s for dinner?" panic moments.
- Crispy magic: That Blackstone griddle gives you restaurant-quality sear – golden crust outside, juicy tenderness inside.
- Easy cleanup: One flat surface means less scrubbing (my kinda cooking!).
- Pantry-friendly: Uses simple spices you probably already have.
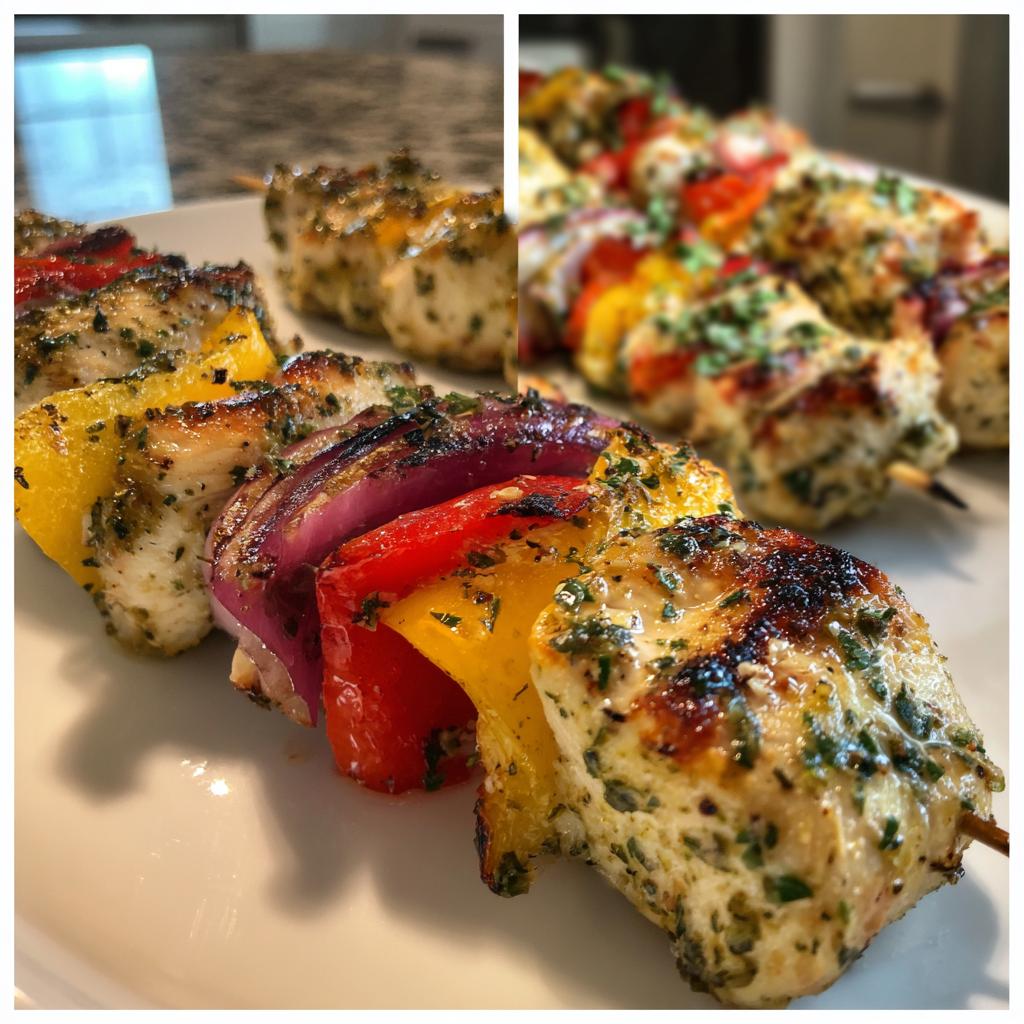
- Versatile base: Dress it up fancy or keep it simple – works with everything from salads to sandwiches.
Ingredients for Blackstone Chicken Recipes
Grab these simple ingredients – I promise you won’t need to make a special trip to the store. The magic happens with just a few basics:
- 1 lb boneless, skinless chicken fillets (trimmed of any weird bits and thoroughly patted dry – this is crucial for that perfect sear!)
- 2 tbsp olive oil (the good stuff – you’ll taste the difference)
- 1 tsp each of: salt, black pepper, garlic powder, paprika (my holy quartet of chicken spices)
- 1 tsp dried thyme (or 2 tsp fresh if you’re feeling fancy – just strip those little leaves off the stems)
See? Nothing crazy. Pro tip: I keep all these spices in little mason jars right next to my griddle – makes impromptu chicken nights a breeze. Now let’s talk subs: no paprika? Use smoked for depth. Out of thyme? Rosemary works in a pinch. The beauty is in the simplicity here!
Equipment Needed
Before we dive into cooking, let’s talk tools – but don’t worry, you won’t need anything fancy! Here’s what I always have ready when making my Blackstone chicken recipes:
- Blackstone griddle (obviously – but any flat-top griddle will work in a pinch)
- Quality spatula (metal works best for scraping up those delicious browned bits)
- Instant-read meat thermometer (my #1 kitchen lifesaver – no more guessing if chicken’s done!)
- Mixing bowl (for tossing the chicken with oil and spices – though I often just do this right on the cutting board when I’m feeling lazy)
That’s seriously it! Oh – and maybe have some tongs nearby if you’re nervous about flipping. The beauty of griddle cooking is how little equipment it requires compared to traditional stove cooking. Less cleanup, more eating – that’s my motto!
How to Make Blackstone Chicken Recipes
Alright, let’s get cooking! I’ve made this recipe dozens of times, and these are the exact steps that give me perfect chicken every single time. Follow along and you’ll have that irresistible crispy-juicy magic in no time.
Step 1: Preheat and Season
First things first – fire up that Blackstone! Crank it to medium-high heat and let it warm up for a good 5 minutes. You want it nice and hot – I test mine by sprinkling a few water droplets on the surface. If they sizzle and dance? Perfect.
While it’s heating, take your dried-off chicken fillets and drizzle them with 1 tbsp olive oil – just enough to lightly coat. Now for the fun part – sprinkle all those beautiful spices evenly over both sides. I like to use my fingers to really press the seasoning into the meat (wash those hands after!). Don’t be shy – you want every bite packed with flavor.
Step 2: Cook the Chicken
Time for the sizzle! Drizzle the remaining 1 tbsp olive oil onto the griddle and spread it around with your spatula. Lay those chicken fillets down with a satisfying hiss – that’s the sound of deliciousness starting!
Here’s my golden rule: don’t touch them for 5 minutes. I know it’s tempting, but that undisturbed time is what builds that gorgeous golden crust. After 5 minutes, peek underneath – if it’s nicely browned, flip ’em! Now, here’s my secret trick: press down lightly with your spatula for about 10 seconds. This gives extra contact with the hot surface for maximum crispiness.
Cook the other side for another 5-7 minutes, then break out that meat thermometer. Slide it into the thickest part – we’re looking for 165°F. If you don’t have a thermometer (though I highly recommend one!), cut into the thickest piece – juices should run clear, no pink.

Step 3: Rest and Serve
Here’s where patience pays off! Transfer that beautiful chicken to a clean plate and let it rest for 2 minutes. I know, I know – it smells amazing and you want to dig in. But those 2 minutes let the juices redistribute, making every bite incredibly moist.
After it’s rested? Go wild! Slice it, chop it, leave it whole – however you like it. I personally love cutting it into strips against the grain for maximum tenderness. Now grab your favorite sides and enjoy that perfect Blackstone chicken you just made with your own two hands!
Tips for Perfect Blackstone Chicken Recipes
After burning my fair share of chicken over the years (we don’t talk about the Great Griddle Incident of 2018), I’ve learned these foolproof tricks for perfect results every time:
- Patience with preheating: That griddle needs to be hot before chicken touches it. I count to 300 after the water droplet test just to be sure.
- Dry chicken = crispy chicken: I’m obsessive about patting fillets dry with paper towels. Wet chicken steams instead of searing – and nobody wants sad, pale chicken.
- The golden spacing rule: Leave space between fillets! Overcrowding drops the griddle temp and makes everything steam. I cook in batches if needed.
- Heat adjustment hack: If chicken browns too fast, I’ll scoot it to a cooler edge and lower the burner underneath. Blackstones can be sneaky with hot spots!
- Press don’t smash: That quick spatula press gives perfect contact, but don’t go squeezing all the juices out like a panini. Gentle pressure for just 10 seconds does the trick.
Bonus tip from my firefighter neighbor: keep a spray bottle of water nearby to tame any flare-ups. (Though I maintain that a little dramatic flame makes dinner more exciting.)
Variations for Blackstone Chicken Recipes
One of my favorite things about this Blackstone chicken is how easily you can tweak it to match your mood. Here are some of my go-to twists when I want to mix things up:
- Spice it up: Add 1/2 tsp cayenne to the spice mix – just enough to make your lips tingle without starting a five-alarm fire. (Though if you’re into that, go for a full teaspoon!)
- Lemon lover’s delight: Grate in the zest of one lemon with the spices – that bright citrusy pop cuts through the richness beautifully.
- Herb swap: Out of thyme? Rosemary brings woodsy depth, oregano adds Mediterranean vibes, or try parsley for freshness.
- Smoky sensation: Replace regular paprika with smoked paprika – suddenly your chicken tastes like it cooked over a campfire.
- Umami boost: Add 1/2 tsp onion powder to amp up the savory factor – my secret weapon when cooking for meat-and-potatoes folks.
Last week I even tried brushing the cooked chicken with honey during the last minute of cooking – sticky, sweet, and totally addictive. The possibilities are endless once you’ve mastered the basic technique!
Serving Suggestions
Now that you’ve got that gorgeous Blackstone chicken, let’s talk about how to turn it into a meal that’ll have everyone asking for seconds! Here’s how I love to serve mine:
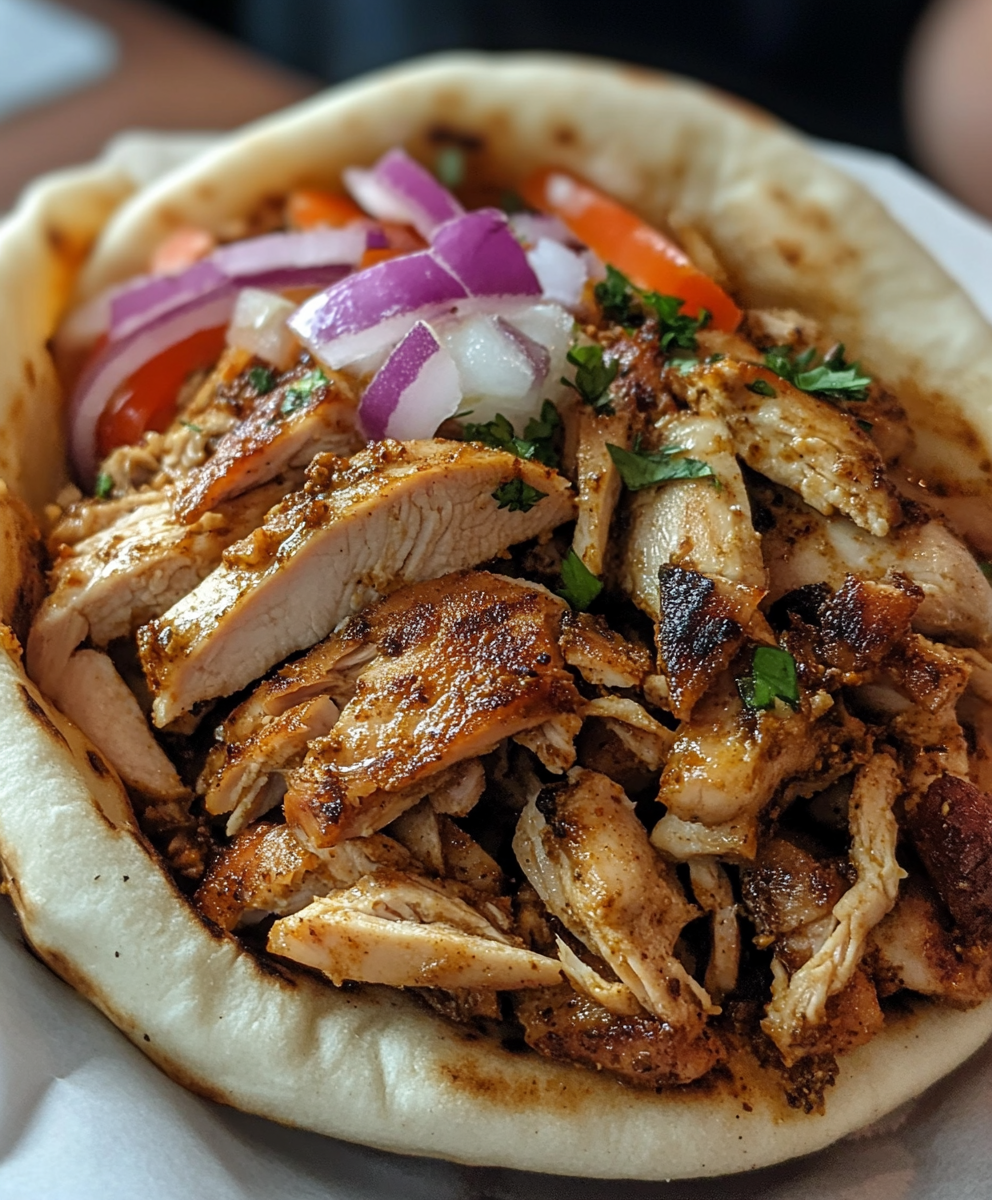
- Classic comfort: Pile sliced chicken on a warm bun with pickles and mayo for an epic sandwich, or serve alongside mashed potatoes and roasted carrots – pure nostalgia on a plate.
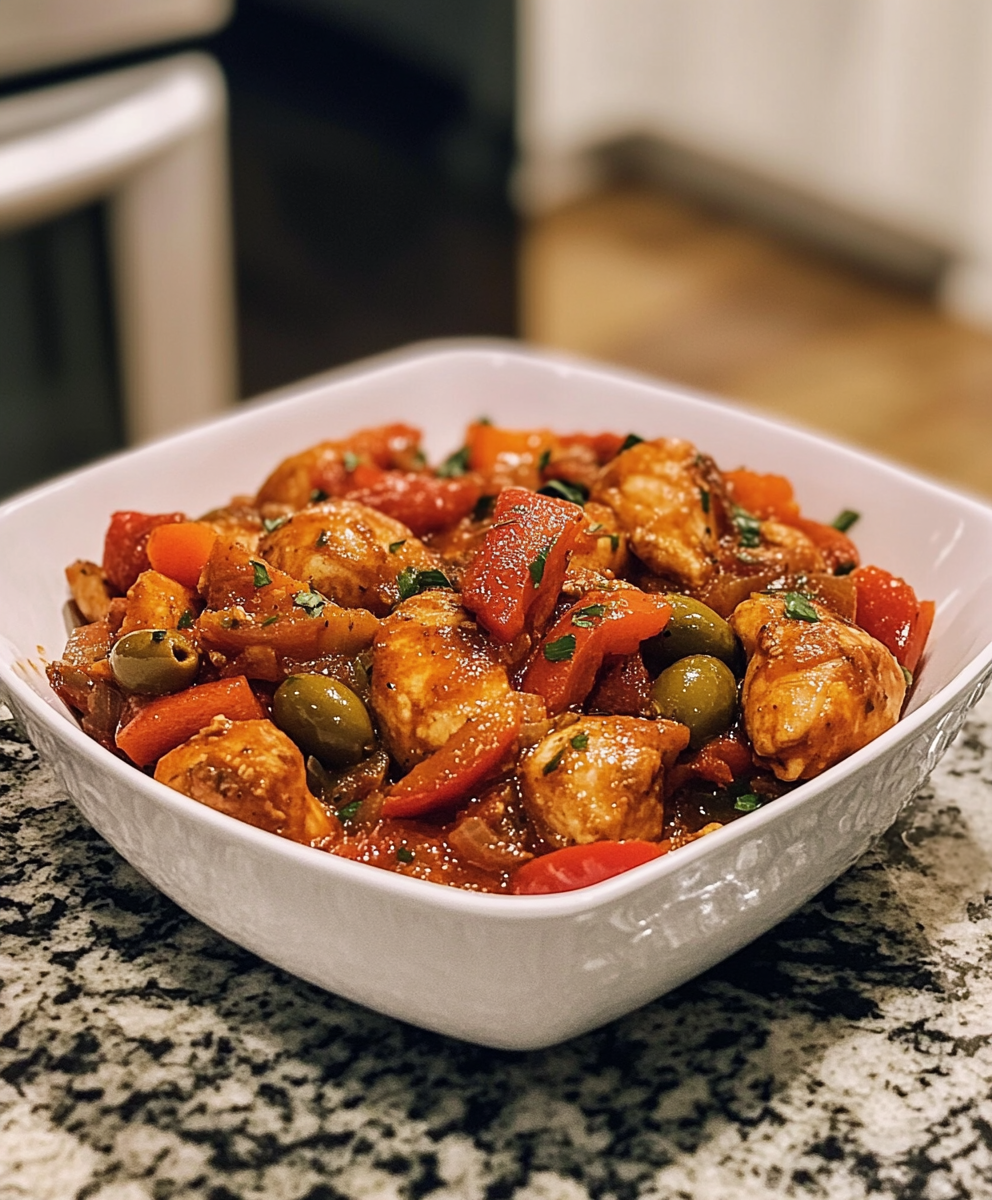
- Light & fresh: Toss chopped chicken over crisp greens with cherry tomatoes, avocado, and a tangy vinaigrette for a protein-packed salad that doesn’t taste like “diet food.”
- Weeknight hero: Pair with quick-cooking sides like microwave rice (don’t judge – we all have those nights!) and frozen stir-fry veggies for dinner in 10.
My favorite trick? Whipping up quick sauces while the chicken rests:
- Garlic aioli: Mix mayo with minced garlic and a squeeze of lemon
- Spicy honey: Blend honey with sriracha to taste
- Herb yogurt: Stir chopped fresh herbs into Greek yogurt
Pro tip: Save any leftover chicken for next-day quesadillas or pasta salads – the possibilities are endless!
Storage and Reheating
I’ll be honest – leftovers rarely last long with this chicken, but when they do, here’s how I keep them tasting almost as good as fresh off the griddle. First rule: cool completely before storing (no one wants soggy, steamed chicken from trapped heat). I tuck mine into an airtight container – glass works best – and it stays good in the fridge for 3 days (though mine never makes it past day two).
Now, reheating is where most people go wrong! The microwave turns crispy chicken into rubber – no thank you. Instead, I grab my trusty cast iron skillet or fire up the Blackstone again (medium heat does the trick). A quick 1-2 minutes per side brings back that gorgeous crust while keeping the inside juicy. No griddle? A toaster oven works in a pinch – just lay pieces in a single layer and toast at 350°F for about 5 minutes.
Pro tip from my trial-and-error disasters: If the chicken seems dry, brush it lightly with olive oil or chicken broth before reheating. And whatever you do – don’t crowd the pan during reheating! Give each piece space to crisp up properly, just like when you first cooked it. Leftover chicken this good deserves proper treatment!
Nutrition Information
Listen, I’m no dietitian – I’m just a home cook who believes good food should taste amazing and make you feel good. Here’s the nutritional scoop on this Blackstone chicken recipe (per serving), but remember: nutritional values are estimates and can vary based on your exact ingredients and portion sizes.
- Calories: 250 kcal (that’s lighter than most takeout!)
- Protein: 38g (chicken is basically nature’s protein bar)
- Fat: 10g (mostly the good kind from olive oil)
- Saturated Fat: 2g (not bad for something this flavorful)
- Carbs: 1g (basically carb-free if you skip the bun)
- Sodium: 600mg (easy to reduce if you’re watching salt – just cut back slightly on the seasoning)
What I love about these numbers? They prove you don’t have to choose between healthy and delicious. This chicken gives you lean protein for energy without weighing you down – perfect for post-workout meals or when you want something satisfying but not heavy. Just another reason this recipe stays in my weekly rotation!
Common Questions About Blackstone Chicken Recipes
I’ve gotten tons of questions from friends about this recipe over the years – here are the ones that come up most often with my tried-and-true answers:
Can I use frozen chicken?
Thaw completely first! Frozen chicken creates steam that prevents proper browning. I thaw mine overnight in the fridge or use the cold water method if I’m in a pinch (just change the water every 30 minutes).
How do I prevent sticking?
Two words: hot and oily. Make sure your griddle is properly preheated (water droplets should dance) and use enough oil to coat the surface. I always do a quick test with one piece first – if it sticks, wait another minute before adding more.
What if I don’t have all the spices?
No stress! This recipe is super flexible. Just use what you have – even just salt, pepper and garlic powder makes delicious chicken. Once you’ve mastered the basic technique, you can experiment with different flavor combos.
How do I know when it’s done?
Invest in a $10 meat thermometer – it’s a game changer! Chicken is safe at 165°F in the thickest part. Without one, cut into the center – juices should run clear with no pink. Remember, it’ll keep cooking slightly while resting.
Can I make this ahead?
Absolutely! Cooked chicken keeps beautifully for meal prep. Store in the fridge for up to 3 days and reheat on the griddle or in a skillet to bring back the crispiness. I love having it ready for quick salads or wraps during busy weeks.
Print
Juicy Blackstone Chicken Recipes Ready in Just 25 Minutes
- Total Time: 25 mins
- Yield: 2 servings 1x
- Diet: Low Fat
Description
A simple and flavorful chicken recipe cooked on a Blackstone griddle for a crispy, juicy finish.
Ingredients
- 1 lb boneless, skinless chicken fillets
- 2 tbsp olive oil
- 1 tsp salt
- 1 tsp black pepper
- 1 tsp garlic powder
- 1 tsp paprika
- 1 tsp dried thyme
Instructions
- Preheat the Blackstone griddle to medium-high heat.
- Season the chicken with salt, pepper, garlic powder, paprika, and thyme.
- Drizzle olive oil on the griddle and spread evenly.
- Place the chicken on the griddle and cook for 5-7 minutes per side, until fully cooked.
- Remove from heat and let rest for 2 minutes before serving.
Notes
- Use a meat thermometer to ensure the chicken reaches 165°F internally.
- Adjust seasoning to taste.
- For extra crispiness, press the chicken lightly with a spatula while cooking.
- Prep Time: 10 mins
- Cook Time: 15 mins
- Category: Main Course
- Method: Griddle Cooking
- Cuisine: American
Nutrition
- Serving Size: 1 serving
- Calories: 250
- Sugar: 0g
- Sodium: 600mg
- Fat: 10g
- Saturated Fat: 2g
- Unsaturated Fat: 7g
- Trans Fat: 0g
- Carbohydrates: 1g
- Fiber: 0g
- Protein: 38g
- Cholesterol: 95mg
Keywords: blackstone chicken, griddle chicken, easy chicken recipe
")
")
")
")