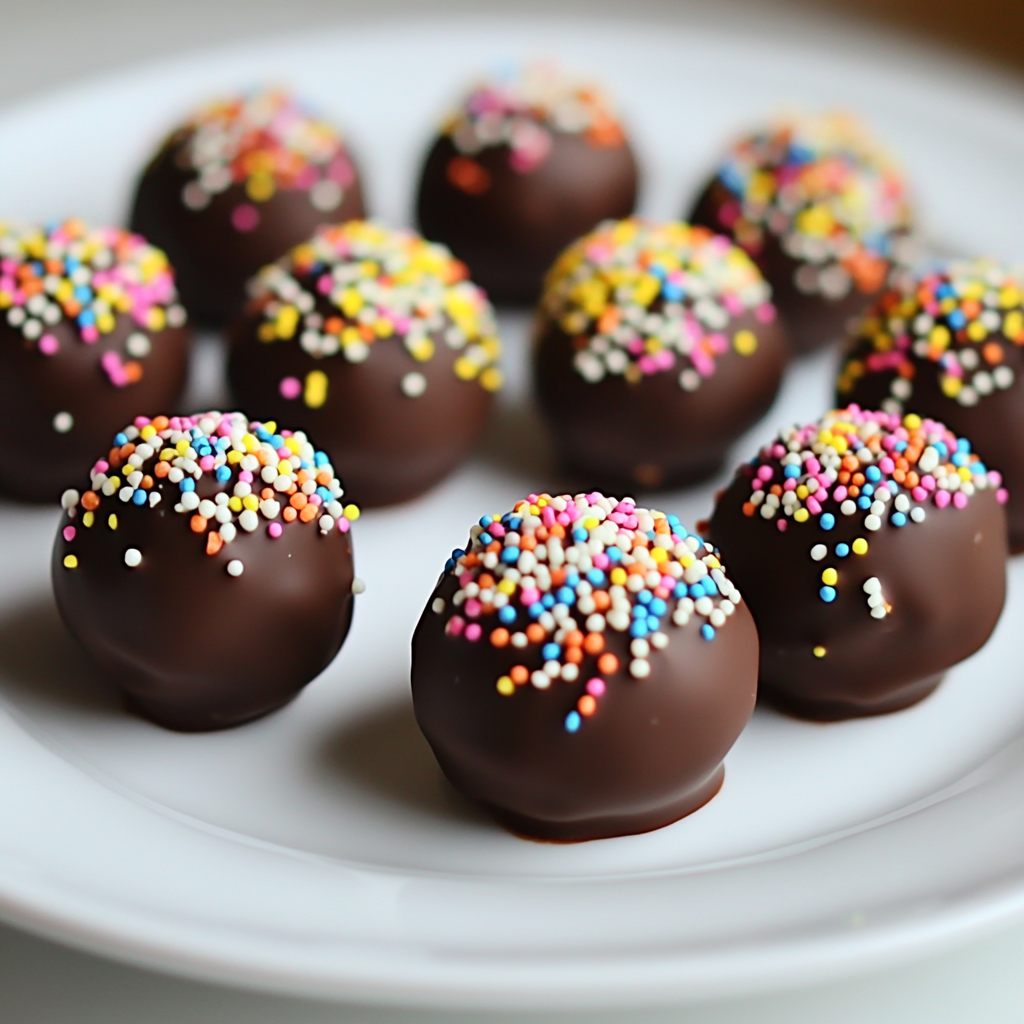
As a passionate home cook, I find joy in creating sweet treats that bring smiles to faces. One of my all-time favorites is the Buttercream Truffles Recipe. These little bites of heaven are not just delicious; they are a delightful blend of creamy buttercream and rich chocolate. Each truffle is like a tiny gift, wrapped in a chocolate coating and sprinkled with joy. They are perfect for any occasion, whether it’s a birthday party, a holiday gathering, or just a cozy night in with loved ones.
Ingredients for Buttercream Truffles Recipe
Before we roll up our sleeves and get started, let’s gather all the ingredients for our Buttercream Truffles Recipe. Each component plays a vital role in creating that perfect balance of sweetness and creaminess. Here’s what you’ll need:
- 🧈 Unsalted butter – 1/2 cup (softened): This is the heart of our buttercream. It adds richness and a smooth texture.
- 🍚 Powdered sugar – 2 cups: This sweet ingredient gives our truffles their delightful sweetness and helps achieve that fluffy consistency.
- 🍦 Vanilla extract – 1 teaspoon: A splash of vanilla adds a warm, inviting flavor that complements the buttercream beautifully.
- 🥛 Heavy cream – 1/4 cup: This creamy addition makes our buttercream light and airy, giving it that melt-in-your-mouth quality.
- 🍫 Chocolate coating – 8 oz (dark or milk chocolate, chopped): The outer layer that encases our buttercream, providing a rich contrast to the sweet filling.
- 🌈 Sprinkles – 1/2 cup (for decoration): These colorful little gems add a fun touch and make our truffles visually appealing.
When I first started making these truffles, I was amazed at how simple the ingredients were. It felt like magic to transform these basic items into something so delightful! I often find myself experimenting with different flavors, like adding a hint of almond extract or even a dash of espresso powder for a coffee twist. The possibilities are endless!
Now that we have our ingredients ready, let’s move on to the tools we’ll need to bring our buttercream truffles to life. Trust me, having the right tools makes the process smoother and more enjoyable!
Tools Needed for Buttercream Truffles Recipe
Before we dive into the sweet world of buttercream truffles, let’s make sure we have all the right tools at our fingertips. Having the right equipment can make the process not only easier but also more enjoyable. Here’s a list of the essential tools I recommend for making your Buttercream Truffles Recipe:
- 🍽️ Mixing Bowl: A large mixing bowl is essential for combining all the ingredients. I love using a glass bowl because I can see the mixture come together beautifully.
- 🎛️ Electric Mixer: An electric mixer is a game-changer! It saves time and ensures that your buttercream is whipped to perfection. If you don’t have one, a good old-fashioned whisk will do, but be prepared for a workout!
- 🍪 Cookie Scoop: This handy tool helps you portion out the buttercream evenly. It’s like a little magic wand that creates perfectly shaped truffles every time.
- 🧊 Baking Sheet: A baking sheet lined with parchment paper is where the magic happens. It’s the perfect surface for your truffles to chill and set without sticking.
- 🍫 Microwave-Safe Bowl: You’ll need this for melting the chocolate coating. Make sure it’s big enough to hold all the chocolate you’ll be using.
- 🍴 Dipping Tool or Fork: A fork or a dipping tool is essential for coating your truffles in chocolate. It allows you to dip and swirl without making a mess.
- ❄️ Plastic Wrap: This is great for covering your mixing bowl while the buttercream chills in the fridge. It keeps everything fresh and prevents any unwanted odors from sneaking in.
When I first started making these truffles, I didn’t have all the fancy tools. I used what I had, and it worked just fine! But I must say, having the right tools makes the experience so much more enjoyable. I remember the first time I used a cookie scoop; it felt like I was a professional chef! Each truffle came out perfectly round, and I couldn’t help but smile at my little creations.
Now that we have our tools ready, it’s time to roll up our sleeves and get into the fun part—preparing our buttercream truffles! Let’s move on to the step-by-step preparation.
Step-by-Step Preparation of Buttercream Truffles Recipe
Now that we have our ingredients and tools ready, it’s time to dive into the fun part—making our Buttercream Truffles Recipe! I can already feel the excitement bubbling up as I think about the sweet, creamy truffles that await. Let’s take it step by step, so you can create these delightful treats with ease.
Step 1: Prepare the Buttercream Mixture
The first step is to create the heart of our truffles—the buttercream mixture. In a mixing bowl, I start by beating the softened unsalted butter with my electric mixer. The sound of the mixer whirring is music to my ears! I mix until the butter is creamy and smooth, like a soft cloud. Then, I gradually add the powdered sugar, mixing on low speed. It’s important to go slow here; otherwise, I might end up with a sugary snowstorm in my kitchen!
Once the sugar is incorporated, I pour in the vanilla extract and heavy cream. The aroma of vanilla fills the air, and I can’t help but smile. I continue to beat the mixture on medium speed until it becomes light and fluffy, about 2-3 minutes. It’s like watching a transformation happen right before my eyes!
Step 2: Shape the Truffles
After preparing the buttercream, it’s time to shape our truffles. I cover the bowl with plastic wrap and pop it in the fridge for about 30 minutes. This chilling time is crucial; it helps the buttercream firm up, making it easier to shape into little balls. While I wait, I often daydream about all the delicious flavors I could try next time.
Once the buttercream is chilled, I take it out and grab my trusty cookie scoop. Using the scoop, I portion out the buttercream and roll it into small balls, about 1 inch in diameter. Each ball feels like a little treasure in my hands! I place them on a baking sheet lined with parchment paper, admiring my handiwork.
Step 3: Chill the Truffles
Now that my truffles are shaped, it’s time for another chill session. I place the baking sheet in the freezer for about 15-20 minutes. This step is essential because it helps the truffles firm up even more, ensuring they hold their shape when I dip them in chocolate. While they chill, I can’t help but sneak a taste of the leftover buttercream. It’s so good, I could eat it by the spoonful!
Step 4: Coat the Truffles
With the truffles nicely chilled, it’s time to melt the chocolate coating. I grab my microwave-safe bowl and chop the chocolate into small pieces. I pop it in the microwave, heating it in 30-second intervals. The smell of melting chocolate is heavenly! I stir in between until it’s smooth and fully melted. It’s like a warm hug for my truffles!
Now comes the fun part—coating the truffles! I take the truffles out of the freezer and use a fork to dip each one into the melted chocolate. I let any excess chocolate drip off before placing them back on the parchment-lined baking sheet. Watching them get enveloped in chocolate is like watching a beautiful transformation unfold!
Step 5: Let the Coating Set
After coating all the truffles, I immediately sprinkle colorful sprinkles on top before the chocolate sets. It’s like adding a burst of joy to each truffle! Once they’re all decorated, I let them sit at room temperature until the chocolate hardens. If I’m in a hurry, I can pop them in the refrigerator for quicker setting.
As I wait for the chocolate to set, I can hardly contain my excitement. I know that soon, I’ll be enjoying these delightful buttercream truffles, and I can’t wait to share them with my family and friends. The anticipation is half the fun!

Serving Suggestions for Buttercream Truffles Recipe
Now that my buttercream truffles are ready, it’s time to think about how to serve them! Presentation can elevate these sweet treats from simple to spectacular. I love to get creative when it comes to serving, and I have a few delightful ideas that I can’t wait to share with you.
First, I often arrange the truffles on a beautiful serving platter. A white or pastel-colored plate makes the colorful sprinkles pop, creating a feast for the eyes. I like to stack them in a pyramid shape, which adds height and makes the display look more inviting. It’s like a little tower of happiness!
Another fun idea is to create individual treat bags. I take small clear bags, fill them with a few truffles, and tie them with a colorful ribbon. These make perfect party favors or sweet gifts for friends and family. I remember the first time I did this; my friends were thrilled to take home a little piece of my kitchen magic!
If I’m hosting a gathering, I love to serve the truffles alongside a selection of beverages. They pair wonderfully with coffee, tea, or even a glass of dessert wine. The rich chocolate and creamy buttercream complement the flavors of the drinks beautifully. I often set up a little dessert station, complete with my truffles, some fresh fruit, and a few other sweet treats. It’s like a mini dessert buffet that everyone can enjoy!
For a more festive touch, I sometimes use themed decorations. For example, during the holidays, I’ll place the truffles in a decorative box or a festive bowl, adding some seasonal decorations like pinecones or ornaments. It brings a cozy, cheerful vibe to the table, and my guests love it!
Lastly, I like to serve the truffles with a side of whipped cream or a scoop of vanilla ice cream. The combination of the creamy truffles with the cold ice cream is simply divine! It’s a little indulgence that makes every bite feel special.
With these serving suggestions, you can turn your buttercream truffles into a delightful centerpiece for any occasion. Whether it’s a casual family gathering or a fancy celebration, these sweet treats are sure to impress. Now, let’s move on to some tips for perfecting your buttercream truffles recipe!
Tips for Perfecting Your Buttercream Truffles Recipe
As I’ve spent time perfecting my Buttercream Truffles Recipe, I’ve gathered a treasure trove of tips that can help you create the most delightful truffles. Each little nugget of wisdom comes from my own kitchen adventures, and I’m excited to share them with you! Here are some of my favorite tips to ensure your truffles turn out perfectly every time.
First and foremost, always use softened unsalted butter. This is crucial for achieving that creamy texture. If your butter is too cold, it won’t blend well with the powdered sugar, and you might end up with lumps. I usually take my butter out of the fridge about an hour before I start. It’s like giving it a little time to breathe and get ready for its big moment!
Next, don’t rush the mixing process. When I mix the butter and sugar, I start on low speed to avoid a sugary cloud. Gradually increasing the speed allows the ingredients to blend smoothly. Patience is key here! I often find myself humming a little tune while I wait for that perfect fluffy consistency.
Another tip is to experiment with flavors! While vanilla is a classic choice, I love to mix things up. Adding a splash of almond extract or a hint of orange zest can elevate your truffles to a whole new level. I remember the first time I added a bit of espresso powder; it was like a little burst of coffee magic in every bite!
When it comes to shaping the truffles, I recommend using a cookie scoop for uniformity. This not only makes the process quicker but also ensures that each truffle is the same size. It’s like creating a little army of sweet soldiers ready to delight your taste buds!
Don’t forget to chill the buttercream mixture before shaping. This step is essential for making the truffles easier to handle. If you find the mixture is still too soft after chilling, you can pop it back in the fridge for a few more minutes. I’ve learned that a little extra patience pays off in the end!
As for the chocolate coating, make sure to melt it slowly. I prefer using a microwave, but you can also use a double boiler if you have one. Stirring frequently helps prevent the chocolate from seizing up. I always keep a close eye on it, as melted chocolate can go from perfect to burnt in a flash!
Lastly, when it comes to decorating, let your creativity shine! Sprinkles are a fun way to add color, but you can also use crushed nuts, coconut flakes, or even a drizzle of white chocolate for a fancy touch. I love to mix and match toppings, creating a little variety in my truffle collection. It’s like a colorful candy garden on my dessert table!
With these tips in your back pocket, you’re well on your way to mastering the art of buttercream truffles. Remember, cooking is all about having fun and experimenting. So, roll up your sleeves, let your creativity flow, and enjoy the sweet journey of making these delightful treats!
FAQs About Buttercream Truffles Recipe
Can I use different flavors for the buttercream?
Absolutely! One of the best things about making Buttercream Truffles Recipe is the endless flavor possibilities. While vanilla is a classic choice, I love to experiment with different extracts and ingredients. For instance, almond extract adds a lovely nutty flavor, while a splash of orange or lemon zest can brighten up the truffles beautifully. You can even try adding a bit of cocoa powder for a chocolatey twist or a hint of peppermint extract for a refreshing touch. The world is your oyster, and your taste buds will thank you for the adventure!
How long do buttercream truffles last?
When stored properly, buttercream truffles can last up to two weeks at room temperature. However, I recommend keeping them in an airtight container to maintain their freshness. If you live in a warmer climate, it’s best to store them in the refrigerator, where they can last for about three weeks. Just be sure to let them sit at room temperature for a few minutes before serving, as this will bring back that delightful creamy texture. Trust me, they’ll be just as delicious as the day you made them!
Can I freeze buttercream truffles?
Yes, you can freeze buttercream truffles! In fact, freezing them is a great way to make them ahead of time. To freeze, simply place the truffles in a single layer on a baking sheet and pop them in the freezer until they’re firm. Once frozen, transfer them to an airtight container or a freezer bag. They can last for up to three months in the freezer. When you’re ready to enjoy them, just let them thaw in the fridge or at room temperature. It’s like having a little stash of sweet surprises waiting for you!
What is the best way to store buttercream truffles?
The best way to store buttercream truffles is in an airtight container. I like to layer them with parchment paper to prevent them from sticking together. If you’re storing them at room temperature, keep them in a cool, dry place away from direct sunlight. If you choose to refrigerate them, make sure they’re well-sealed to avoid absorbing any odors from the fridge. No one wants their truffles tasting like last week’s leftovers! With proper storage, your truffles will stay fresh and delicious, ready to be enjoyed whenever the sweet tooth strikes!
Conclusion on Buttercream Truffles Recipe
As I wrap up this delightful journey through my Buttercream Truffles Recipe, I can’t help but feel a sense of joy and accomplishment. These little bites of sweetness are not just a treat; they are a celebration of creativity, love, and the simple pleasures of life. Each truffle is a testament to the magic that happens when you combine a few basic ingredients with a sprinkle of imagination.
Print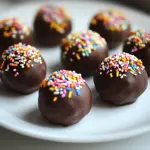
Buttercream Truffles Recipe: Discover Sweet Bliss Today!
- Total Time: 1 hour 10 minutes
- Yield: 24 truffles
- Diet: Vegetarian
Description
A delightful recipe for creamy buttercream truffles coated in rich chocolate, perfect for any occasion.
Ingredients
- 🧈 Unsalted butter – 1/2 cup (softened)
- 🍚 Powdered sugar – 2 cups
- 🍦 Vanilla extract – 1 teaspoon
- 🥛 Heavy cream – 1/4 cup
- 🍫 Chocolate coating – 8 oz (dark or milk chocolate, chopped)
- 🌈 Sprinkles – 1/2 cup (for decoration)
Instructions
- Prepare the buttercream mixture by beating softened unsalted butter until creamy, then gradually add powdered sugar, vanilla extract, and heavy cream until light and fluffy.
- Chill the buttercream mixture in the fridge for about 30 minutes.
- Shape the chilled buttercream into small balls using a cookie scoop and place them on a baking sheet lined with parchment paper.
- Chill the shaped truffles in the freezer for 15-20 minutes.
- Melt the chocolate coating in a microwave-safe bowl, stirring until smooth.
- Dip each truffle into the melted chocolate, letting excess chocolate drip off, and place back on the parchment-lined baking sheet.
- Sprinkle colorful sprinkles on top of the coated truffles before the chocolate sets.
- Let the truffles sit at room temperature until the chocolate hardens, or refrigerate for quicker setting.
Notes
- Use softened unsalted butter for the best texture.
- Experiment with different flavors by adding extracts or zest.
- Chill the buttercream mixture for easier handling.
- Store truffles in an airtight container to maintain freshness.
- Prep Time: 1 hour
- Cook Time: 10 minutes
- Category: Dessert
- Method: No-bake
- Cuisine: American
Nutrition
- Serving Size: 1 truffle
- Calories: 120
- Sugar: 10g
- Sodium: 30mg
- Fat: 7g
- Saturated Fat: 4g
- Unsaturated Fat: 2g
- Trans Fat: 0g
- Carbohydrates: 14g
- Fiber: 0g
- Protein: 1g
- Cholesterol: 15mg
Keywords: buttercream truffles, chocolate truffles, dessert recipe, homemade sweets
")
")
")
")