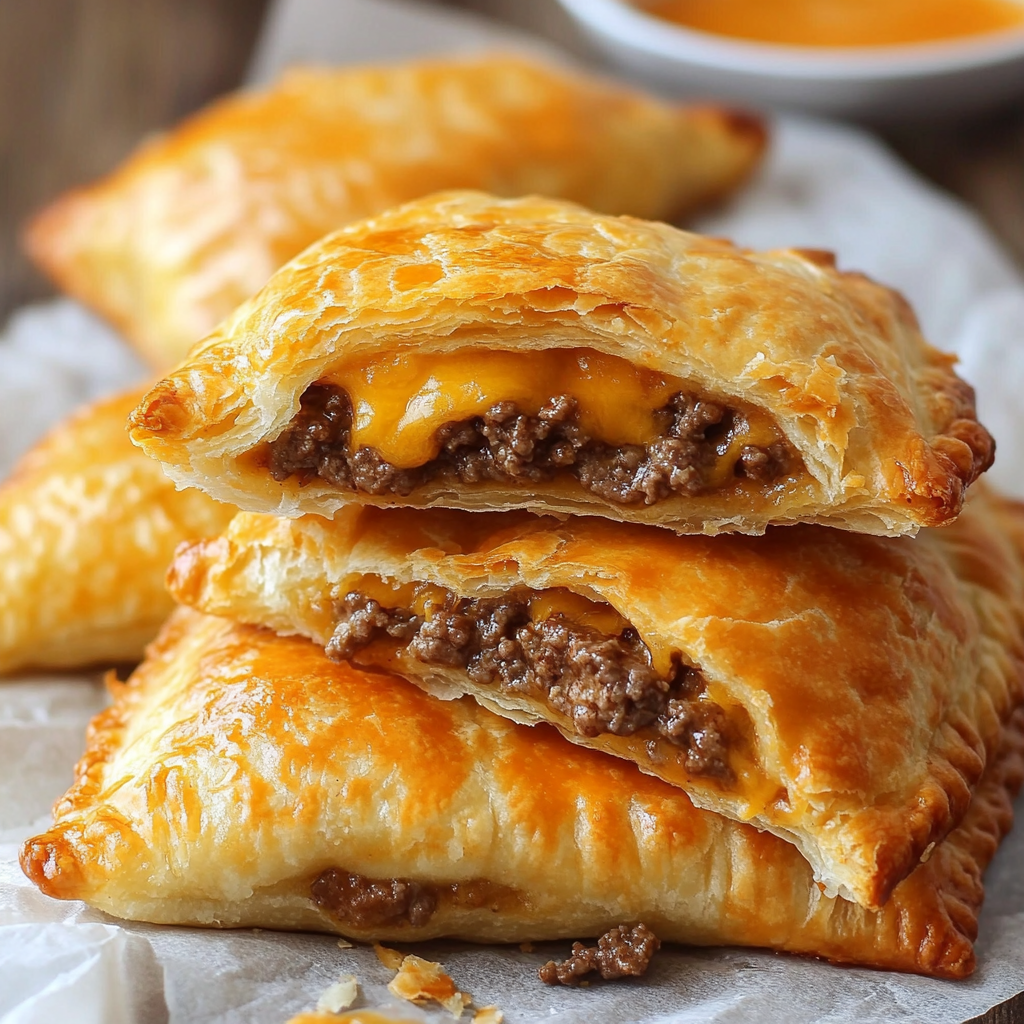
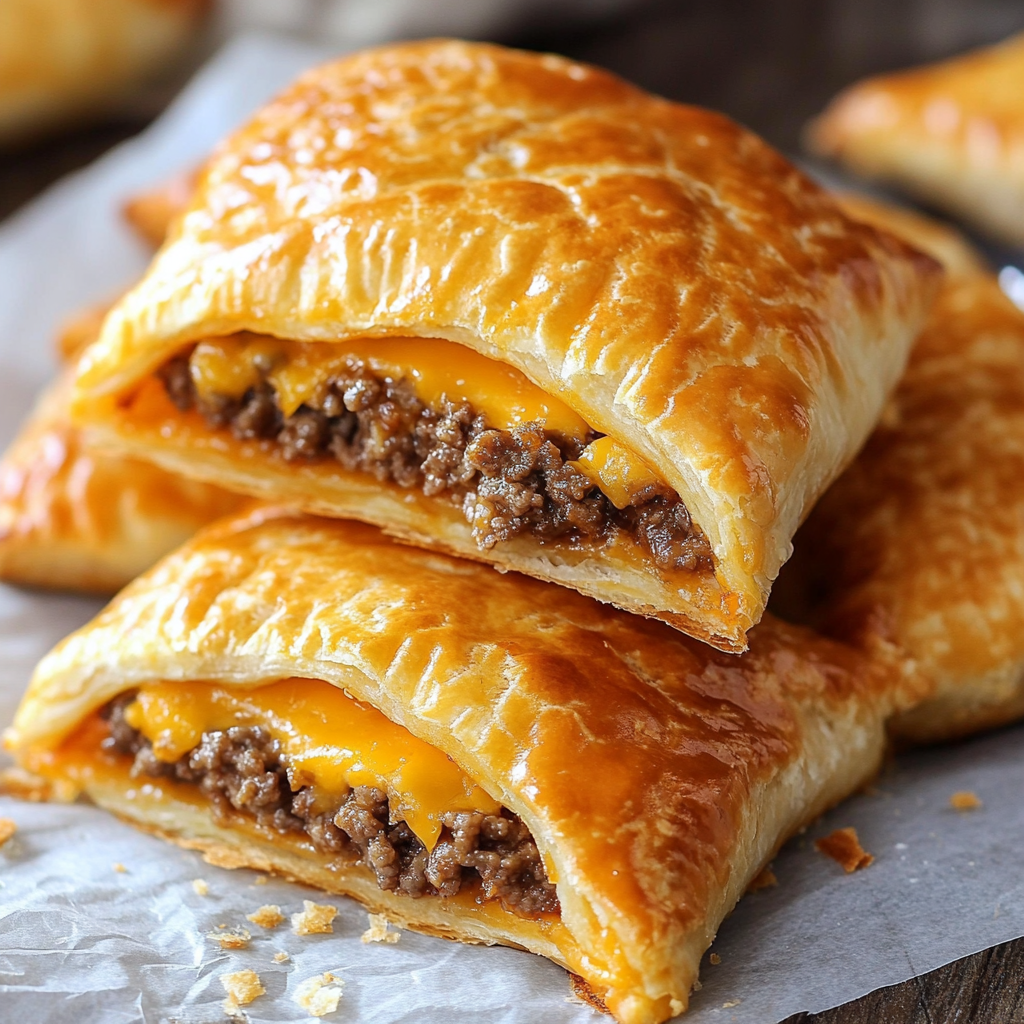
Ah, Cheeseburger Pockets! Just the name makes my mouth water. These delightful little treats are like a warm hug on a plate. Imagine a crispy, golden crust enveloping a savory filling of seasoned ground beef and melted cheddar cheese. It’s like a cheeseburger, but in a fun, portable form! Perfect for a quick snack, a party appetizer, or even a cozy family dinner, these pockets are sure to please everyone at the table.
Ingredients for Cheeseburger Pockets Recipe
Now that I’ve whetted your appetite with the introduction, let’s dive into the ingredients for these scrumptious Cheeseburger Pockets. I always find that having everything prepped and ready makes the cooking process smoother and more enjoyable. So, gather these ingredients, and let’s get started!
- Ground Beef: 1 lb (450 g) – This is the star of the show! I prefer using lean ground beef for a healthier option, but feel free to use your favorite type.
- Cheddar Cheese: 1 cup, shredded (about 100 g) – The gooey, melty goodness that binds everything together. I love sharp cheddar for its bold flavor, but you can use mild if you prefer.
- Onion: 1 small, finely chopped – This adds a lovely sweetness and depth to the filling. I often use yellow onions, but white or red work just as well!
- Garlic Powder: 1 teaspoon – A sprinkle of this magic dust elevates the flavor profile. If you’re a garlic lover like me, you might want to add a bit more!
- Salt and Pepper: to taste – Essential seasonings that bring out the flavors of the beef and cheese. I always taste as I go to get it just right.
- Refrigerated Crescent Roll Dough: 1 can (8 oz or 225 g) – This is what gives our pockets that flaky, buttery crust. It’s a lifesaver for quick recipes!
As I gather these ingredients, I can’t help but feel excited about the deliciousness that’s about to unfold. Each component plays a vital role in creating that perfect bite. And the best part? You can easily adjust the ingredients to suit your taste. Want to throw in some diced pickles or a dash of hot sauce? Go for it! The beauty of cooking is that it’s all about making it your own.
Tools Needed for Cheeseburger Pockets Recipe
Before we dive into the cooking process, let’s make sure you have all the right tools at your fingertips. Having the right equipment can make a world of difference in the kitchen. Trust me, I’ve learned this the hard way! Here’s a handy list of what you’ll need to whip up these delightful Cheeseburger Pockets.
- Skillet: A good non-stick skillet is essential for browning the ground beef and onions. I love my cast iron skillet for its even heat distribution, but any skillet will do!
- Spatula: You’ll need a spatula to stir the beef mixture and ensure everything cooks evenly. A wooden or silicone spatula works wonders and won’t scratch your skillet.
- Baking Sheet: A baking sheet lined with parchment paper is perfect for placing your filled pockets. It makes cleanup a breeze and prevents sticking.
- Measuring Cups and Spoons: Accurate measurements are key to a successful recipe. I always keep my measuring cups and spoons handy to ensure I get the right amounts of each ingredient.
- Mixing Bowl: A mixing bowl is great for combining the beef and cheese mixture. I prefer a medium-sized bowl that’s easy to handle.
- Rolling Pin (optional): If you want to roll out the crescent dough a bit more, a rolling pin can help. However, it’s not necessary since the dough is already pre-rolled.
- Oven Mitts: Safety first! You’ll definitely need a pair of oven mitts to protect your hands when taking those golden pockets out of the oven.
As I gather these tools, I can’t help but feel a sense of anticipation. Each item plays a role in bringing my cheeseburger pockets to life. Cooking is not just about the ingredients; it’s about the experience, the joy of creating something delicious from scratch. So, let’s get ready to roll up our sleeves and dive into the next steps!
Step-by-Step Preparation of Cheeseburger Pockets Recipe
Step 1: Prepare the Filling for Cheeseburger Pockets Recipe
Let’s kick things off by preparing the filling for our Cheeseburger Pockets. This step is where the magic begins! I start by heating my trusty skillet over medium heat. The sizzle of the ground beef hitting the pan is music to my ears. I add the 1 lb of ground beef and the finely chopped onion, letting them mingle and cook together. The aroma fills my kitchen, and I can already imagine how delicious these pockets will be!
As the beef browns, I sprinkle in some salt, pepper, and a teaspoon of garlic powder. The seasoning is crucial; it’s like giving the beef a warm hug of flavor. I stir everything together, making sure the onions soften and the beef is cooked through, which usually takes about 5-7 minutes. Once it’s all nicely browned, I drain any excess fat. This step is important to keep our pockets from getting soggy. After that, I remove the skillet from the heat and let the mixture cool slightly. Trust me, you want to avoid burning your fingers when you assemble the pockets!
Step 2: Make the Dough for Cheeseburger Pockets Recipe
Now that our filling is ready, it’s time to work with the dough. I grab my can of refrigerated crescent roll dough and pop it open. The sound is always a little thrilling, like unwrapping a present! I unroll the dough onto a clean surface, and I can see those lovely perforated lines. I gently separate the dough into triangles, making sure not to tear them. Each triangle is like a little canvas waiting to be filled with deliciousness.
If you want to get a bit creative, you can use a rolling pin to flatten the triangles slightly. This gives you a bit more space for filling, but it’s totally optional. I usually skip this step because I love the flaky texture of the dough as it is. Just remember, the dough is the cozy blanket that wraps around our savory filling, so treat it with care!
Step 3: Assemble the Cheeseburger Pockets
Now comes the fun part—assembling our Cheeseburger Pockets! I take a spoonful of the beef and cheese mixture and place it at the wide end of each triangle. It’s like tucking in a little treasure! I always make sure not to overfill, as that can lead to a messy situation in the oven. A little goes a long way, and we want to keep the filling snug and secure.
Next, I roll the dough over the filling, starting from the wide end and rolling towards the point. As I roll, I pinch the seams to seal the pockets tightly. This is where I channel my inner chef, making sure each pocket is perfectly closed. I like to give them a little pat to ensure they’re sealed well. Once I’ve filled and rolled all the triangles, I place them on a baking sheet lined with parchment paper. The anticipation is building, and I can’t wait to see how they turn out!
Step 4: Bake the Cheeseburger Pockets
It’s time to bring our Cheeseburger Pockets to life in the oven! I preheat my oven to 375°F (190°C) and slide the baking sheet into the oven. The smell of baking dough is heavenly! I set a timer for 12-15 minutes and watch as the pockets puff up and turn golden brown. It’s like watching a beautiful sunrise in my kitchen.
Once the timer goes off, I carefully pull the baking sheet out of the oven, using my trusty oven mitts. The pockets are golden and inviting, and I can hardly wait to dig in. I let them cool for a few minutes before serving. This is the hardest part—waiting! But trust me, the cheesy, savory goodness is worth it. And there you have it, perfectly baked Cheeseburger Pockets ready to be enjoyed!
Serving Suggestions for Cheeseburger Pockets Recipe
Best Dipping Sauces for Cheeseburger Pockets Recipe
Now that our Cheeseburger Pockets are out of the oven and looking absolutely scrumptious, let’s talk about the fun part—dipping sauces! I believe that a great dipping sauce can elevate any dish, and these pockets are no exception. Here are a few of my favorites that pair perfectly with the cheesy, savory goodness of the pockets:
- Ketchup: The classic choice! There’s something about the tangy sweetness of ketchup that complements the flavors of the cheeseburger pockets. I like to serve it in a small bowl for easy dipping.
- Ranch Dressing: Creamy and zesty, ranch dressing adds a delightful twist. It’s like a party in your mouth! I often whip up a quick homemade ranch with sour cream, mayo, and herbs for an extra special touch.
- Mustard: If you’re a mustard lover, this is a must-try! The sharpness of mustard cuts through the richness of the cheese and beef, creating a perfect balance. I prefer yellow mustard, but Dijon works well too!
- BBQ Sauce: For a smoky flavor, BBQ sauce is a fantastic option. It adds a sweet and tangy kick that pairs beautifully with the cheeseburger filling. I love using a homemade version for that extra touch of love.
- Hot Sauce: If you like a little heat, drizzle some hot sauce over your pockets or serve it on the side. It adds a fiery punch that takes these pockets to the next level!
As I set out these dipping sauces, I can’t help but feel excited. Each sauce brings its own unique flavor, and it’s fun to see which one becomes the favorite at the table. I love watching my family and friends experiment with different combinations, creating their own perfect bites!
Side Dishes to Pair with Cheeseburger Pockets Recipe
While the Cheeseburger Pockets are delicious on their own, serving them with the right side dishes can turn this meal into a feast! Here are some of my go-to side dishes that complement the pockets beautifully:
- French Fries: You can’t go wrong with crispy, golden French fries! They’re the ultimate comfort food and pair perfectly with the cheeseburger pockets. I love to sprinkle them with a little sea salt for that extra crunch.
- Coleslaw: A refreshing coleslaw adds a nice crunch and balances the richness of the pockets. I often make a simple slaw with cabbage, carrots, and a tangy dressing for a pop of color and flavor.
- Garden Salad: A light garden salad with fresh greens, tomatoes, and cucumbers is a great way to add some freshness to the meal. Drizzle it with a simple vinaigrette, and you’ve got a perfect pairing!
- Potato Wedges: For a heartier option, try serving potato wedges seasoned with herbs and spices. They’re easy to make and add a satisfying crunch alongside the pockets.
- Veggie Platter: If you want to keep things light, a colorful veggie platter with carrots, celery, and bell peppers is a great choice. Serve it with a creamy dip for a healthy crunch!
As I prepare these side dishes, I can’t help but feel a sense of joy. It’s all about creating a delightful dining experience, and these sides add that extra touch. Whether it’s a casual family dinner or a fun gathering with friends, these Cheeseburger Pockets and their accompaniments are sure to impress!
Tips for Perfect Cheeseburger Pockets Recipe
Common Mistakes to Avoid in Cheeseburger Pockets Recipe
As a passionate home cook, I’ve had my fair share of kitchen mishaps. When it comes to making Cheeseburger Pockets, there are a few common mistakes that can turn your culinary adventure into a bit of a disaster. Let me share some tips to help you avoid these pitfalls!
- Overfilling the Pockets: It’s tempting to pile on the filling, but trust me, less is more! Overfilling can lead to messy pockets that burst open in the oven. Stick to a spoonful of filling for each triangle, and you’ll be golden!
- Not Sealing Properly: Make sure to pinch the seams tightly to seal the pockets. If they’re not sealed well, the filling can ooze out while baking. I like to give them a little pat after sealing to ensure they’re snug.
- Skipping the Cooling Step: After cooking the beef mixture, let it cool slightly before filling the dough. If it’s too hot, it can make the dough soggy and difficult to handle. Patience is key here!
- Ignoring Oven Temperature: Every oven is different, so keep an eye on your pockets as they bake. If they’re browning too quickly, you can lower the temperature slightly. You want them to be golden and puffed, not burnt!
- Not Using Parchment Paper: Lining your baking sheet with parchment paper is a game-changer. It prevents sticking and makes cleanup a breeze. Don’t skip this step; your future self will thank you!
By keeping these tips in mind, you’ll be well on your way to creating perfect Cheeseburger Pockets every time. Cooking is all about learning from our experiences, and I’ve certainly learned a lot along the way!
Variations to Try with Cheeseburger Pockets Recipe
One of the things I love most about cooking is the ability to get creative. This Cheeseburger Pockets Recipe is a fantastic base, and you can easily customize it to suit your taste. Here are some fun variations to try:
- Cheesy Bacon Pockets: Add crispy bacon bits to the beef mixture for an extra layer of flavor. The smoky goodness of bacon pairs perfectly with the cheeseburger filling!
- Veggie Lovers Pockets: For a vegetarian twist, swap the ground beef for sautéed mushrooms, bell peppers, and zucchini. Add some mozzarella cheese for a deliciously cheesy bite!
- Spicy Jalapeño Pockets: If you like a little heat, toss in some diced jalapeños or a splash of hot sauce to the beef mixture. It adds a fiery kick that’s sure to please spice lovers!
- BBQ Cheeseburger Pockets: Mix in some BBQ sauce with the beef for a tangy twist. The sweet and smoky flavors will take your pockets to a whole new level!
- Breakfast Pockets: For a fun breakfast option, fill the pockets with scrambled eggs, cheese, and cooked sausage or bacon. They make for a hearty and delicious morning treat!
These variations are just the tip of the iceberg! Feel free to experiment with different ingredients and flavors. Cooking is all about having fun and making it your own. I can’t wait to hear about the delicious creations you come up with!
FAQs About Cheeseburger Pockets Recipe
Can I make Cheeseburger Pockets Recipe ahead of time?
Absolutely! One of the things I love about this Cheeseburger Pockets Recipe is its flexibility. You can prepare the filling a day in advance and store it in the fridge. Just make sure to let it cool completely before transferring it to an airtight container. When you’re ready to bake, simply assemble the pockets with the chilled filling and pop them in the oven. It’s a great way to save time, especially if you’re hosting a gathering or need a quick meal during a busy week!
What can I substitute in the Cheeseburger Pockets Recipe?
Substitutions are a fantastic way to make this recipe your own! If you don’t have ground beef on hand, you can use ground turkey or chicken for a leaner option. For a vegetarian twist, try using black beans or lentils instead of meat. You can also switch up the cheese—mozzarella, pepper jack, or even a blend of your favorites work wonderfully. And if you’re not a fan of onions, feel free to leave them out or replace them with finely chopped bell peppers. The beauty of cooking is that you can tailor it to your taste!
How do I store leftover Cheeseburger Pockets?
If you happen to have any leftovers (which is rare in my house!), storing them is super easy. Allow the pockets to cool completely, then place them in an airtight container. They can be stored in the fridge for up to 3 days. When you’re ready to enjoy them again, simply reheat in the oven at 350°F (175°C) for about 10-15 minutes, or until heated through. You can also pop them in the microwave for a quicker option, but I find that the oven keeps the crust nice and crispy!
Conclusion on Cheeseburger Pockets Recipe
As I wrap up this delightful journey through my Cheeseburger Pockets Recipe, I can’t help but feel a sense of satisfaction. Cooking is not just about the food; it’s about the memories we create and the joy we share with others. These pockets are more than just a tasty snack; they’re a way to bring family and friends together around the table.
Print
Cheeseburger Pockets Recipe: A Quick, Tasty Delight!
- Total Time: 30 minutes
- Yield: 8 pockets
- Diet: Gluten Free
Description
Cheeseburger Pockets are delightful treats with a crispy crust and a savory filling of seasoned ground beef and melted cheddar cheese, perfect for snacks, appetizers, or family dinners.
Ingredients
- Ground Beef: 1 lb (450 g)
- Cheddar Cheese: 1 cup, shredded (about 100 g)
- Onion: 1 small, finely chopped
- Garlic Powder: 1 teaspoon
- Salt and Pepper: to taste
- Refrigerated Crescent Roll Dough: 1 can (8 oz or 225 g)
Instructions
- Prepare the filling by browning the ground beef and onion in a skillet, seasoning with garlic powder, salt, and pepper.
- Make the dough by unrolling the refrigerated crescent roll dough and separating it into triangles.
- Assemble the pockets by placing a spoonful of the beef mixture at the wide end of each triangle and rolling it up, sealing the seams.
- Bake the pockets in a preheated oven at 375°F (190°C) for 12-15 minutes until golden brown.
Notes
- Customize the filling with diced pickles or hot sauce.
- Serve with various dipping sauces like ketchup, ranch, mustard, BBQ sauce, or hot sauce.
- Pair with side dishes like French fries, coleslaw, or a garden salad.
- Prep Time: 15 minutes
- Cook Time: 15 minutes
- Category: Snack/Appetizer
- Method: Baking
- Cuisine: American
Nutrition
- Serving Size: 1 pocket
- Calories: 250
- Sugar: 1g
- Sodium: 400mg
- Fat: 15g
- Saturated Fat: 6g
- Unsaturated Fat: 8g
- Trans Fat: 0g
- Carbohydrates: 20g
- Fiber: 1g
- Protein: 12g
- Cholesterol: 50mg
Keywords: Cheeseburger Pockets, Snack, Appetizer, Easy Recipe
")
")
")
")