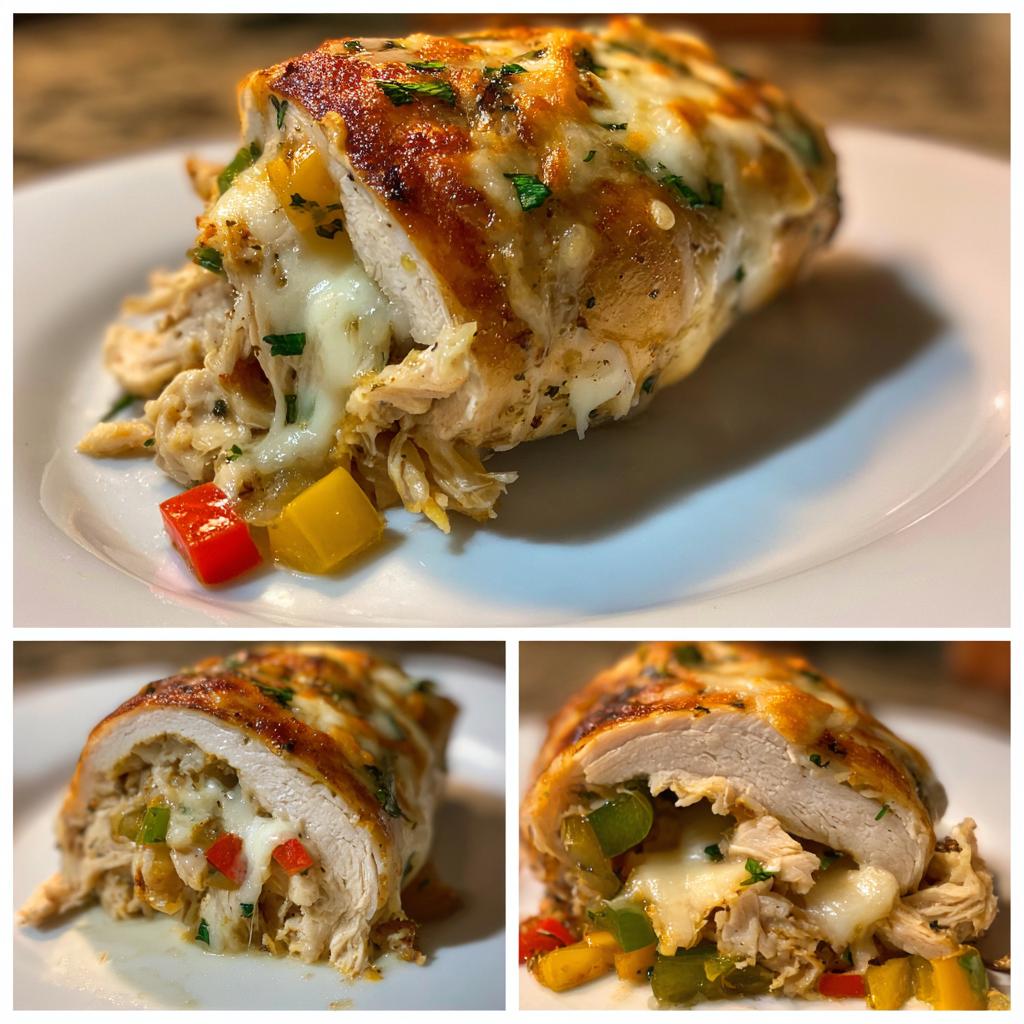
Busy weeknights call for quick, flavorful meals, and my chicken roll ups never disappoint. These little bundles of joy pack in all the goodness of juicy chicken, melty cheese, and crisp veggies—ready in just 30 minutes. I first made these on a crazy Tuesday when my kids were begging for something “fun” for dinner, and now they’re our go-to when time’s tight but taste matters. Honestly, once you try rolling up your chicken with that oozy mozzarella and colorful peppers, you’ll wonder how you ever settled for plain baked chicken. Plus, they’re so versatile—you can stuff them with whatever you’ve got in the fridge!
Why You’ll Love These Chicken Roll Ups
Trust me, once you make these once, you’ll be hooked. Here’s why:
- Crazy easy: Just slice, stuff, roll, and bake—no fancy skills needed!
- Your rules: Swap in any cheese or veggies you love (or need to use up).
- Protein powerhouse: Packed with 28g of protein per serving to keep you full.
- Kid-approved: My picky eater actually asks for these (miracle status).
Seriously, they’re weeknight magic.
Ingredients for Chicken Roll Ups
Here’s what you’ll need for these cheesy, veggie-packed wonders:
- 2 boneless, skinless chicken breasts (halved horizontally for thin slices – trust me, this makes rolling way easier!)
- 1/2 cup packed shredded mozzarella (the “packed” part matters – we want every roll oozing with cheese)
- 1/4 cup finely diced bell peppers (I use the colorful mini ones when I’m feeling fancy)
- 1/4 cup diced onions (red onions add nice color if you’ve got ’em)
- 1 tsp each garlic powder, salt, black pepper (this simple trio adds big flavor)
- 1 tbsp olive oil (for that perfect golden sear)
Ingredient Substitutions & Notes
Don’t stress if you’re missing something! Here are my favorite swaps:
- Cheese: Feta adds tang, pepper jack brings heat – just avoid super soft cheeses that might leak out
- Veggies: Spinach, zucchini, or mushrooms work great (sauté watery veggies first to prevent soggy chicken)
- No onions? Totally fine – I’ve skipped them when my kids protest and they still taste amazing
Watch out: If your filling looks wet, pat it dry! Excess moisture makes rolling tricky and can lead to falling apart.
How to Make Chicken Roll Ups
Okay, let’s get rolling (literally)! Follow these steps and you’ll have golden, cheesy perfection in no time:
- Preheat your oven to 375°F (190°C) – do this first so it’s ready when you need it!
- Slice those chicken breasts horizontally like you’re opening a book. Aim for 1/4-inch thick slices – they’ll roll up beautifully without breaking.
- Season both sides with garlic powder, salt, and pepper. Don’t be shy – this is your flavor foundation!
- Pile on the goods – sprinkle cheese first (it acts like glue), then add your colorful veggies. Leave about 1/2 inch border so everything stays put when rolling.
- Roll ’em tight! Start from one end and tuck as you go. Secure with 2-3 toothpicks spaced evenly – this keeps them from unrolling in the oven.
- Sear to golden perfection in hot olive oil – just 2-3 minutes per side gives that gorgeous color and locks in juices.
- Bake for 15-20 minutes until the internal temp hits 165°F. That melty cheese smell will tell you when they’re done!
Pro Tips for Perfect Chicken Roll Ups
After making these dozens of times (yes, we’re obsessed), here’s what I’ve learned:
- Toothpick hack: Insert them at an angle so they’re easier to remove after baking
- Less is more: Overstuffing = leaks. Stick to about 2 tbsp filling per roll
- Rest time matters: Let them sit 5 minutes before removing toothpicks – the cheese sets so they hold shape
- Even thickness: Pound thicker spots gently with a rolling pin for uniform cooking
Follow these and you’ll get restaurant-worthy roll ups every time!
Serving Suggestions for Chicken Roll Ups
These little flavor bundles shine even brighter with the right sides! Here’s how I love to serve them:
- Roasted veggies: Toss some asparagus or broccoli in olive oil and garlic – they’ll roast while the chicken bakes
- Simple salad: A crisp arugula mix with lemon vinaigrette cuts through the richness perfectly
- Dipping sauces: My kids go crazy for marinara, while I’m all about that garlic aioli drizzle
Pro tip: Serve with quinoa or rice to catch any cheesy drips – no good flavor left behind!
Storing and Reheating Chicken Roll Ups
These roll ups save beautifully for later! In the fridge, they’ll stay fresh for 3 days – just pop them in an airtight container. For longer storage, freeze them (wrapped tight in foil) for up to a month. When reheating, skip the microwave – that’ll make them soggy. Instead, warm them in a 350°F oven for 10-15 minutes until heated through. That way, you’ll keep that perfect crispy outside and gooey cheese inside. Easy-peasy!
Chicken Roll Ups Nutrition
Here’s the scoop on what you’re getting in each delicious roll up (estimated for the basic recipe – your mileage may vary with substitutions):
- 210 calories – light but satisfying
- 28g protein – hello, muscle fuel!
- 8g fat (only 3g saturated) – thanks to that smart olive oil sear
Remember, these numbers can change if you go wild with extra cheese or swap ingredients – but that’s the fun of cooking, right?
FAQs About Chicken Roll Ups
I get questions about these roll ups all the time – here are the answers that’ll save you some trial and error!
Can I use chicken thighs instead of breasts?
Absolutely! Thighs actually stay juicier and are more forgiving when rolling. Just remove any excess fat first and pound them to even thickness. The cooking time might be a minute or two longer since they’re a bit thicker.
Help! My filling keeps leaking out – what am I doing wrong?
First, make sure you’re not overstuffing (I know, it’s tempting!). Also, pat your veggies dry before adding them, and always start with a cheese layer – it acts like edible glue. Finally, those toothpicks should go in at an angle, not straight through.
Can I prep these ahead of time?
You bet! Assemble them (through the searing step) up to a day ahead. Store in the fridge, then just pop them in the oven when ready. The sear keeps them from drying out – genius, right?
Are these chicken roll ups freezer-friendly?
Totally! After baking, let them cool completely, then wrap individually in foil. They’ll keep for a month frozen. To reheat, bake at 350°F straight from frozen (add 5-7 extra minutes). Perfect for emergency dinners!
Share Your Chicken Roll Ups
Made these? Show me your cheesy masterpieces! Tag me in your photos or leave a note below – I love seeing your kitchen wins.
Print
Juicy Chicken Roll Ups Ready in Just 30 Minutes!
- Total Time: 30 mins
- Yield: 4 servings 1x
- Diet: Low Calorie
Description
Simple and delicious chicken roll ups filled with cheese and vegetables.
Ingredients
- 2 boneless, skinless chicken breasts
- 1/2 cup shredded mozzarella cheese
- 1/4 cup diced bell peppers
- 1/4 cup diced onions
- 1 tsp garlic powder
- 1 tsp salt
- 1 tsp black pepper
- 1 tbsp olive oil
Instructions
- Preheat oven to 375°F (190°C).
- Cut chicken breasts horizontally to create thin slices.
- Season chicken with garlic powder, salt, and pepper.
- Place shredded cheese, bell peppers, and onions on each chicken slice.
- Roll up the chicken tightly and secure with toothpicks.
- Heat olive oil in a skillet over medium heat.
- Sear chicken roll ups for 2-3 minutes on each side.
- Transfer to a baking dish and bake for 15-20 minutes until fully cooked.
Notes
- Use toothpicks to hold the rolls together while baking.
- Let the roll ups cool for 5 minutes before serving.
- Substitute vegetables based on preference.
- Prep Time: 10 mins
- Cook Time: 20 mins
- Category: Main Course
- Method: Baking
- Cuisine: American
Nutrition
- Serving Size: 1 roll up
- Calories: 210
- Sugar: 1g
- Sodium: 450mg
- Fat: 8g
- Saturated Fat: 3g
- Unsaturated Fat: 4g
- Trans Fat: 0g
- Carbohydrates: 3g
- Fiber: 1g
- Protein: 28g
- Cholesterol: 85mg
Keywords: chicken roll ups, stuffed chicken, easy dinner

")
")
")
")