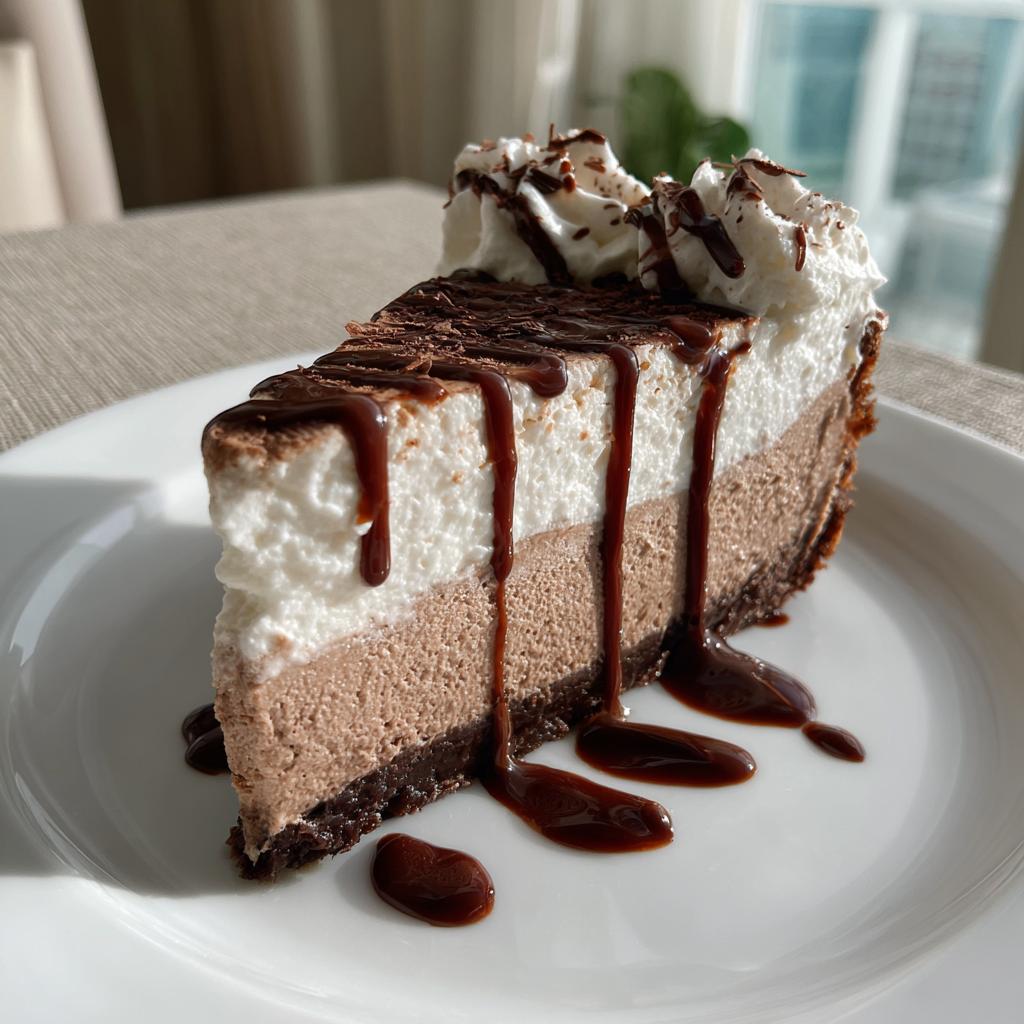
Oh my goodness, you have to try this Chocolate Mousse Cheesecake! It’s like someone took all my favorite desserts and smashed them together into one glorious creation. I first made it for my sister’s birthday – totally winging it because I couldn’t decide between cheesecake or chocolate mousse. The result? Absolute magic. The rich, velvety cheesecake base melts into this fluffy cloud of chocolate mousse on top. It’s decadent without being too heavy, and trust me, it disappears faster than you can say “seconds please!” The best part? It’s way easier to make than it looks.
Why You’ll Love This Chocolate Mousse Cheesecake
Let me count the ways this dessert will steal your heart:
- The texture is pure magic – creamy cheesecake meets airy mousse in every bite
- It looks fancy but honestly? Super easy to put together
- Perfect for entertaining – everyone always asks for seconds
- The chocolate flavor? Intense but not overwhelming
- Chills overnight so you can make it ahead (and sneak a spoonful before guests arrive)
Seriously, this is the dessert that makes people think you’re a pastry chef. Your secret is safe with me!
Chocolate Mousse Cheesecake Ingredients
I learned the hard way that using the right ingredients makes all the difference here. My first attempt with cold cream cheese resulted in lumpy batter – oops! Here’s everything you’ll need for that perfect texture:
- 200g digestive biscuits – crushed into fine crumbs (I use a rolling pin inside a plastic bag – so satisfying!)
- 100g unsalted butter – melted until just liquid (not too hot!)
- 500g cream cheese – must be room temperature, I leave mine out for 2 hours (this is non-negotiable for smoothness)
- 150g granulated sugar – regular white sugar works perfectly
- 2 large eggs – also at room temperature (I pop them in warm water for 10 minutes if I forget to take them out)
- 1 tsp vanilla extract – the real stuff, not imitation
- 200g dark chocolate – melted and slightly cooled (I use 70% cocoa for rich flavor without being bitter)
- 300ml heavy cream – cold straight from the fridge
- 2 tbsp powdered sugar – for whipping into the mousse top
Pro tip: Measure everything before starting! It makes the process so much smoother when you’re not scrambling mid-recipe. And yes, I may have once substituted margarine for butter – let’s just say the crust wasn’t quite the same…
Equipment Needed
You don’t need anything fancy for this Chocolate Mousse Cheesecake – just the basics from your kitchen. Here’s what I always grab:
- 9-inch springform pan – this removable bottom is a lifesaver for clean slices
- Mixing bowls – one large for cheesecake batter, one medium for whipping cream
- Electric mixer – hand or stand mixer both work (though I’ll admit I sometimes cheat and use my immersion blender)
- Spatula – silicone is best for scraping every last bit of that delicious batter
- Measuring cups/spoons – eyeballing ingredients never works for cheesecake!
- Microwave-safe bowl – for melting chocolate (or use a double boiler if you’re feeling fancy)
That’s it! No specialty tools required. Though I will say – a pastry brush helps spread the butter evenly on the crust if you want to get technical. But honestly? Your clean hands work just fine too!
How to Make Chocolate Mousse Cheesecake
Alright, let’s dive into making this showstopper! Don’t let the layers intimidate you – I’ll walk you through each step like I’m right there in your kitchen. The key is taking it slow and enjoying the process. After all, good things come to those who wait (and who love chocolate).
Step 1: Prepare the Crust
First things first – let’s make that buttery biscuit base. I like to crush my digestives in a plastic bag with a rolling pin – it’s oddly therapeutic after a long day! You want fine crumbs, not big chunks. Mix them with melted butter until it looks like wet sand.
Press this heavenly mixture firmly into your springform pan – I use the bottom of a glass to get it nice and even. Don’t forget the sides! About 2cm up creates the perfect crust-to-filling ratio. Pop this in the fridge while you work on the filling. Chilling helps it stay crisp when we bake it.
Step 2: Make the Cheesecake Filling
Now for the magic – that velvety cheesecake layer. Remember how I insisted on room temp cream cheese? This is why! Beat it with sugar until completely smooth – no lumps allowed. Scrape down the bowl often – those sneaky lumps hide at the bottom!
Add eggs one at a time, mixing just until combined. Overbeating incorporates too much air (we’ll get our fluffiness from the mousse later). Stir in vanilla – that little splash makes all the difference. Your batter should be silky smooth, like pudding. Taste a spoonful? Okay fine, maybe two…
Step 3: Fold in Chocolate
Here’s where things get seriously chocolatey. Melt your dark chocolate (microwave in 30-second bursts, stirring between) and let it cool slightly. Too hot and it’ll cook the eggs in your batter – learned that the hard way!
Gently fold the chocolate into your cheesecake mixture. I use a big metal spoon and make wide, slow motions – think “hugging” the chocolate into the batter rather than stirring. You’ll see beautiful marble swirls at first that slowly blend into one rich, chocolatey dream.
Step 4: Bake and Cool
Pour your gorgeous batter onto the chilled crust and smooth the top. Bake at 160°C (325°F) for about 40 minutes. You’ll know it’s done when the edges look set but the center still has a slight wobble – like a chocolate jiggle that says “I’m perfect!”
Let it cool completely in the pan – rushing this leads to cracks (still tasty but not as pretty). I leave mine on the counter for at least 2 hours. Patience is key – distract yourself with dishes or, you know, licking the bowl.
Step 5: Add the Mousse Layer
The grand finale! Whip your cold heavy cream with powdered sugar until stiff peaks form – when you lift the beaters, the peaks should stand straight up without drooping. Fold this gently into your remaining melted chocolate (cooled completely now).
Spread this cloud of chocolatey goodness over your cooled cheesecake. I use an offset spatula to get those picture-perfect swirls. Chill for at least 4 hours, but overnight is better if you can wait. The flavors meld beautifully, and you’ll get cleaner slices. Not that I’ve ever managed to wait the full time…
Tips for the Perfect Chocolate Mousse Cheesecake
After making this chocolate mousse cheesecake more times than I can count (and eating even more slices), I’ve picked up some game-changing tricks. These little nuggets of wisdom will take your dessert from “pretty good” to “oh-my-gosh-can-I-have-the-recipe” status!
Chill it like you mean it – I know, I know, waiting is the hardest part. But trust me, letting this beauty chill overnight makes all the difference. The flavors meld together, the texture sets perfectly, and you’ll get those clean Instagram-worthy slices. My impatient younger self learned this the messy way!
Quality chocolate matters – This isn’t the time to skimp on those baking chips from the back of your pantry. Splurge on good-quality dark chocolate (70% cocoa is my sweet spot). The depth of flavor will have people wondering what your secret ingredient is. (It’s love. And good chocolate.)
The room temperature rule – I can’t stress this enough: room temp ingredients are non-negotiable. Cold cream cheese = lumpy batter. Cold eggs = uneven mixing. Leave everything out for at least 2 hours before starting. If you forget (I always do), pop the cream cheese on a warm plate and the eggs in a bowl of lukewarm water for 10 minutes.
Bake with confidence – That slight wobble in the center when you pull it from the oven? That’s exactly what you want! It’ll firm up as it cools. Overbaking leads to cracks (still delicious but not as pretty). If you’re nervous, do the toothpick test – it should come out with moist crumbs, not wet batter.
Slice like a pro – Here’s my foolproof method: run a thin knife under hot water, wipe it dry, then make your cut. Repeat between each slice for clean edges. Bonus tip – dip your knife in chocolate first for those gorgeous chocolate-dipped slice sides!
Remember, even if it cracks or your layers aren’t perfectly even, it’ll still taste amazing. Some of my “ugly duckling” cheesecakes have been the most delicious! The secret is sharing it with people who appreciate good dessert – they’ll never notice the imperfections.
Storage and Serving Suggestions
Okay, let’s talk about keeping your chocolate mousse cheesecake happy and how to serve it like a pro! First things first – this beauty must stay refrigerated. I learned this the hard way when I left a slice out “just for a few minutes” and came back to a chocolate puddle (still ate it though).
In the fridge, it stays perfect for up to 3 days – though let’s be real, it never lasts that long in my house! Cover it loosely with foil or plastic wrap to prevent fridge odors from sneaking in. If you need to store it longer, you can freeze individual slices wrapped tightly in plastic then foil for up to a month. Thaw overnight in the fridge when those chocolate cravings hit.
Now for the fun part – serving! My favorite ways to dress it up:
- Chocolate shavings – Use a vegetable peeler on a chocolate bar for those gorgeous curls
- Fresh berries – Raspberries or strawberries add a pop of color and tart contrast
- Whipped cream rosettes – Pipe little clouds around the edges for extra wow factor
- Edible flowers – For fancy occasions, they look stunning against the dark chocolate
- Caramel drizzle – Because why choose between chocolate and caramel when you can have both?
Let the cheesecake sit at room temperature for about 15 minutes before serving – this lets the flavors really shine. And here’s my secret service tip: warm your knife under hot water before slicing for those picture-perfect clean cuts. Your guests will think you’re a pastry chef!
Chocolate Mousse Cheesecake Variations
Don’t get me wrong – the classic version is perfection, but sometimes I love playing around with different flavors! Here are some of my favorite ways to mix things up when I’m feeling adventurous:
- White Chocolate Dream – Swap the dark chocolate for white chocolate in both layers. It’s like eating a cloud! Add a swirl of raspberry jam before baking for a pretty marbled effect.
- Mocha Magic – Dissolve 1 tablespoon instant espresso powder into the melted chocolate for a coffee kick that enhances the chocolate flavor beautifully.
- Mint Chocolate Chip – Add 1/2 teaspoon peppermint extract to the mousse layer and fold in mini chocolate chips. Perfect for holiday gatherings!
- Salted Caramel Swirl – Drizzle caramel sauce over the cheesecake layer before adding the mousse, then sprinkle with flaky sea salt. Sweet and salty heaven.
- Orange Zest Twist – Add the zest of one orange to the cheesecake batter. The citrus brightens up all that rich chocolate.
The best part? You can always do half-and-half if you can’t decide – just divide the batter and add different mix-ins to each portion. My family loves when I make sampler cheesecakes with four different flavors in one pan! Whatever variation you choose, the basic method stays the same – so feel free to get creative with your favorite flavors.
Nutritional Information
Okay, let’s talk nutrition – because we’re all adults here (even if we eat dessert like kids sometimes). A slice of this heavenly chocolate mousse cheesecake packs some serious deliciousness, and here’s what that looks like nutritionally. But remember – life’s too short to count calories when chocolate is involved!
- Calories: 450 per slice (but who’s counting when it’s this good?)
- Fat: 35g (mostly from all that glorious cream cheese and chocolate)
- Saturated Fat: 20g (worth every single gram)
- Carbohydrates: 40g (hey, we all need energy!)
- Sugar: 30g (it’s dessert, not a salad – we knew what we signed up for)
- Protein: 6g (protein in dessert? Bonus!)
- Sodium: 200mg
- Fiber: 2g (thanks to that dark chocolate)
Important note: These nutritional values are estimates and can vary based on the specific ingredients you use. If you’re substituting anything or adjusting portions (no judgment if you want an extra-large slice), the numbers will change. And let’s be honest – when something tastes this good, sometimes numbers just don’t matter as much as that first blissful bite!
Frequently Asked Questions
Can I use milk chocolate instead of dark chocolate?
Absolutely! While I prefer dark chocolate for its rich flavor, milk chocolate works beautifully too – just expect a sweeter, milder taste. If you go this route, reduce the sugar in the cheesecake layer by about 25g since milk chocolate is already quite sweet. White chocolate is another fun option – though you’ll want to decrease the sugar even more and maybe add a pinch of salt to balance the sweetness.
How do I prevent cracks in my cheesecake?
Oh, the dreaded cracks! Here’s what I’ve learned: First, don’t overmix the batter after adding eggs – this incorporates too much air. Second, bake in a water bath (place your springform pan in a larger pan with hot water halfway up the sides). And most importantly, let it cool gradually – turn off the oven and crack the door open for an hour before removing. If cracks still happen (they sometimes do!), just cover them with extra mousse – it’s like edible spackle!
Can I make this ahead of time?
You’re speaking my language! This cheesecake actually gets better with time. Make it up to 2 days before serving – the flavors develop beautifully in the fridge. Just add the mousse topping the day you plan to serve it for maximum freshness. If you’re really pressed for time, you can freeze the baked cheesecake (without topping) for up to a month – thaw overnight in the fridge before adding the mousse layer.
My mousse layer isn’t setting – what went wrong?
Ah, the perils of whipped cream! Three likely culprits: 1) Your cream wasn’t cold enough, 2) You overwhipped it (stop at stiff peaks!), or 3) The melted chocolate was too warm when you folded it in. For rescue missions, pop the whole cheesecake in the freezer for 30 minutes to firm up. If it’s still too soft, you can always rebrand it as “chocolate mousse sauce” – pour it over individual slices instead!
Can I make this gluten-free?
Yes indeed! Simply swap the digestive biscuits for your favorite gluten-free cookie (I like gluten-free graham crackers or almond flour cookies). The rest of the ingredients are naturally gluten-free – just double check your chocolate labels if you’re highly sensitive. The texture and taste will be just as amazing, promise!
Alright, my fellow dessert lovers, it’s time to get baking! This chocolate mousse cheesecake is waiting to become your new signature dish – the one everyone begs you to bring to parties. Don’t just take my word for it though – grab those ingredients and experience the magic for yourself. I want to hear all about your cheesecake adventures! Did you add any fun twists? How long did it actually take before someone snuck the first slice? Drop your stories (and maybe a photo if you’re feeling fancy) in the comments below. Happy baking, and may your cheesecake always be crack-free and your mousse perfectly fluffy! You can also find more delicious recipes on our site or check out our Pinterest for visual inspiration.
Print
Irresistible Chocolate Mousse Cheesecake in 6 Easy Steps
- Total Time: 5 hours (includes chilling)
- Yield: 8 servings 1x
- Diet: Vegetarian
Description
A rich and creamy dessert combining the best of chocolate mousse and cheesecake.
Ingredients
- 200g digestive biscuits
- 100g unsalted butter, melted
- 500g cream cheese
- 150g granulated sugar
- 2 large eggs
- 1 tsp vanilla extract
- 200g dark chocolate, melted
- 300ml heavy cream
- 2 tbsp powdered sugar
Instructions
- Preheat oven to 160°C (325°F).
- Crush biscuits and mix with melted butter. Press into a springform pan.
- Beat cream cheese and sugar until smooth. Add eggs and vanilla.
- Fold in melted chocolate. Pour onto the biscuit base.
- Bake for 40 minutes. Let it cool completely.
- Whip heavy cream and powdered sugar. Spread over the cheesecake.
- Chill for at least 4 hours before serving.
Notes
- Use room temperature cream cheese for smoother texture.
- Chill the cheesecake overnight for best results.
- Garnish with chocolate shavings if desired.
- Prep Time: 20 minutes
- Cook Time: 40 minutes
- Category: Dessert
- Method: Baking
- Cuisine: American
Nutrition
- Serving Size: 1 slice
- Calories: 450
- Sugar: 30g
- Sodium: 200mg
- Fat: 35g
- Saturated Fat: 20g
- Unsaturated Fat: 10g
- Trans Fat: 0g
- Carbohydrates: 40g
- Fiber: 2g
- Protein: 6g
- Cholesterol: 120mg
Keywords: chocolate mousse cheesecake, dessert, easy cheesecake recipe
")
")
")
")