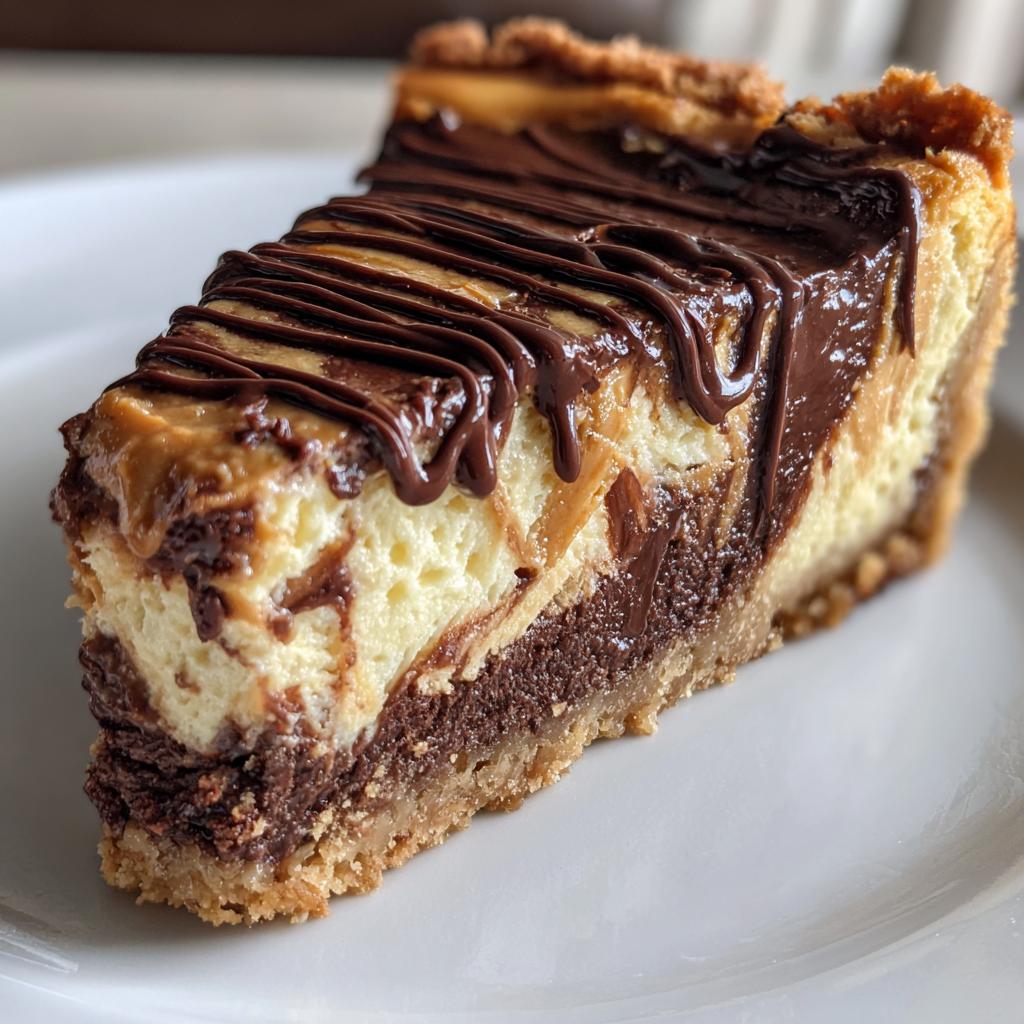
The first time I tried chocolate peanut butter cheesecake at a tiny Brooklyn bakery, I nearly melted into the floor. That perfect balance of rich chocolate, salty-sweet peanut butter, and that impossibly creamy texture? Absolute magic. I’ve spent years tweaking my own version – this recipe is the result of all those delicious experiments.
What makes this chocolate peanut butter cheesecake special? That velvety filling hugs your tongue like a hug from your favorite aunt, while the chocolate cookie crust adds just the right crunch. And here’s my secret – using dark chocolate instead of milk chocolate keeps it sophisticated rather than cloyingly sweet. Every bite reminds me why this combo is truly one of life’s greatest pleasures.
Funny story – I once messed up by using cold cream cheese straight from the fridge. The lumps! The tragedy! Now I religiously leave my ingredients out overnight. Trust me, it makes all the difference in achieving that satiny smooth texture we cheesecake lovers crave.
Why You’ll Love This Chocolate Peanut Butter Cheesecake
This isn’t just any cheesecake – it’s the dessert dreams are made of. Here’s why it’ll become your new obsession:
- Rich yet balanced: Dark chocolate cuts through the peanut butter’s richness for that perfect sweet-salty harmony
- Surprisingly simple: No fancy techniques – just mix, bake, and chill (the hardest part is waiting!)
- Universal crowd-pleaser: I’ve served this at everything from birthday parties to book clubs, and plates always come back licked clean
- Make-ahead magic: Actually tastes better after chilling overnight, making it perfect for stress-free entertaining
Pro tip: Keep napkins handy – this decadent beauty tends to disappear fast!
My Must-Have Ingredients for Chocolate Peanut Butter Cheesecake
Listen, I’ve learned the hard way – cheesecakes are divas when it comes to ingredients. Every component needs to be just right. Here’s exactly what goes into my signature chocolate peanut butter masterpiece:
- 200g chocolate cookies (crushed): I use Oreos (yes, with the filling – it adds extra richness!) crushed to sandy crumbs in my food processor
- 100g melted butter (unsalted): This binds our crust – unsalted lets us control the sweetness
- 500g cream cheese (room temperature): Full-fat Philadelphia is my ride-or-die here – cold cream cheese = lumpy disaster
- 150g granulated sugar: Not powdered, not brown – regular white sugar dissolves perfectly
- 200g smooth peanut butter: Use the regular kind, not natural – that separation is trouble
- 3 large eggs (room temp): Cold eggs can make the filling seize up – learned that the messy way
- 100g dark chocolate (70%): Chopped fine so it melts evenly into the batter
- 1 tsp vanilla extract: The good stuff – skip imitation unless you want sadness in dessert form
See how specific I’m being? That’s because cheesecake success lives in the details. Pro tip: Measure everything before starting – it’s called “mise en place” and makes you feel fancy while preventing mid-recipe panic!
Equipment You’ll Need
Alright, let’s talk tools! You don’t need anything fancy, but these basics will make your chocolate peanut butter cheesecake journey smooth as that creamy filling:
- 9-inch springform pan: Non-negotiable! The removable sides are cheesecake lifesavers
- Stand mixer or hand mixer: Your arm will thank you – cream cheese needs proper beating
- Rubber spatula: For scraping every last bit of that glorious batter
- Measuring cups and spoons: Precision matters with cheesecakes
- Food processor: Makes crushing those cookies a 10-second job
- Mixing bowls: One large, one medium – I like glass so I can microwave ingredients if needed
- Whisk: For gently incorporating eggs without overmixing
- Parchment paper: Optional but helpful for easy removal
That’s it! No special gadgets required. Though fair warning – once you taste this cheesecake, you might start eyeing fancy dessert torches for garnishes… not that I’m speaking from experience or anything.
How to Make Chocolate Peanut Butter Cheesecake
Alright friends, let’s get into the nitty-gritty of creating this dreamy dessert! I’ve broken it down into simple steps so you can nail it on your first try. Just follow along – I’ll be right there with you in spirit (probably sneaking spoonfuls of peanut butter while you work).
Preparing the Crust
First things first – that glorious chocolate cookie base! Here’s how I do it:
- Toss your chocolate cookies into the food processor and pulse until they look like dark sand (about 15-20 pulses). No processor? No problem! Seal them in a bag and roll with a rolling pin – great stress relief!
- Drizzle in the melted butter while mixing. You’ll know it’s ready when pinching a bit holds its shape.
- Press this magical mixture firmly into your springform pan using a measuring cup – really get in there! I go up the sides about 1 inch for extra crunch in every bite.
- Pop this in the freezer while you make the filling. This helps prevent a crumbly crust disaster later!
Making the Filling
Now for the star of the show – that silky peanut butter chocolate filling:
- Beat the room-temp cream cheese alone first – about 1 minute on medium. This breaks it up so no lumps ruin our smooth dreams.
- Add sugar and peanut butter. Beat another 2 minutes until it’s fluffy like a peanut butter cloud.
- With mixer on low, add eggs one at a time. Seriously – wait until each disappears completely before adding the next. Patience prevents cracks!
- Melt your dark chocolate (I microwave in 30-second bursts, stirring between) and gently fold it in with the vanilla. The batter should look like liquid silk at this point.
Baking and Cooling
The home stretch! Here’s how to bake it perfectly:
- Pour filling over your chilled crust. Smooth the top with a spatula – no perfection needed, it’ll settle as it bakes.
- Bake at 160°C (320°F) for 50-60 minutes. It’s done when the edges look set but the center still jiggles slightly when nudged.
- Turn off oven, crack the door, and let it cool slowly inside for 1 hour. This prevents dramatic sinking!
- Transfer to a wire rack to cool completely (about 2 hours), then refrigerate overnight. Yes, the full night – this transforms good cheesecake into legendary status.
See? Not nearly as scary as some fancy desserts make it out to be. Just remember – low and slow is the cheesecake mantra. Now try not to stare at your fridge all night waiting for that first slice!
Tips for the Perfect Chocolate Peanut Butter Cheesecake
After making this cheesecake more times than I can count (what? It’s for “quality control”), I’ve picked up some tricks that make all the difference between good and “oh-my-gosh-give-me-the-recipe” amazing:
- Room temp is non-negotiable: I leave my cream cheese and eggs out overnight. Cold ingredients = lumpy filling that bakes unevenly. If you forget (we’ve all been there!), microwave cream cheese in 15-second bursts until it gives when pressed.
- Mix gently after adding eggs: Once those eggs go in, keep the mixer on low speed and stop as soon as they’re incorporated. Overbeating adds too much air, which leads to cracks and a weird spongy texture. Think “just married,” not “whipped to oblivion.”
- The water bath secret: Wrap your springform pan bottom in foil, place it in a larger pan, and pour hot water halfway up the sides. This gentle heat prevents cracks and gives that creamy texture we all crave. Bonus: Your kitchen will smell like a chocolate peanut butter spa.
- Chill it like you mean it: I know it’s tempting, but hacking into a warm cheesecake is a crime against dessert. That overnight chill lets the flavors develop and gives the perfect sliceable texture. Pro tip: Mark your calendar for “cheesecake o’clock” tomorrow!
- Run a knife under hot water before slicing for picture-perfect pieces. Wipe between cuts for Instagram-worthy slices that’ll make your friends think you’re a pastry chef.
There you have it – my hard-earned cheesecake wisdom. Follow these, and you’ll be the chocolate peanut butter hero at every gathering. Just don’t blame me when people start requesting it weekly!
Variations and Substitutions
One of the best things about this chocolate peanut butter cheesecake is how adaptable it is! Whether you’re accommodating allergies or just feeling experimental, here are my favorite twists on the classic:
For gluten-free friends
Swap those chocolate cookies for gluten-free Oreos (they exist and taste amazing!) or gluten-free graham crackers. The crust still gets that perfect crunch – no one will know the difference. Just check that your peanut butter is certified GF too if needed.
Nut butter alternatives
Not a peanut fan? Try:
- Almond butter: Gives a slightly more sophisticated flavor
- Cashew butter: Ultra-creamy with a milder taste
- Sunflower seed butter: Perfect for nut-free gatherings
Pro tip: Stick to the same measurements, but know that natural nut butters might make the filling a bit softer.
Chocolate variations
Feeling fancy? Mix up your chocolate choices:
- White chocolate: For a sweeter, creamier version
- Milk chocolate: If dark is too intense for your crowd
- Chocolate chips: Fold in mini chips for extra chocolatey bites
- Espresso powder: Add 1 tsp to enhance the chocolate flavor without making it taste like coffee
Dairy-free options
For my lactose-intolerant pals:
- Use dairy-free cream cheese (the Violife brand works surprisingly well)
- Swap butter for coconut oil in the crust
- Choose a dairy-free chocolate – most dark chocolates over 70% are naturally dairy-free
The beauty is, no matter which version you choose, you still get that same magical creamy texture that makes this cheesecake so special. My advice? Try the classic version first, then start playing – I’d love to hear what delicious combinations you come up with!
Serving and Storing Chocolate Peanut Butter Cheesecake
Now for the best part – enjoying your masterpiece! Here’s how I like to serve and keep this chocolate peanut butter cheesecake tasting its absolute best:
Topping Ideas That’ll Make It Shine
While this cheesecake is stunning on its own, a little garnish never hurt anybody. My go-to options:
- Fresh whipped cream: Sweetened just slightly with powdered sugar – pipe it around the edges for fancy points
- Chocolate shavings: Use a vegetable peeler on a chocolate bar for elegant curls
- Caramel drizzle: That salty-sweet combo with peanut butter? Chef’s kiss!
- Crushed peanuts: Adds crunch and reinforces the peanut flavor
- Berry coulis: Raspberry or strawberry cuts through the richness beautifully
Pro tip: Add toppings right before serving so they stay fresh-looking. Except chocolate shavings – those can go on after chilling so they stick better.
Storage Tips for Maximum Freshness
Here’s how to keep your cheesecake tasting like it just came out of the oven:
- In the fridge: Cover tightly with plastic wrap or store in an airtight container. It’ll keep beautifully for 5 days (if it lasts that long!).
- Freezing: Slice before freezing for easy portions. Wrap each piece in plastic wrap, then foil. They’ll keep for up to 3 months – perfect for surprise cravings!
- Thawing: Transfer frozen slices to the fridge overnight or let sit at room temp for 30 minutes if you just can’t wait.
One last secret – the flavors actually deepen after a day or two in the fridge. So if you can resist diving in right away, you’ll be rewarded with an even more incredible taste experience. But no judgment if you sneak a sliver “for quality control” – I do it every time!
Chocolate Peanut Butter Cheesecake Nutrition
Let’s talk numbers – but don’t worry, this is the fun kind of math! Here’s the nutritional breakdown per slice of this glorious chocolate peanut butter cheesecake (based on 10 servings):
- Calories: 450
- Fat: 30g (15g saturated)
- Carbohydrates: 35g
- Sugar: 25g
- Protein: 8g
- Sodium: 300mg
- Fiber: 2g
Important note: These values are estimates based on the exact ingredients I use. Your numbers might vary slightly depending on:
- The specific brand of peanut butter you choose
- Whether you use natural or processed peanut butter
- The exact percentage of dark chocolate
- Any additional toppings you add
If you’re watching specific dietary needs, you can:
- Reduce sugar by 25g for a slightly less sweet version
- Use reduced-fat cream cheese (though texture may change)
- Swap sugar alternatives if needed (just check conversion rates)
But let’s be real – this is dessert, meant to be enjoyed in moderation as part of a balanced diet. My philosophy? Savor every bite of that creamy peanut butter chocolate goodness, maybe take an extra walk the next day, and call it a happy compromise!
Frequently Asked Questions
Can I use natural peanut butter?
You can, but be careful! Natural peanut butter tends to separate, which might make your filling oily. If you do use it, stir it really well first, and maybe reduce the butter in the crust by 10g. Personally? I stick with regular creamy peanut butter – it gives the most reliable results every time.
How do I prevent cracks in my cheesecake?
Three words: low and slow! Don’t overmix after adding eggs, bake at a moderate temperature (no higher than 160°C), and let it cool gradually in the turned-off oven. If a tiny crack does appear, just cover it with whipped cream or chocolate shavings – it’ll be our little secret!
Can I make this ahead of time?
Absolutely! In fact, I recommend it. This cheesecake tastes even better after chilling overnight. You can bake it up to 3 days before serving – just keep it covered in the fridge. The flavors have more time to develop into something magical.
Why does my filling look lumpy?
Ah, the dreaded lumps! This usually means your cream cheese was too cold. Always let it sit out until it’s room temperature (about 2 hours). In a pinch, microwave it in 15-second bursts, stirring between, until it’s soft but not melted.
Can I freeze leftovers?
You bet! Slice it first, then wrap each piece tightly in plastic wrap and foil. They’ll keep for about 3 months in the freezer. Thaw in the fridge overnight or at room temp for 30 minutes when that cheesecake craving hits!
Ready to Make Magic Happen?
There you have it – everything I’ve learned about creating the ultimate chocolate peanut butter cheesecake! From that first life-changing bite in Brooklyn to all my kitchen experiments since, this recipe represents years of delicious discovery. Now it’s your turn to experience that rich, creamy magic for yourself.
Grab your springform pan and favorite peanut butter – I can’t wait for you to taste this dreamy combination of flavors and textures. When you do, come back and tell me all about it! Did you stick to the classic version or try one of the fun variations? Any brilliant discoveries of your own? Leave a comment below with your results, questions, or that proud moment when you took your first perfect slice. Happy baking, friends – may your cheesecake be crack-free and your spoons always find their way back to the peanut butter jar!
Print
1 Perfect Chocolate Peanut Butter Cheesecake That Melts Hearts
- Total Time: 80 minutes
- Yield: 10 servings 1x
- Diet: Vegetarian
Description
A rich and creamy chocolate peanut butter cheesecake with a crunchy crust.
Ingredients
- 200g chocolate cookies
- 100g melted butter
- 500g cream cheese
- 150g sugar
- 200g peanut butter
- 3 eggs
- 100g dark chocolate
- 1 tsp vanilla extract
Instructions
- Preheat oven to 160°C (320°F).
- Crush cookies and mix with melted butter. Press into a springform pan.
- Beat cream cheese, sugar, and peanut butter until smooth.
- Add eggs one at a time, mixing well after each.
- Melt dark chocolate and fold it into the mixture with vanilla.
- Pour filling over the crust and bake for 50-60 minutes.
- Let cool, then refrigerate for at least 4 hours.
Notes
- Use room temperature cream cheese for smoother texture.
- Chill cheesecake overnight for best results.
- Top with extra chocolate or peanut butter drizzle if desired.
- Prep Time: 20 minutes
- Cook Time: 60 minutes
- Category: Dessert
- Method: Baking
- Cuisine: American
Nutrition
- Serving Size: 1 slice
- Calories: 450
- Sugar: 25g
- Sodium: 300mg
- Fat: 30g
- Saturated Fat: 15g
- Unsaturated Fat: 10g
- Trans Fat: 0g
- Carbohydrates: 35g
- Fiber: 2g
- Protein: 8g
- Cholesterol: 90mg
Keywords: chocolate peanut butter cheesecake, dessert, homemade cheesecake
")
")
")
")