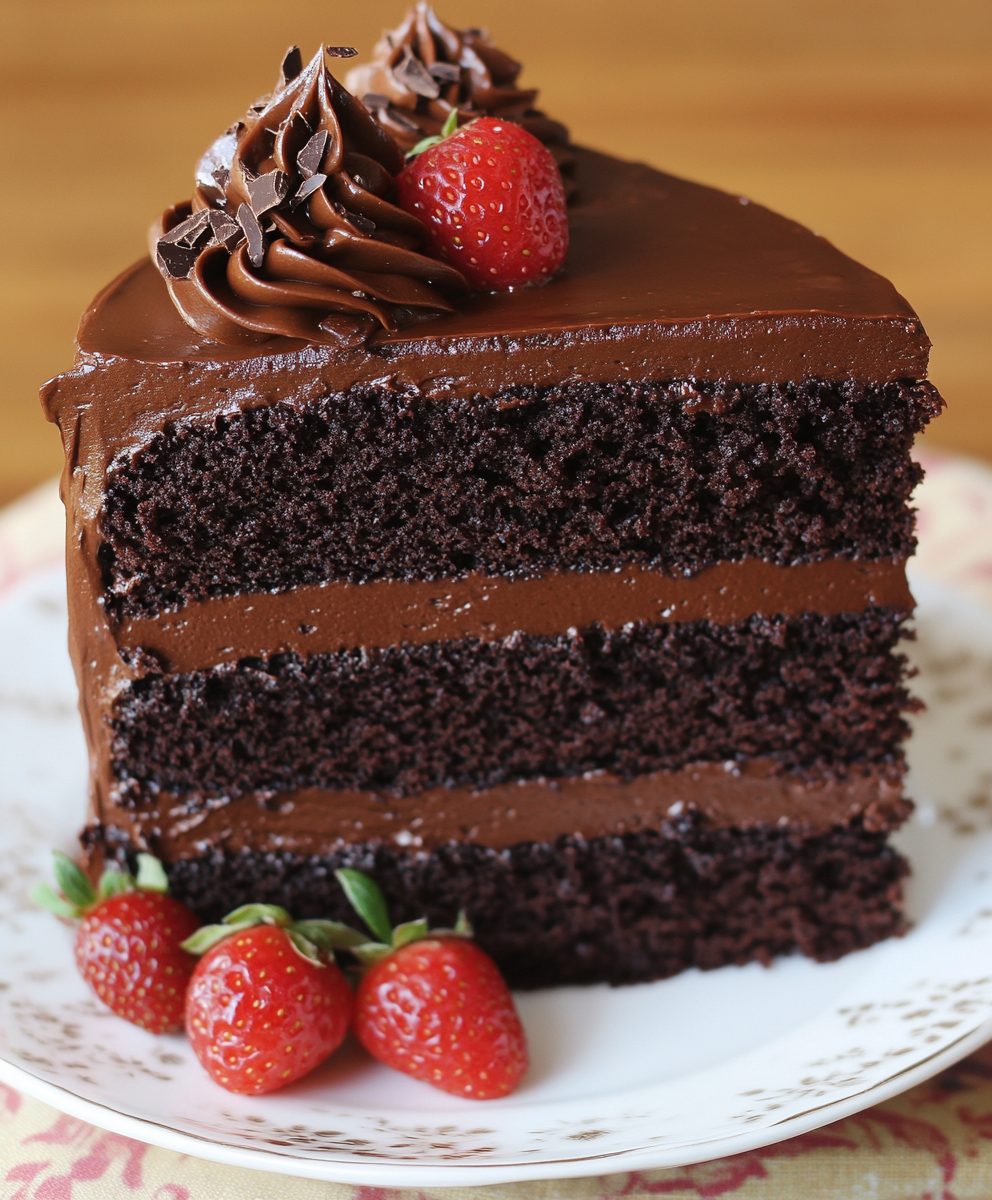
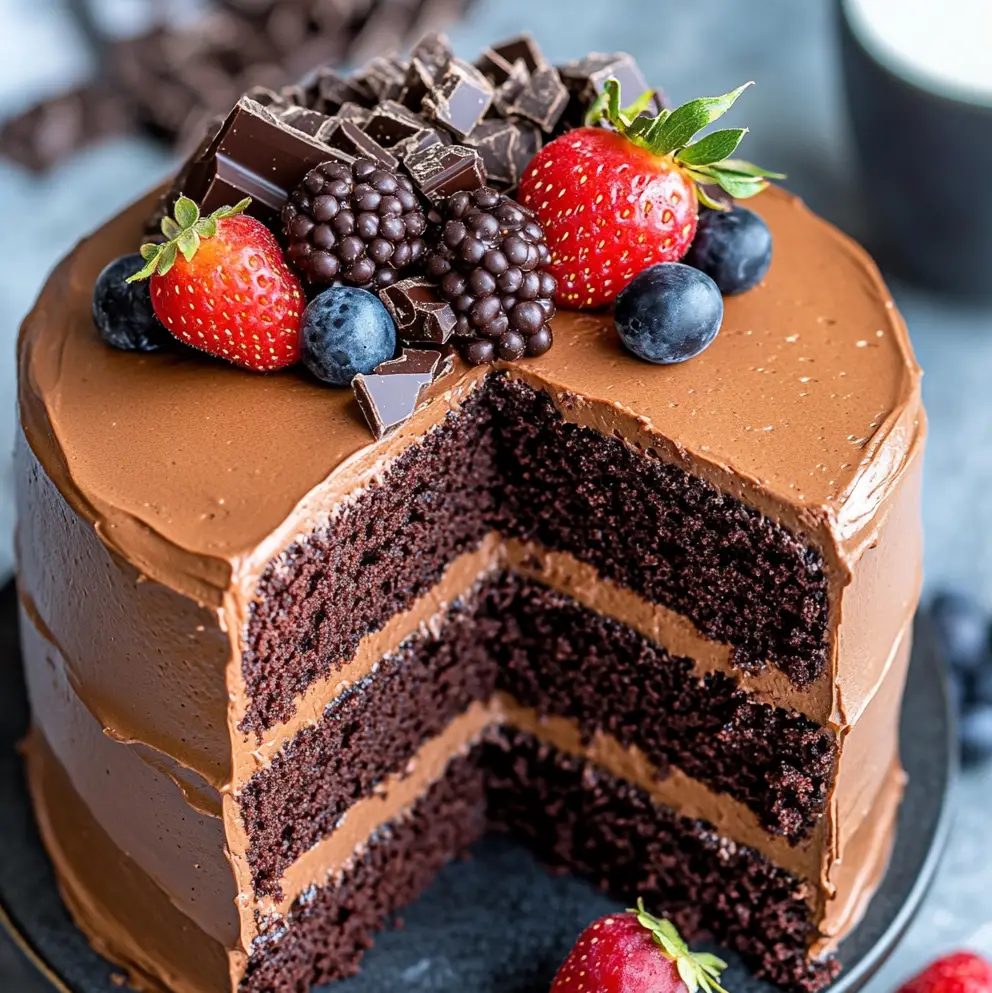
There’s something truly special about a Classic Chocolate Layer Cake. This delightful dessert has been a favorite for generations, bringing joy to countless celebrations. Whether it’s a birthday, anniversary, or just a simple family gathering, this cake never fails to impress. Its rich, moist layers combined with creamy chocolate frosting create a heavenly experience for chocolate lovers.
Ingredients for Classic Chocolate Layer Cake
To create a mouthwatering Classic Chocolate Layer Cake, you’ll need a selection of simple yet essential ingredients. Each component plays a vital role in achieving that rich flavor and moist texture we all love. Here’s what you’ll need:
- 🌾 All-purpose flour – 2 cups (240 g): This is the base of your cake, providing structure and stability.
- 🍫 Cocoa powder – 3/4 cup (75 g): This ingredient gives the cake its deep chocolate flavor and color.
- 🥄 Baking powder – 1 1/2 teaspoons: This leavening agent helps the cake rise, making it light and fluffy.
- 🍬 Granulated sugar – 2 cups (400 g): Sugar adds sweetness and moisture to the cake.
- 🥚 Eggs – 4 large: Eggs bind the ingredients together and contribute to the cake’s richness.
- 🥛 Milk – 1 cup (240 ml): Milk adds moisture and helps create a tender crumb.
- 🧈 Unsalted butter – 1 cup (226 g), softened: Butter adds flavor and richness, making the cake deliciously moist.
- 🍦 Vanilla extract – 2 teaspoons: This enhances the overall flavor of the cake.
- 🍫 Chocolate frosting – 2 cups: For layering and topping, this frosting is the crowning glory of your cake.
Gathering these ingredients is the first step toward baking your Classic Chocolate Layer Cake. Each item contributes to the cake’s delightful taste and texture, ensuring that every slice is a treat. Now that you have your ingredients ready, let’s move on to the tools you’ll need for this baking adventure!

Tools Needed for Classic Chocolate Layer Cake
Before diving into the baking process, it’s essential to gather the right tools. Having the proper equipment will make your experience smoother and more enjoyable. Here’s a list of tools you’ll need to create your Classic Chocolate Layer Cake:
- 🍽️ Mixing bowls: You’ll need at least two mixing bowls—one for dry ingredients and another for wet ingredients.
- 🎛️ Electric mixer: A hand or stand mixer will help you cream the butter and sugar effectively, ensuring a light and fluffy batter.
- 🥄 Measuring cups and spoons: Accurate measurements are crucial for baking. Use these to measure your ingredients precisely.
- 🍰 9-inch round cake pans: Two of these pans are necessary for baking the cake layers evenly.
- 🧊 Cooling racks: After baking, these racks allow your cakes to cool properly, preventing sogginess.
- 🍴 Spatula: A rubber or offset spatula is perfect for spreading frosting smoothly on your cake.
- 🔪 Knife or cake leveler: This tool helps you level the cake layers for a more professional look.
- 🎂 Cake stand or serving plate: Once your cake is frosted, a beautiful stand or plate will showcase your creation.
Having these tools on hand will set you up for success as you bake your Classic Chocolate Layer Cake. Each tool plays a role in ensuring that your cake turns out perfectly. Now that you’re equipped with the right tools, let’s move on to the step-by-step preparation of this delightful dessert!
Step-by-Step Preparation of Classic Chocolate Layer Cake
Now that you have your ingredients and tools ready, it’s time to dive into the exciting process of making your Classic Chocolate Layer Cake. Follow these steps carefully to ensure a delicious outcome!
Step 1: Preheat the Oven for Classic Chocolate Layer Cake
First things first, preheat your oven to 350°F (175°C). This step is crucial as it ensures that your cake bakes evenly. While the oven heats up, grease and flour two 9-inch round cake pans. This will help the cakes release easily once they are baked.
Step 2: Mix Dry Ingredients for Classic Chocolate Layer Cake
In a medium bowl, whisk together the all-purpose flour, cocoa powder, baking powder, and a pinch of salt. Mixing these dry ingredients first helps to evenly distribute the cocoa and baking powder throughout the flour. Set this mixture aside for later use.
Step 3: Cream Butter and Sugar for Classic Chocolate Layer Cake
In a large mixing bowl, use an electric mixer to cream the softened butter and granulated sugar together. Beat them on medium speed until the mixture is light and fluffy, which should take about 3-5 minutes. This step is important as it incorporates air into the batter, making your cake light and airy.
Step 4: Add Eggs and Vanilla to Classic Chocolate Layer Cake Mixture
Next, add the eggs one at a time to the butter and sugar mixture. Make sure to mix well after each addition. This helps to fully incorporate the eggs, ensuring a smooth batter. After adding the eggs, mix in the vanilla extract until everything is well combined.
Step 5: Combine Wet and Dry Ingredients for Classic Chocolate Layer Cake
Now it’s time to combine the wet and dry ingredients. Gradually add the dry mixture to the butter mixture, alternating with the milk. Start and end with the dry ingredients. Mix until just combined and smooth. Be careful not to overmix, as this can make the cake dense.
Step 6: Bake the Cakes for Classic Chocolate Layer Cake
Once your batter is ready, divide it evenly between the prepared cake pans. Place them in the preheated oven and bake for 30-35 minutes. To check if they are done, insert a toothpick into the center of the cakes. If it comes out clean, your cakes are ready!
Step 7: Cool the Cakes for Classic Chocolate Layer Cake
After baking, remove the cakes from the oven and let them cool in the pans for about 10 minutes. This allows them to set. Then, carefully turn them out onto wire racks to cool completely. Cooling is essential to prevent the frosting from melting when you apply it.
Step 8: Frost the Cake for Classic Chocolate Layer Cake
Once the cakes are completely cool, it’s time to frost! Place one layer on a serving plate and spread a generous layer of chocolate frosting on top. Then, place the second layer on top and frost the top and sides of the entire cake. Make sure to use a spatula for a smooth finish.
Step 9: Decorate the Classic Chocolate Layer Cake
For an elegant touch, consider decorating your Classic Chocolate Layer Cake with chocolate shavings on top. You can also add a few fresh berries for a pop of color. This not only enhances the cake’s appearance but also adds a delightful contrast in flavor.
Step 10: Serve the Classic Chocolate Layer Cake
Finally, slice the cake and serve it at room temperature. Enjoy this rich and decadent dessert with family and friends. Each bite of your Classic Chocolate Layer Cake will surely bring smiles and satisfaction!

Serving Suggestions for Classic Chocolate Layer Cake
When it comes to serving your Classic Chocolate Layer Cake, the options are as delightful as the cake itself! Here are some creative serving suggestions to elevate your dessert experience:
- 🍦 Pair with Ice Cream: A scoop of vanilla or mint chocolate chip ice cream complements the rich chocolate flavor perfectly. The cold creaminess contrasts beautifully with the warm cake.
- 🍓 Fresh Berries: Serve slices of cake with a side of fresh strawberries, raspberries, or blueberries. The tartness of the berries balances the sweetness of the cake.
- ☕ Accompany with Coffee: A cup of freshly brewed coffee or espresso enhances the chocolate flavor. The bitterness of coffee pairs wonderfully with the sweetness of the cake.
- 🍫 Drizzle with Chocolate Sauce: For an extra indulgent treat, drizzle warm chocolate sauce over each slice. This adds a luxurious touch that chocolate lovers will adore.
- 🥄 Top with Whipped Cream: A dollop of freshly whipped cream adds lightness and a creamy texture. You can also flavor the whipped cream with vanilla or a hint of almond extract.
- 🍯 Serve with Caramel Sauce: A drizzle of caramel sauce can add a sweet, buttery flavor that complements the chocolate beautifully.
These serving suggestions not only enhance the flavor of your Classic Chocolate Layer Cake but also create a more enjoyable experience for your guests. Whether it’s a special occasion or a casual gathering, these ideas will surely impress everyone at the table. So, get creative and enjoy every delicious bite!
Tips for Perfecting Your Classic Chocolate Layer Cake
Baking a Classic Chocolate Layer Cake can be a delightful experience, but there are a few tips that can help you achieve perfection. Here are some expert suggestions to ensure your cake turns out moist, flavorful, and visually stunning:
- 🧈 Use Room Temperature Ingredients: Make sure your eggs, butter, and milk are at room temperature before mixing. This helps create a smoother batter and ensures even baking.
- ⚖️ Measure Accurately: Baking is a science, so precise measurements are crucial. Use a kitchen scale for the best results, especially for flour and sugar.
- 🌡️ Don’t Overmix: Once you combine the wet and dry ingredients, mix just until combined. Overmixing can lead to a dense cake, which is not what you want!
- ⏲️ Check for Doneness: Ovens can vary, so start checking your cakes a few minutes before the recommended baking time. A toothpick should come out clean or with a few moist crumbs.
- ❄️ Cool Completely: Allow your cakes to cool completely before frosting. This prevents the frosting from melting and sliding off, ensuring a beautiful finish.
- 🍫 Chill the Frosting: If your frosting is too soft, chill it for a bit before spreading. This will make it easier to work with and help it hold its shape.
- 🎨 Experiment with Flavors: Don’t hesitate to add your twist! Consider adding espresso powder to enhance the chocolate flavor or a splash of almond extract for a unique taste.
- 🌿 Garnish Creatively: Use fresh mint leaves, edible flowers, or colorful sprinkles to make your cake visually appealing. A beautiful presentation can elevate the entire dessert experience.
By following these tips, you’ll be well on your way to creating a stunning and delicious Classic Chocolate Layer Cake. Each step is an opportunity to enhance your baking skills and impress your friends and family. Happy baking!
FAQs about Classic Chocolate Layer Cake
What is the best way to store Classic Chocolate Layer Cake?
To keep your Classic Chocolate Layer Cake fresh, store it in an airtight container. If you have leftover cake, place it in the fridge. This will help maintain its moisture and flavor. For longer storage, you can freeze the cake. Wrap it tightly in plastic wrap and then in aluminum foil. It can last up to three months in the freezer. Just remember to let it thaw in the fridge before serving!
Can I make Classic Chocolate Layer Cake ahead of time?
Absolutely! You can bake the layers of your Classic Chocolate Layer Cake a day or two in advance. Just make sure to cool them completely before wrapping them in plastic wrap. This will keep them moist. You can also frost the cake a day ahead. Just store it in the fridge. This way, you can save time on the day of your celebration!
What can I substitute for eggs in Classic Chocolate Layer Cake?
If you need an egg substitute for your Classic Chocolate Layer Cake, there are several options. You can use 1/4 cup of unsweetened applesauce for each egg. Another option is to use 1/4 cup of yogurt or buttermilk. For a vegan alternative, try using a flaxseed meal. Mix 1 tablespoon of flaxseed meal with 2.5 tablespoons of water and let it sit for a few minutes until it thickens. These substitutes will help bind the ingredients together just like eggs!
How can I make Classic Chocolate Layer Cake gluten-free?
To make a gluten-free Classic Chocolate Layer Cake, simply replace the all-purpose flour with a gluten-free flour blend. Make sure the blend contains xanthan gum, which helps provide structure. You can also use almond flour or coconut flour, but you may need to adjust the liquid ingredients. Always check the labels to ensure all your ingredients are gluten-free. This way, everyone can enjoy a slice of your delicious cake!
Conclusion on Classic Chocolate Layer Cake
In conclusion, the Classic Chocolate Layer Cake is more than just a dessert; it’s a celebration of flavors and memories. This cake has a unique ability to bring people together, whether it’s for a birthday, holiday, or simply a weekend treat. Its rich chocolate flavor, combined with the creamy frosting, creates a delightful experience that is hard to resist.
Print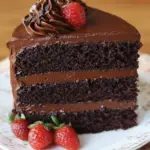
Classic Chocolate Layer Cake is a must-try dessert.
- Total Time: 1 hour 5 minutes
- Yield: 12 servings
- Diet: Vegetarian
Description
A Classic Chocolate Layer Cake that is rich, moist, and perfect for any celebration.
Ingredients
- 🌾 All-purpose flour – 2 cups (240 g)
- 🍫 Cocoa powder – 3/4 cup (75 g)
- 🥄 Baking powder – 1 1/2 teaspoons
- 🍬 Granulated sugar – 2 cups (400 g)
- 🥚 Eggs – 4 large
- 🥛 Milk – 1 cup (240 ml)
- 🧈 Unsalted butter – 1 cup (226 g), softened
- 🍦 Vanilla extract – 2 teaspoons
- 🍫 Chocolate frosting – 2 cups
Instructions
- Preheat your oven to 350°F (175°C) and grease and flour two 9-inch round cake pans.
- In a medium bowl, whisk together the all-purpose flour, cocoa powder, baking powder, and a pinch of salt.
- In a large mixing bowl, cream the softened butter and granulated sugar together until light and fluffy.
- Add the eggs one at a time, mixing well after each addition, then mix in the vanilla extract.
- Gradually add the dry mixture to the butter mixture, alternating with the milk, and mix until just combined.
- Divide the batter evenly between the prepared cake pans and bake for 30-35 minutes.
- Let the cakes cool in the pans for about 10 minutes, then turn them out onto wire racks to cool completely.
- Frost the first layer with chocolate frosting, place the second layer on top, and frost the top and sides of the cake.
- Decorate with chocolate shavings or fresh berries if desired.
- Slice and serve at room temperature.
Notes
- Use room temperature ingredients for better mixing.
- Measure ingredients accurately for best results.
- Do not overmix the batter to avoid a dense cake.
- Check for doneness a few minutes before the recommended baking time.
- Cool cakes completely before frosting to prevent melting.
- Prep Time: 30 minutes
- Cook Time: 35 minutes
- Category: Dessert
- Method: Baking
- Cuisine: American
Nutrition
- Serving Size: 1 slice
- Calories: 450
- Sugar: 35g
- Sodium: 300mg
- Fat: 20g
- Saturated Fat: 10g
- Unsaturated Fat: 8g
- Trans Fat: 0g
- Carbohydrates: 60g
- Fiber: 3g
- Protein: 6g
- Cholesterol: 80mg
Keywords: Chocolate Cake, Layer Cake, Dessert, Baking
")
")
")
")