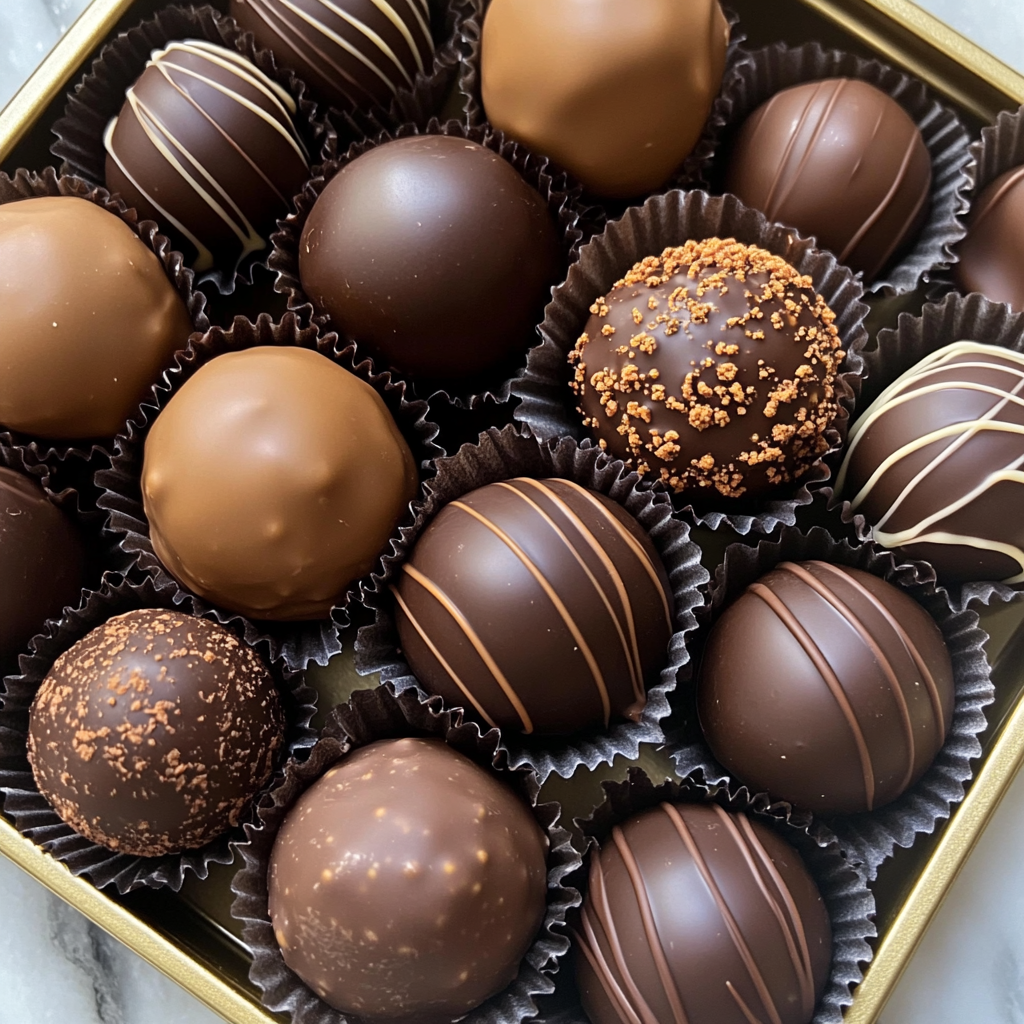
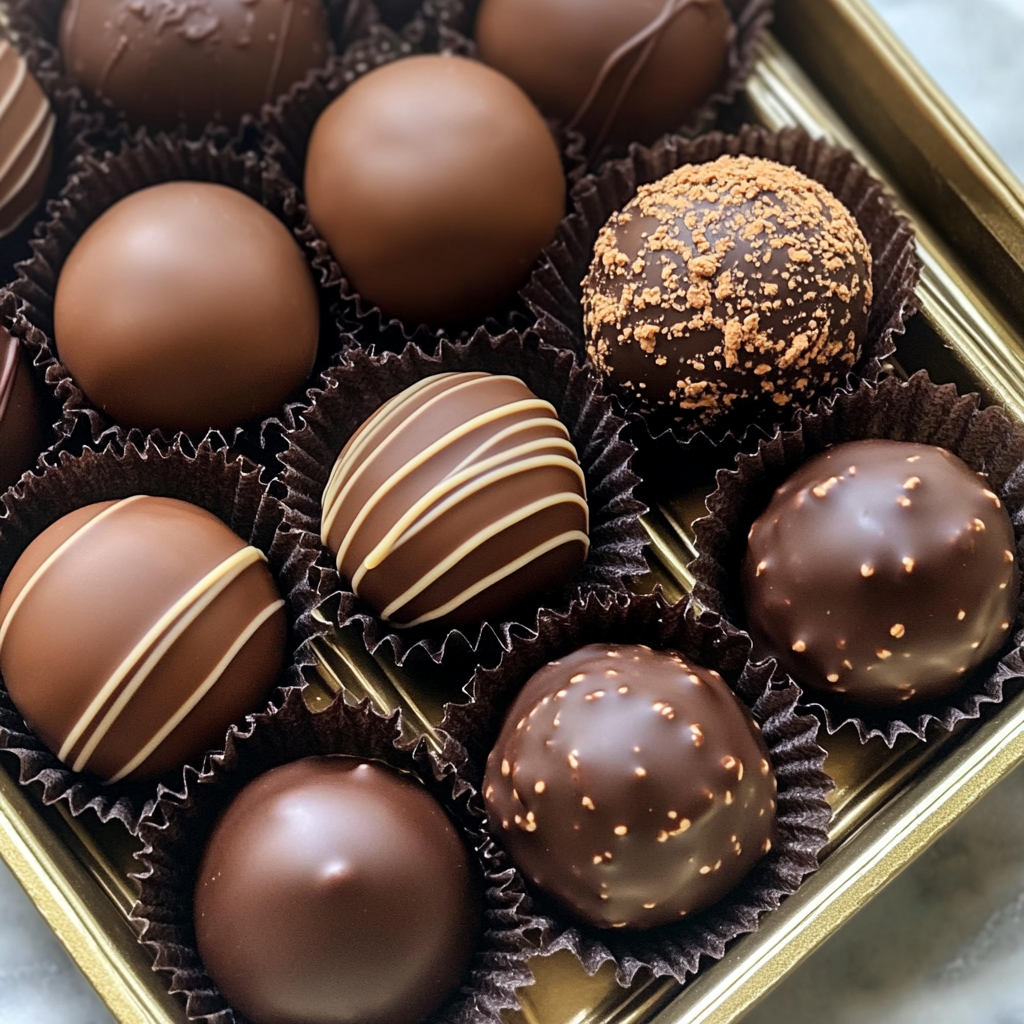
Ah, classic chocolate truffles! Just the thought of them makes my heart skip a beat. These little bites of heaven are rich, creamy, and oh-so-decadent. At their core, classic chocolate truffles are made from a simple mixture of dark chocolate, heavy cream, and butter. When combined, they create a luscious ganache that melts in your mouth like a warm hug on a chilly day. I love how versatile they are, too! You can coat them in cocoa powder, nuts, or even drizzle them with more chocolate for that extra touch of elegance.
Ingredients for Classic Chocolate Truffles
Before diving into the delightful world of classic chocolate truffles, let’s gather our ingredients. I always find that having everything prepped and ready makes the cooking process smoother and more enjoyable. Here’s what you’ll need to create these little bites of bliss:
- 🍫 Dark Chocolate: 200g (about 7 oz), finely chopped. This is the star of the show! I prefer using high-quality dark chocolate with at least 70% cocoa for that rich flavor.
- 🥛 Heavy Cream: 100ml (about 1/2 cup). This adds the creaminess that makes the truffles melt in your mouth.
- 🧈 Unsalted Butter: 25g (about 2 tablespoons). Butter gives the truffles a silky texture and enhances the chocolate flavor.
- 🍫 Cocoa Powder: for dusting (about 50g or 1/2 cup). This is what gives the truffles that classic look and a slight bitterness that balances the sweetness.
- 🌿 Vanilla Extract: 1 teaspoon. A splash of vanilla adds warmth and depth to the flavor profile.
As I gather these ingredients, I can’t help but feel excited. Each one plays a crucial role in creating the perfect truffle. The dark chocolate is like the canvas, while the cream and butter are the brushstrokes that bring it to life. And let’s not forget the cocoa powder, which adds that finishing touch, like a sprinkle of magic dust!
When I first started making these truffles, I experimented with different types of chocolate. I found that using a mix of dark and milk chocolate can create a delightful balance of flavors. But for the classic version, sticking to dark chocolate is the way to go. It’s rich, it’s bold, and it’s simply irresistible!
Now that we have our ingredients ready, let’s move on to the tools we’ll need to whip up these delicious classic chocolate truffles.
Tools Needed for Classic Chocolate Truffles
Before we embark on our chocolate truffle adventure, let’s make sure we have the right tools at our disposal. Having the right equipment can make all the difference in the kitchen. I remember the first time I attempted to make these truffles; I was scrambling around looking for things! So, to save you from that chaos, here’s a handy list of tools you’ll need:
- Heatproof Bowl: This is where the magic begins! A glass or ceramic bowl works best for melting the chocolate.
- Small Saucepan: You’ll need this to heat the heavy cream. A saucepan with a thick bottom helps prevent scorching.
- Spatula or Whisk: A silicone spatula is perfect for stirring the chocolate and cream together. It’s gentle and won’t scratch your bowl.
- Cookie Scoop or Melon Baller: This handy tool helps you shape the truffles into uniform balls. If you don’t have one, your hands will do just fine!
- Parchment Paper: Line your baking sheet with parchment paper to prevent the truffles from sticking. It makes cleanup a breeze!
- Refrigerator: Not a tool in the traditional sense, but you’ll need this to chill your truffle mixture until it’s firm enough to scoop.
As I gather these tools, I can’t help but feel a sense of anticipation. Each item has its purpose, like a team working together to create something beautiful. The heatproof bowl cradles the chocolate, while the spatula gently folds in the cream, creating that luscious ganache. And when it’s time to shape the truffles, the cookie scoop ensures that each one is a perfect little sphere of joy.
Once you have everything ready, you’ll be all set to dive into the delightful process of making classic chocolate truffles. Trust me, the satisfaction of creating these treats from scratch is worth every moment spent in the kitchen!
Step-by-Step Preparation of Classic Chocolate Truffles
Step 1: Preparing the Chocolate Mixture
Now that we have our ingredients and tools ready, it’s time to dive into the heart of the process: preparing the chocolate mixture. This step is where the magic truly begins! I remember the first time I melted chocolate; it felt like I was creating something special. Here’s how to do it:
First, take your heatproof bowl and add the finely chopped dark chocolate. I love using a sharp knife to chop the chocolate into small pieces. It helps it melt evenly and quickly. Then, in a small saucepan, pour in the heavy cream and place it over medium heat. As the cream heats up, keep an eye on it. You want it to simmer gently, not boil. The moment you see tiny bubbles forming around the edges, it’s time to pour!
Once the cream is hot, carefully pour it over the chopped chocolate. I like to let it sit for about two minutes. This waiting period allows the chocolate to soften and melt beautifully. It’s like watching a beautiful sunset; you just have to be patient. After two minutes, grab your spatula and gently stir the mixture until it becomes smooth and glossy. The aroma of melted chocolate is simply divine, and I can’t help but sneak a taste!
Step 2: Chilling the Mixture
With our chocolate mixture now silky and smooth, it’s time to chill it. This step is crucial for achieving the perfect truffle texture. I always cover the bowl with plastic wrap to keep it fresh. Then, I pop it into the refrigerator for about 1-2 hours. During this time, the mixture firms up, making it easier to scoop and shape into those delightful little balls.
While I wait, I often find myself daydreaming about all the different flavors I could add to my truffles. Sometimes, I’ll think about adding a hint of orange zest or a splash of espresso for a little kick. The possibilities are endless! But for now, I focus on the classic version, letting the rich chocolate flavor shine through.
Step 3: Shaping the Truffles
Once the mixture is firm enough to scoop, it’s time for the fun part: shaping the truffles! I take my cookie scoop and gently scoop out a portion of the chilled chocolate mixture. If you don’t have a scoop, don’t worry! You can use your hands to roll them into balls. I find that using my hands adds a personal touch to each truffle.
As I roll the mixture between my palms, I can feel the warmth of my hands melting the chocolate just slightly, making it easier to shape. I aim for about 1 inch in diameter for each truffle. Once I have a nice little ball, I place it on a parchment-lined baking sheet. The sight of those little chocolate spheres lined up is enough to make my heart flutter with excitement!
Step 4: Coating the Truffles
Now comes the final step: coating the truffles! I love this part because it’s where the truffles truly come to life. I take a small bowl filled with cocoa powder and roll each truffle in it until it’s fully coated. The cocoa powder adds a beautiful contrast to the rich chocolate inside, and it gives each truffle that classic look.
As I roll them, I can’t help but shake off any excess cocoa powder. It’s like giving each truffle a little dusting of magic! Once they’re all coated, I place them back on the parchment paper. At this point, I can hardly wait to share them with my family and friends. The anticipation is almost as sweet as the truffles themselves!
And there you have it! The step-by-step preparation of classic chocolate truffles is complete. Each step is filled with joy and creativity, and I can’t wait for you to experience the same delight in your kitchen!
Serving Suggestions for Classic Chocolate Truffles
Pairing Classic Chocolate Truffles with Beverages
Now that we’ve crafted these delightful classic chocolate truffles, it’s time to think about how to enjoy them to the fullest. One of my favorite ways to elevate the experience is by pairing them with the perfect beverage. The right drink can enhance the rich flavors of the truffles and create a truly indulgent moment.
For a classic pairing, I often reach for a glass of red wine. A bold Cabernet Sauvignon or a smooth Merlot complements the deep chocolate flavor beautifully. The tannins in the wine cut through the richness of the truffles, creating a harmonious balance. It’s like a dance of flavors on your palate!
If you’re in the mood for something a bit lighter, a cup of freshly brewed coffee or espresso is another fantastic option. The warm, robust notes of coffee enhance the chocolate, making each bite even more satisfying. I love to sip my coffee slowly while savoring a truffle, allowing the flavors to mingle and create a cozy moment.
For those who prefer non-alcoholic options, a rich hot chocolate can be a delightful companion. I like to make mine with a splash of vanilla and a sprinkle of cinnamon for an extra touch of warmth. The creamy texture of the hot chocolate pairs perfectly with the truffles, making it a comforting treat on a chilly day.
Creative Ways to Present Classic Chocolate Truffles
Presentation is key when it comes to serving classic chocolate truffles. After all, we eat with our eyes first! I love to get a little creative when it’s time to showcase my truffles. One of my favorite methods is to arrange them on a beautiful platter, dusted with a light sprinkle of cocoa powder or even edible gold dust for a touch of elegance.
Another fun idea is to place the truffles in decorative cupcake liners. This not only adds a pop of color but also makes them easy to grab and enjoy. I often mix and match different colors and patterns to create a festive display, especially for special occasions.
If I’m feeling particularly adventurous, I’ll create a truffle tower! Stacking the truffles in a pyramid shape on a cake stand adds height and drama to the presentation. It’s a showstopper that’s sure to impress guests at any gathering.
Lastly, I love to pair my truffles with fresh fruits like strawberries or raspberries. The tartness of the fruit contrasts beautifully with the sweetness of the chocolate, creating a delightful combination. Plus, it adds a pop of color to the plate, making it even more inviting!
With these serving suggestions, you’re all set to enjoy your classic chocolate truffles in style. Whether you’re indulging solo or sharing with loved ones, these little bites of joy are sure to bring smiles and satisfaction to any occasion!
Tips for Perfecting Classic Chocolate Truffles
Common Mistakes to Avoid
As I’ve journeyed through the world of chocolate truffles, I’ve learned a few lessons along the way. Trust me, avoiding these common mistakes can make all the difference in your truffle-making experience. Here are some pitfalls to watch out for:
- Overheating the Cream: One of the biggest mistakes I made early on was letting the cream boil. This can cause the chocolate to seize up, turning it into a grainy mess. Remember, we want a gentle simmer, not a rolling boil!
- Not Chilling Long Enough: Patience is key! If you don’t chill the mixture long enough, it will be too soft to scoop. I’ve been there, and it’s frustrating when your truffles turn into a gooey puddle instead of beautiful balls.
- Using Low-Quality Chocolate: The chocolate you choose makes a huge impact on flavor. I’ve tried making truffles with cheap chocolate, and let me tell you, the taste was far from heavenly. Always opt for high-quality dark chocolate for the best results.
- Skipping the Dusting: Dusting the truffles in cocoa powder or another coating is not just for looks; it adds flavor and texture. I’ve made the mistake of skipping this step, and the truffles felt incomplete. Don’t forget this final touch!
By keeping these tips in mind, you’ll be well on your way to creating perfect classic chocolate truffles that will impress everyone who gets a taste. Each mistake is a stepping stone to becoming a better home cook, and I’m excited for you to embark on this delicious journey!
Variations on Classic Chocolate Truffles
While classic chocolate truffles are undeniably delicious, I love to experiment with different flavors and ingredients to create unique variations. It’s like adding a splash of color to a beautiful painting! Here are some of my favorite twists on the classic recipe:
- Orange Zest: Adding a teaspoon of freshly grated orange zest to the chocolate mixture gives the truffles a bright, citrusy flavor. It’s like a burst of sunshine in every bite!
- Espresso Powder: For coffee lovers, mixing in a teaspoon of espresso powder enhances the chocolate flavor and adds a delightful kick. It’s perfect for those cozy mornings when you need a little pick-me-up.
- Nutty Delight: Incorporate finely chopped nuts, like hazelnuts or almonds, into the chocolate mixture for added crunch and flavor. You can also roll the truffles in crushed nuts instead of cocoa powder for a delightful texture.
- Spicy Kick: If you’re feeling adventurous, try adding a pinch of cayenne pepper or chili powder to the chocolate mixture. The heat pairs surprisingly well with the rich chocolate, creating a unique flavor experience.
- Liqueur Infusion: A splash of your favorite liqueur, such as Grand Marnier or Baileys, can elevate the truffles to a whole new level. Just be sure to adjust the amount of cream accordingly to maintain the right consistency.
These variations allow you to personalize your classic chocolate truffles and impress your friends and family with your creativity. Each twist brings a new adventure in flavor, and I can’t wait for you to try them all!
FAQs About Classic Chocolate Truffles
How long do Classic Chocolate Truffles last?
Ah, the age-old question of how long these delightful treats can last! When stored properly in an airtight container in the refrigerator, classic chocolate truffles can last up to a week. However, I must admit, they rarely last that long in my house! The rich flavors tend to get even better as they sit, but I recommend enjoying them within the first few days for the best texture and taste. If you want to keep them longer, you can freeze them for up to three months. Just remember to let them thaw in the fridge before indulging!
Can I use different types of chocolate for Classic Chocolate Truffles?
Absolutely! While I adore the classic version made with dark chocolate, experimenting with different types of chocolate can lead to some delicious results. You can use milk chocolate for a sweeter, creamier truffle or even white chocolate for a unique twist. Just keep in mind that the ratios of cream and butter may need slight adjustments depending on the chocolate you choose. Each type brings its own personality to the truffles, and I love discovering new favorites!
What is the best way to store Classic Chocolate Truffles?
Storing classic chocolate truffles is quite simple! I recommend placing them in an airtight container to keep them fresh and prevent them from absorbing any odors from the fridge. If you’ve rolled them in cocoa powder, be aware that they may lose some of that beautiful dusting over time. To maintain their appearance, you can dust them again before serving. If you’re planning to freeze them, make sure to separate layers with parchment paper to prevent sticking. Trust me, a little extra care goes a long way!
Are Classic Chocolate Truffles gluten-free?
Yes, classic chocolate truffles are naturally gluten-free! The main ingredients—dark chocolate, heavy cream, and butter—do not contain gluten. However, if you’re using any additional flavorings or coatings, like certain liqueurs or flavored powders, it’s always a good idea to check the labels. I love making these truffles for friends with dietary restrictions, and they’re always a hit! Just be sure to use gluten-free ingredients to keep them safe for everyone to enjoy.
Conclusion: Enjoying Your Classic Chocolate Truffles
As I wrap up this delightful journey into the world of classic chocolate truffles, I can’t help but feel a sense of joy and satisfaction. Making these little bites of bliss is not just about the end result; it’s about the entire experience. From gathering the ingredients to shaping and coating each truffle, every step is filled with love and creativity. I hope you’ve felt that same excitement as you followed along!
Print
Classic Chocolate Truffles: Indulge in Pure Bliss Today!
- Total Time: 2 hours 40 minutes
- Yield: 20 truffles
- Diet: Vegetarian
Description
Classic chocolate truffles are rich, creamy, and decadent bites made from dark chocolate, heavy cream, and butter, perfect for any occasion.
Ingredients
- 🍫 Dark Chocolate: 200g (about 7 oz), finely chopped
- 🥛 Heavy Cream: 100ml (about 1/2 cup)
- 🧈 Unsalted Butter: 25g (about 2 tablespoons)
- 🍫 Cocoa Powder: for dusting (about 50g or 1/2 cup)
- 🌿 Vanilla Extract: 1 teaspoon
Instructions
- Prepare the chocolate mixture by melting dark chocolate with hot heavy cream.
- Chill the mixture in the refrigerator for 1-2 hours until firm.
- Scoop and shape the chilled mixture into 1-inch balls.
- Coat the truffles in cocoa powder and place them on parchment paper.
Notes
- Overheating the cream can cause the chocolate to seize.
- Chill the mixture long enough for easy scooping.
- Use high-quality chocolate for the best flavor.
- Dusting the truffles is essential for flavor and texture.
- Prep Time: 30 minutes
- Cook Time: 10 minutes
- Category: Dessert
- Method: No-bake
- Cuisine: French
Nutrition
- Serving Size: 1 truffle
- Calories: 100
- Sugar: 5g
- Sodium: 5mg
- Fat: 7g
- Saturated Fat: 4g
- Unsaturated Fat: 2g
- Trans Fat: 0g
- Carbohydrates: 9g
- Fiber: 1g
- Protein: 1g
- Cholesterol: 10mg
Keywords: chocolate truffles, dessert, no-bake, French dessert, indulgent treats
")
")
")
")