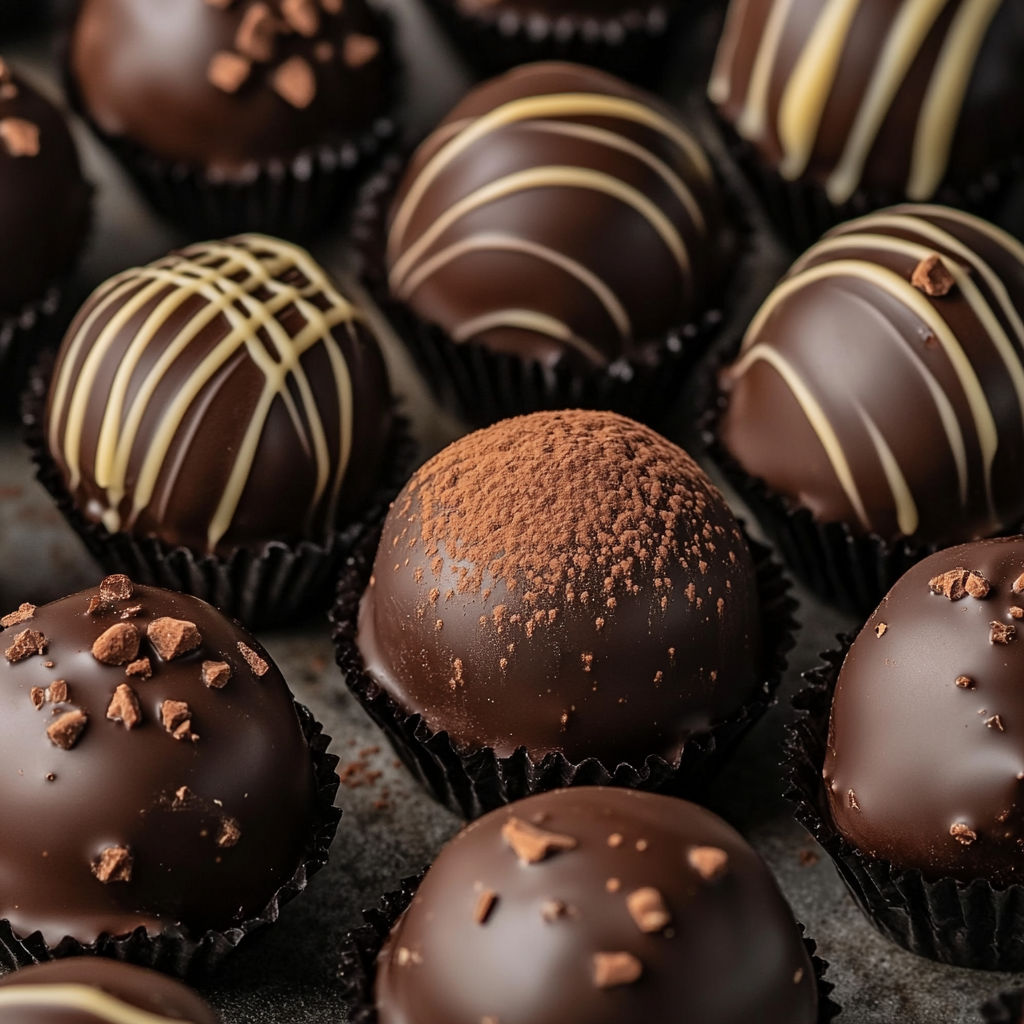
As a passionate home cook, I find immense joy in creating sweet treats that bring smiles to faces. One of my all-time favorites is the Classic Dark Chocolate Truffles Recipe. These little bites of heaven are not just desserts; they are an experience. Each truffle is a delightful explosion of rich chocolate flavor that melts in your mouth, leaving you craving more. Whether you’re celebrating a special occasion or simply indulging yourself, these truffles are the perfect choice.
Ingredients for Classic Dark Chocolate Truffles Recipe
Before we dive into the delightful process of making Classic Dark Chocolate Truffles, let’s gather our ingredients. Each component plays a vital role in creating that rich, melt-in-your-mouth experience. Here’s what you’ll need:
- 🍫 Dark Chocolate: 8 oz (finely chopped) – The star of the show! Choose a high-quality dark chocolate with at least 60% cocoa for a deep, rich flavor.
- 🥛 Heavy Cream: 1/2 cup (120 ml) – This adds creaminess and helps create that luscious ganache.
- 🧈 Unsalted Butter: 2 tablespoons (28 g) – A little butter goes a long way in enhancing the truffle’s smooth texture.
- 🍫 Cocoa Powder: 1/4 cup (for dusting) – This gives the truffles a beautiful finish and a hint of bitterness that balances the sweetness.
- 🌿 Vanilla Extract: 1 teaspoon – A splash of vanilla adds warmth and depth to the flavor.
As I gather these ingredients, I can’t help but feel excited. The dark chocolate, in particular, is like a treasure waiting to be unveiled. I often find myself standing in the chocolate aisle, contemplating which bar to choose. The right chocolate can make all the difference! I recommend picking a brand you love, as it will shine through in the final product.
Once you have everything ready, you’ll be amazed at how simple it is to create these decadent truffles. The ingredients are straightforward, but the magic happens when they come together. So, let’s get ready to transform these humble ingredients into something extraordinary!
Tools Needed for Classic Dark Chocolate Truffles Recipe
Before we embark on our truffle-making journey, it’s essential to gather the right tools. Having the right equipment not only makes the process smoother but also adds to the fun! Here’s a list of the tools I find indispensable when whipping up my Classic Dark Chocolate Truffles Recipe:
- 🍽️ Medium Heatproof Bowl: This is where the magic begins! A bowl that can withstand heat is crucial for melting the chocolate.
- 🔥 Small Saucepan: You’ll need this to heat the heavy cream. A saucepan with a thick bottom helps prevent scorching.
- 🥄 Spatula or Whisk: A spatula is perfect for stirring the ganache until it’s smooth and glossy. A whisk can also work wonders!
- 🧊 Plastic Wrap: This will cover your ganache while it chills in the fridge, keeping it fresh and ready for shaping.
- 🍪 Cookie Scoop or Teaspoon: These tools are great for portioning out the ganache. A cookie scoop makes it easy to get uniform truffles!
- 🍽️ Shallow Dish: You’ll need this for rolling the truffles in cocoa powder. A wide dish allows for easy coating.
- 🥡 Airtight Container: Once your truffles are ready, store them in a container to keep them fresh and delicious.
As I gather these tools, I can’t help but feel a sense of anticipation. Each item has its purpose, and together they create a symphony of flavors and textures. I remember the first time I made truffles; I was a bit overwhelmed by the process. But with the right tools, everything fell into place, and I ended up with a batch of truffles that made my heart sing!
So, let’s make sure we have everything ready before we dive into the step-by-step preparation. Trust me, having these tools on hand will make your truffle-making experience not only easier but also more enjoyable!
Step-by-Step Preparation of Classic Dark Chocolate Truffles Recipe
Now that we have our ingredients and tools ready, it’s time to dive into the delightful process of making Classic Dark Chocolate Truffles. I love this part because it’s where the magic truly happens! Each step is simple yet rewarding, and I can’t wait to share my journey with you. Let’s get started!
Step 1: Preparing the Chocolate Ganache
The first step is all about creating that luscious chocolate ganache. I start by placing the finely chopped dark chocolate in a medium heatproof bowl. The chocolate is like a canvas, waiting for the creamy masterpiece to come. Next, I heat the heavy cream in a small saucepan over medium heat. I keep a close eye on it, waiting for those tiny bubbles to form around the edges. It’s important not to let it boil, as that can change the texture of our ganache.
Once the cream is just about to simmer, I pour it over the chopped chocolate. This is the moment I love the most! I let it sit for about 2-3 minutes, allowing the heat to work its magic and soften the chocolate. The aroma that fills the air is simply divine! After a few minutes, I add the unsalted butter and vanilla extract. With a spatula, I gently stir the mixture until it becomes smooth and glossy. It’s like watching a beautiful transformation unfold right before my eyes!
Step 2: Chilling the Ganache
Now that our ganache is ready, it’s time to let it chill. I cover the bowl with plastic wrap and pop it into the refrigerator. This is where patience comes into play! I usually let it chill for about 1-2 hours, or until it’s firm enough to scoop. During this time, I often find myself daydreaming about how delicious these truffles will be. The anticipation is half the fun!
While waiting, I sometimes prepare a cup of tea or coffee to sip on. It’s a lovely way to pass the time and get into the cozy spirit of truffle-making. Plus, it gives me a moment to reflect on all the delicious variations I can try in the future!
Step 3: Shaping the Truffles
Once the ganache is firm, it’s time for the fun part—shaping the truffles! I take out the bowl and grab my trusty cookie scoop. Using the scoop, I portion out the ganache and roll each portion between my palms to form smooth balls. It’s like crafting little chocolate treasures! I love the feeling of the cool ganache in my hands, and I can’t help but sneak a taste of the rich chocolate as I work.
As I shape the truffles, I often think about how each one is unique. Some may be a bit larger or smaller, but that’s what makes them special! I usually end up with a mix of sizes, and I find that adds to their charm. Plus, it gives me a reason to sample a few along the way!
Step 4: Coating the Truffles
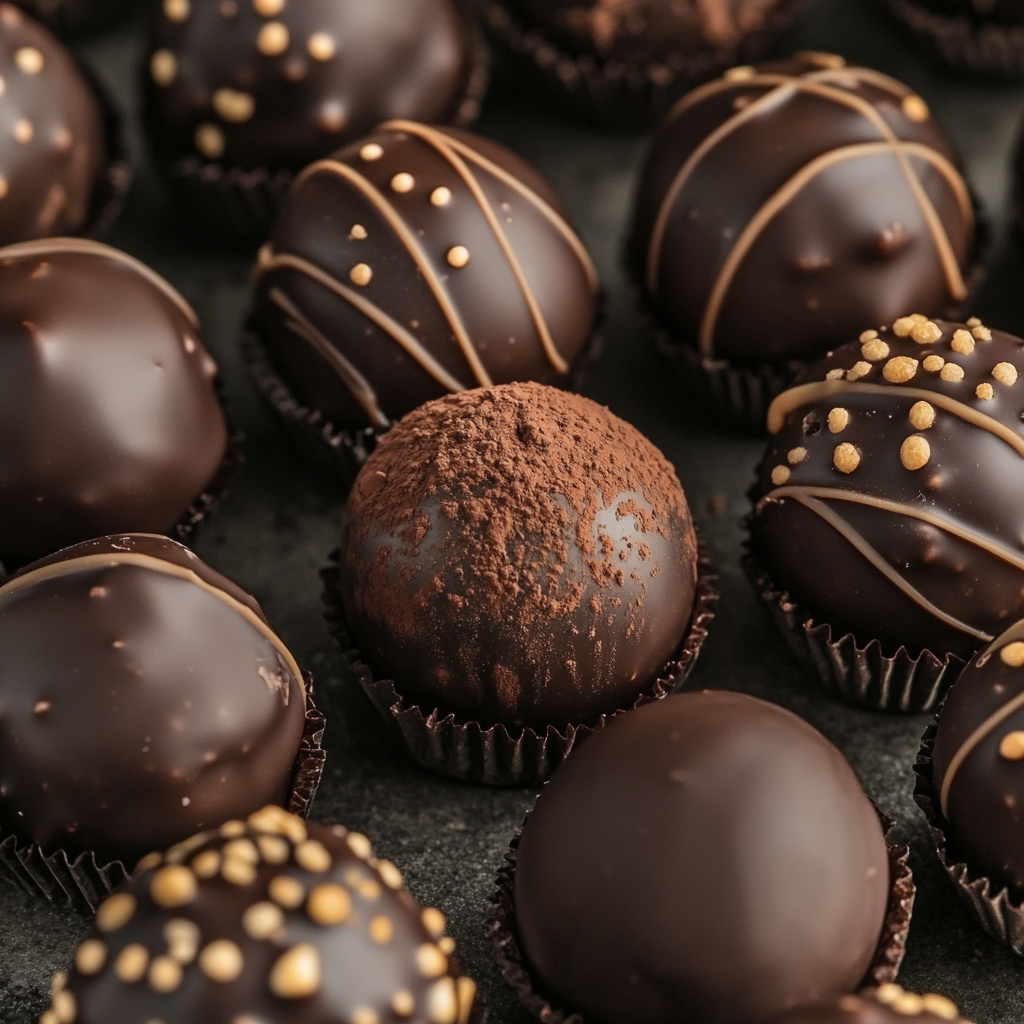
Now comes the final touch—coating the truffles! I pour the cocoa powder into a shallow dish, creating a cozy little bed for my truffles. One by one, I roll each truffle in the cocoa powder until they are fully coated. It’s like giving them a warm, chocolatey hug! I gently shake off any excess cocoa, making sure they look just right.
As I finish coating the last truffle, I can’t help but admire my handiwork. The rich, dark color of the cocoa powder against the glossy chocolate is simply stunning. I often take a moment to appreciate the beauty of these little bites before placing them in an airtight container. It’s a satisfying end to a delightful process, and I can hardly wait to share them with friends and family!
Serving Suggestions for Classic Dark Chocolate Truffles Recipe
Now that we’ve crafted our Classic Dark Chocolate Truffles, it’s time to think about how to serve them. Presentation and pairing can elevate these delightful treats to a whole new level! I love to get creative when it comes to serving, and I can’t wait to share some of my favorite ideas with you.
Pairing with Beverages
One of the best parts about enjoying truffles is pairing them with the perfect beverage. The right drink can enhance the rich flavors of the chocolate and create a delightful experience. Here are some of my go-to pairings:
- ☕ Coffee: A rich cup of coffee is a classic choice. The bitterness of the coffee complements the sweetness of the truffles beautifully. I often brew a strong espresso or a velvety cappuccino to enjoy alongside my truffles.
- 🍷 Red Wine: If you’re feeling fancy, a glass of full-bodied red wine, like Cabernet Sauvignon or Merlot, pairs wonderfully with dark chocolate. The fruity notes in the wine enhance the chocolate’s depth, making each bite even more indulgent.
- 🥛 Milk: For a comforting option, a glass of cold milk is always a hit! The creaminess of the milk balances the richness of the truffles, making it a delightful treat for both kids and adults.
- 🍵 Herbal Tea: If you prefer something lighter, a warm cup of herbal tea, like chamomile or peppermint, can be a refreshing choice. The soothing flavors of the tea create a lovely contrast to the decadent truffles.
As I sip my chosen beverage while enjoying a truffle, I often find myself savoring each moment. It’s a simple pleasure that brings joy to my day!
Presentation Ideas
When it comes to presenting your truffles, a little creativity can go a long way. I love to make my truffles look as good as they taste! Here are some fun presentation ideas:
- 🍽️ Truffle Tower: Stack your truffles in a beautiful tower on a decorative plate. This creates an eye-catching centerpiece that’s sure to impress your guests.
- 🎀 Gift Boxes: If you’re gifting your truffles, consider placing them in a charming box lined with tissue paper. A simple ribbon tied around the box adds a personal touch that makes the gift feel extra special.
- 🌿 Garnish with Fresh Herbs: For a pop of color, garnish your serving plate with fresh mint or edible flowers. It adds a lovely touch and makes the truffles look even more inviting.
- 🍫 Chocolate Drizzle: For an extra indulgent touch, drizzle some melted chocolate over the truffles before serving. It adds a beautiful finish and makes them look like they came straight from a fancy chocolatier!
As I arrange my truffles for serving, I can’t help but feel a sense of pride. Each truffle is a labor of love, and presenting them beautifully makes the experience even more enjoyable. Whether it’s a cozy night in or a gathering with friends, these serving suggestions will surely impress!
Tips for Perfecting Your Classic Dark Chocolate Truffles Recipe
As I’ve journeyed through the delightful world of making Classic Dark Chocolate Truffles, I’ve picked up a few tips that can truly elevate your truffle-making game. These little nuggets of wisdom have helped me create truffles that are not only delicious but also visually stunning. Let’s dive into some essential tips that will ensure your truffles turn out perfect every time!
Choosing the Right Chocolate
The chocolate you choose is the heart and soul of your truffles. I can’t stress enough how important it is to select high-quality dark chocolate. When I first started making truffles, I learned that not all chocolates are created equal. Look for chocolate with at least 60% cocoa content for a rich, deep flavor. The higher the cocoa percentage, the more intense the chocolate experience!
When I’m at the store, I often find myself reading labels and checking for ingredients. I prefer chocolate that has minimal additives—just cocoa, sugar, and maybe a bit of vanilla. Brands that focus on quality will make a noticeable difference in your truffles. I’ve had great success with brands like Ghirardelli and Callebaut, but feel free to explore and find your favorite!
Also, don’t forget to taste the chocolate before you use it! A little nibble can help you gauge the flavor profile and ensure it’s something you’ll love in your truffles. After all, the chocolate is the star of the show, and it deserves to shine!
Storing Your Truffles
Once you’ve crafted your beautiful truffles, it’s essential to store them properly to maintain their freshness. I usually place my truffles in an airtight container, which helps keep them from drying out. It’s like tucking them into a cozy little bed! I recommend separating layers with parchment paper to prevent them from sticking together.
Storing your truffles in the refrigerator is a great option, especially if you live in a warm climate. They can last up to two weeks in the fridge, but I can assure you they won’t last that long in my house! If you want to keep them for longer, you can freeze them. Just make sure to wrap them tightly in plastic wrap before placing them in a freezer-safe container. When you’re ready to enjoy them, let them thaw in the fridge for a few hours.
As I store my truffles, I often find myself daydreaming about the next batch I’ll make. Each time I open the container, I’m greeted by the rich aroma of chocolate, and it reminds me of the joy that comes from creating these little delights. So, whether you’re enjoying them right away or saving them for later, proper storage will keep your truffles tasting divine!
FAQs about Classic Dark Chocolate Truffles Recipe
Can I use milk chocolate instead of dark chocolate?
Absolutely! While I adore the rich, intense flavor of dark chocolate, using milk chocolate can create a sweeter and creamier truffle. Just keep in mind that the ganache will be softer, so you might need to chill it a bit longer before shaping. I remember the first time I experimented with milk chocolate; the truffles turned out to be a hit with my friends who prefer a sweeter treat. It’s all about finding what you love!
How long do homemade truffles last?
Homemade truffles can last up to two weeks when stored properly in an airtight container in the refrigerator. I often find that they taste best within the first week, as the flavors are fresh and vibrant. If you want to keep them longer, you can freeze them! Just wrap each truffle tightly in plastic wrap and place them in a freezer-safe container. When you’re ready to enjoy them, let them thaw in the fridge for a few hours. It’s like having a little chocolate surprise waiting for you!
Can I add flavors to my truffles?
Yes, yes, yes! Adding flavors to your truffles is one of the most exciting parts of the process. I love to experiment with different extracts, spices, or even liqueurs. A splash of orange liqueur or a hint of peppermint extract can take your truffles to a whole new level. Just remember to start with a small amount and taste as you go. It’s all about finding that perfect balance of flavors that makes your heart sing!
What is the best way to coat truffles?
The classic way to coat truffles is with cocoa powder, but there are so many fun options! You can roll them in crushed nuts, shredded coconut, or even dip them in melted chocolate for an extra indulgent treat. I love to get creative with my coatings! Just make sure to shake off any excess coating to keep them looking neat and tidy. The coating not only adds flavor but also gives your truffles a beautiful finish. It’s like dressing them up for a special occasion!
Conclusion on Classic Dark Chocolate Truffles Recipe
As I wrap up this delightful journey through the world of Classic Dark Chocolate Truffles Recipe, I can’t help but feel a sense of fulfillment. Making these truffles is not just about the end product; it’s about the entire experience—the aromas, the textures, and the joy of sharing them with loved ones. Each step, from preparing the ganache to rolling the truffles in cocoa powder, is a celebration of chocolate that brings warmth to my heart.
Print
Classic Dark Chocolate Truffles Recipe: Indulge Today!
- Total Time: 2 hours 40 minutes
- Yield: 24 truffles
- Diet: Vegetarian
Description
A delightful recipe for Classic Dark Chocolate Truffles that melt in your mouth, perfect for any occasion.
Ingredients
- 🍫 Dark Chocolate: 8 oz (finely chopped)
- 🥛 Heavy Cream: 1/2 cup (120 ml)
- 🧈 Unsalted Butter: 2 tablespoons (28 g)
- 🍫 Cocoa Powder: 1/4 cup (for dusting)
- 🌿 Vanilla Extract: 1 teaspoon
Instructions
- Prepare the chocolate ganache by placing chopped dark chocolate in a heatproof bowl.
- Heat the heavy cream in a saucepan until just simmering, then pour it over the chocolate.
- Let it sit for 2-3 minutes, then stir in butter and vanilla until smooth.
- Chill the ganache in the refrigerator for 1-2 hours until firm.
- Shape the chilled ganache into small balls using a cookie scoop.
- Roll each truffle in cocoa powder to coat.
- Store the truffles in an airtight container until ready to serve.
Notes
- Use high-quality dark chocolate with at least 60% cocoa for best flavor.
- Experiment with flavors by adding extracts or spices to the ganache.
- Truffles can be stored in the refrigerator for up to two weeks.
- For a sweeter option, milk chocolate can be used instead of dark chocolate.
- Prep Time: 30 minutes
- Cook Time: 10 minutes
- Category: Dessert
- Method: No-bake
- Cuisine: French
Nutrition
- Serving Size: 1 truffle
- Calories: 100
- Sugar: 6g
- Sodium: 5mg
- Fat: 7g
- Saturated Fat: 4g
- Unsaturated Fat: 2g
- Trans Fat: 0g
- Carbohydrates: 9g
- Fiber: 1g
- Protein: 1g
- Cholesterol: 10mg
Keywords: chocolate truffles, dessert, homemade, sweet treats
")
")
")
")