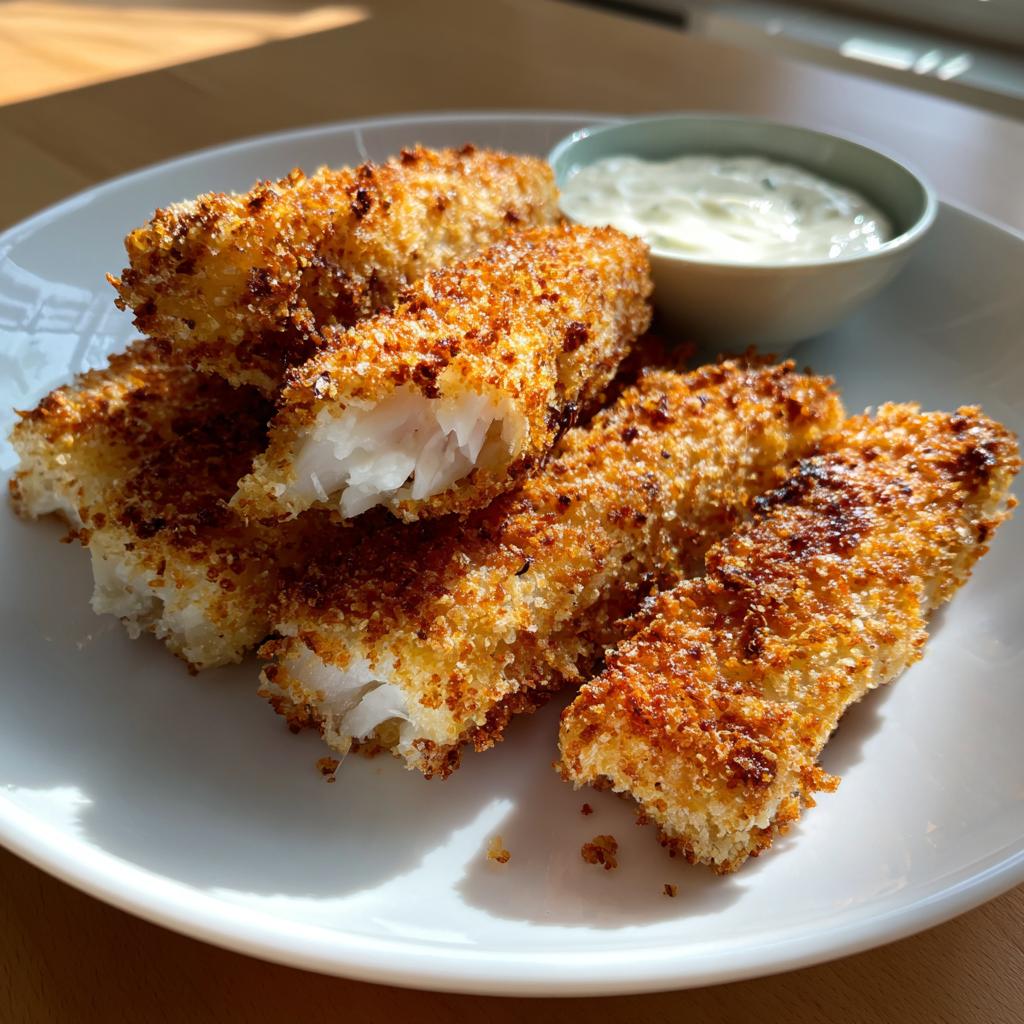
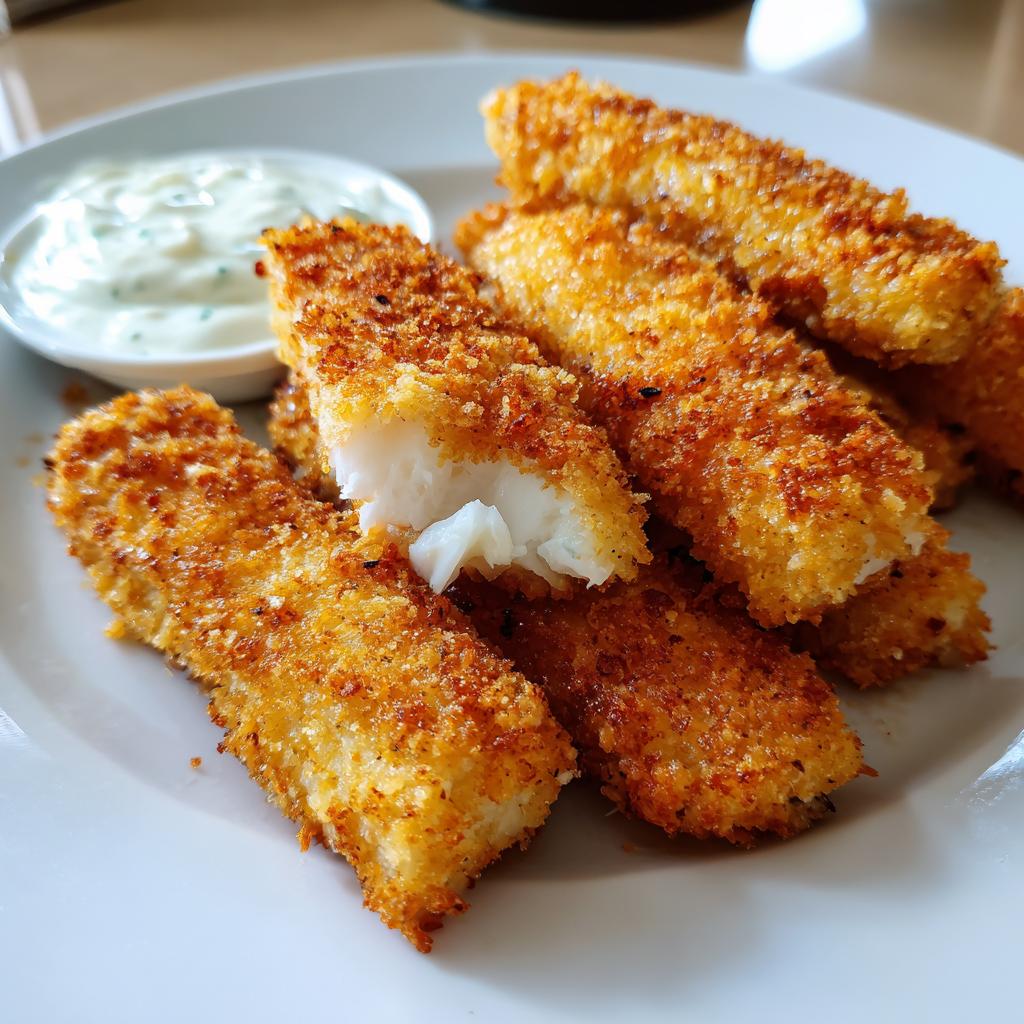
Oh, crispy baked fish sticks – they’re my go-to when the kids are begging for something fried but I want to keep things on the healthier side. Trust me, these aren’t those sad, soggy fish sticks from the freezer aisle. We’re talking golden, crunchy perfection that’ll have everyone reaching for seconds!
I stumbled onto this recipe years ago when my youngest declared war on anything “healthy.” The magic happens when you combine simple ingredients with a hot oven – no deep fryer needed. What I love most (besides the crispy factor) is how quick they come together. From fridge to table in 30 minutes flat on busy weeknights. Plus, that Parmesan in the breading? Absolute game-changer.
Why You’ll Love These Crispy Baked Fish Sticks
Honestly, what’s not to love? These little golden sticks of deliciousness hit all the right notes:
- Healthier than fried – All the crunch without the oil bath (your heart will thank you)
- Ready in a flash – 30 minutes from cutting board to plate, even on crazy weeknights
- Kid-approved magic – My picky eaters inhale these faster than chicken nuggets
- Totally customizable – Swap spices or breadcrumbs to match your mood (I’m addicted to adding a pinch of cayenne)
- No fancy skills needed – If you can dip and bake, you’ve got this
Seriously, they’re the superhero of weeknight dinners – fast, fun, and secretly good for you!
Ingredients for Crispy Baked Fish Sticks
Here’s everything you’ll need to make these perfectly crunchy fish sticks – and yes, every single one of these ingredients matters! I’ve tested this recipe more times than I can count, and these exact measurements give you that ideal crispy-to-tender ratio.
- 1 lb white fish fillets (cod or haddock work best) – needs to be fresh or properly thawed, cut into 1-inch strips (trust me, uniform size = even cooking)
- 1 cup breadcrumbs – I use plain, but panko gives extra crunch if you’re feeling fancy
- 1/2 cup grated Parmesan cheese – the real stuff, not the powdered kind (this is our secret flavor booster!)
- 1 tsp paprika – for that beautiful golden color and subtle smokiness
- 1/2 tsp garlic powder – because everything’s better with garlic
- 1/2 tsp salt – I prefer kosher salt for even seasoning
- 1/4 tsp black pepper – freshly ground if you’ve got it
- 2 eggs – beaten well to help that coating stick
- 2 tbsp olive oil – for drizzling (makes them crisp up beautifully)
Quick tip: If your fish seems wet after cutting, pat it dry with paper towels first. That extra moisture is the enemy of crispiness!
How to Make Crispy Baked Fish Sticks
Okay, let’s get cooking! I promise this is so easy you’ll wonder why you ever bought frozen fish sticks. Just follow these simple steps and you’ll have golden, crispy perfection in no time.
Step 1: Prep the Fish
First things first – grab your sharpest knife and cut those fish fillets into 1-inch strips. Here’s my trick: make them all about the length of your index finger and as even as possible. Why? Because uniform pieces mean everything cooks at the same rate – no burnt ends while the middle’s still raw!
Quick tip: If your fish feels slippery, pat it dry with paper towels. Moisture is the enemy of crispiness, and we want maximum crunch here.
Step 2: Coat the Fish
Now for the fun part – the crispy coating! You’ll need two bowls: one for beaten eggs, one for your breadcrumb mixture. Here’s how I do it:
- Dip each fish strip in the egg, letting excess drip off (too much egg = soggy coating)
- Roll it in the breadcrumb mix, pressing gently so it sticks
- Lay it on your parchment-lined baking sheet – don’t crowd them!
Pro tip: Use one hand for wet ingredients and one for dry to avoid “breadcrumb fingers” (you’re welcome!).
Step 3: Bake to Perfection
Pop those beauties in your preheated 425°F oven for about 12-15 minutes. Here’s the key to perfect crispiness:
- Flip them halfway through – this gives you even browning on both sides
- Drizzle with olive oil before baking (this makes them golden and crispy)
- Want extra crunch? Broil for 1-2 minutes at the end – just watch them closely!
You’ll know they’re done when they’re golden brown and flake easily with a fork. That satisfying crunch when you bite in? That’s the sound of success!
Tips for the Best Crispy Baked Fish Sticks
After making these crispy baked fish sticks more times than I can count, I’ve picked up some foolproof tricks to guarantee perfect results every single time. These little nuggets of wisdom will take your fish sticks from good to “can’t-stop-eating-them” great!
Start with super-dry fish
Here’s the golden rule: moisture is the enemy of crispiness. Before you even think about coating those fish strips, pat them dry with paper towels. I mean really dry – like you’re trying to soak up every last drop. Fresh fish tends to be wetter than thawed frozen fish, so pay extra attention if you’re using it.
The breadcrumb shuffle
Don’t just dump your breadcrumb mixture onto the fish – press it in gently with your fingers. This helps the coating stick better during baking. And here’s my secret: let the coated fish sticks sit on the baking sheet for 5 minutes before popping them in the oven. This gives the coating time to really adhere.
Space them out!
I know it’s tempting to cram as many fish sticks as possible onto one baking sheet, but resist! Crowding leads to steaming instead of crisping. Give each piece some breathing room – about half an inch between them works perfectly.
Broil for the final crunch
If you want that extra-special crunch (and who doesn’t?), turn on the broiler for the last 1-2 minutes of cooking. But watch them like a hawk – they can go from golden to burnt in seconds! This trick works especially well if you’re reheating leftovers too.
Serve immediately
Fish sticks are at their absolute crispiest right out of the oven. If you need to hold them for a bit, keep them in the turned-off oven with the door slightly ajar. This prevents them from getting soggy while you finish prepping sides.
Follow these simple tips, and you’ll have fish sticks so crispy, your family will swear they’re fried – our little secret!
Serving Suggestions for Crispy Baked Fish Sticks
Now that you’ve got these gorgeous golden fish sticks ready, let’s talk about how to serve them up right! The beauty of this recipe is how versatile it is – dress them up fancy or keep it simple for a quick meal. Here are my favorite ways to enjoy them:
Dipping sauces that’ll make you swoon
Oh, the dipping possibilities! My kids go nuts for:
- Classic tartar sauce – I jazz mine up with extra dill and lemon zest
- Creamy garlic aioli – just mayo, garlic, and a squeeze of lemon
- Spicy sriracha mayo – mix mayo with sriracha to taste (my husband’s favorite)
- Sweet chili sauce – perfect for when you want that sweet-heat combo
Sides that complete the meal
For weeknight dinners, I usually pair these with:
- Crispy oven fries – bake them right alongside the fish sticks
- Simple green salad – balances out the richness perfectly
- Steamed veggies – broccoli or green beans work great
- Mac and cheese – because sometimes you just need comfort food
Fun ways to serve them
When I’m feeling creative, I’ll:
- Stuff them in wraps with lettuce, tomato, and that garlic aioli
- Make fish tacos – add slaw and lime crema
- Top a salad for a protein-packed lunch
- Serve as appetizers with lemon wedges for parties
The best part? However you serve them, those crispy baked fish sticks will disappear fast – guaranteed!
Storage and Reheating Instructions
Okay, let’s talk leftovers – because let’s be real, sometimes you actually have some! (Though in my house, that’s pretty rare with these crispy baked fish sticks.) Here’s how to keep them tasting fresh and crispy, because soggy fish sticks are just sad.
Storing them right
First rule: let them cool completely before storing. I know it’s tempting to toss them straight into a container, but that trapped steam turns crispy into soggy real fast. Once cooled:
- Airtight is key – Use a container with a tight lid or wrap them well in foil
- Single layer magic – Stacking squishes the coating (I learned this the hard way)
- Fridge life – They’ll keep for 2 days max (after that, the texture goes downhill)
Reheating like a pro
Microwaving? Just don’t. You’ll end up with rubbery fish and sad, soft breading. Here’s how to bring back that glorious crunch:
- Oven method – 375°F for 5-7 minutes (flip halfway) – my go-to
- Toaster oven – Even faster! About 3-4 minutes does the trick
- Air fryer – 350°F for 2-3 minutes if you’ve got one (so good!)
Pro tip: If they’re looking a bit dry, spritz lightly with oil before reheating. And for extra crispiness? Broil for the last minute – just keep an eye on them!
Honestly? I think they’re almost as good reheated as fresh – as long as you follow these steps. Now you’ve got no excuse not to make a double batch!
Crispy Baked Fish Sticks Variations
One of my favorite things about this recipe? How easily you can switch it up! Once you’ve mastered the basic version, try these fun twists that keep dinner exciting. My family never gets tired of these crispy baked fish sticks because we’re always changing them up.
Panko power
For extra crunch, swap regular breadcrumbs for panko. I love how panko gives these fish sticks that shatteringly crisp texture – almost like they’re fried! Sometimes I’ll toast the panko first for even more flavor. Just spread it on a baking sheet and pop it in a 350°F oven for 5 minutes until lightly golden. Let it cool before using in the recipe.
Spice it up
The spice blend is where you can really get creative. Try these combos:
- Lemon pepper – Add 1 tsp lemon zest + 1/2 tsp black pepper (so fresh!)
- Cajun kick – Replace paprika with 1 tsp Cajun seasoning (watch out – this one’s spicy!)
- Herb garden – Mix in 1 tbsp dried herbs like dill, parsley, and chives
Gluten-free goodness
My sister-in-law is gluten-free, so I’ve perfected this version for her. Simply:
- Use gluten-free panko or crushed gluten-free crackers
- Double-check your spices are GF (some blends contain wheat)
- Serve with GF dipping sauces (most are naturally GF anyway)
The best part? No one can tell the difference – they’re just as crispy and delicious!
Cheese variations
While Parmesan is our favorite, don’t be afraid to experiment with other cheeses:
- Pecorino Romano – Saltier and sharper than Parmesan
- Asiago – Gives a nice nutty flavor
- Cheddar – For when you want that classic fish-and-chips taste
See? Endless possibilities! Once you’ve tried the basic recipe, have fun playing with these variations. It’s like getting a whole new meal without much extra work.
Nutritional Information for Crispy Baked Fish Sticks
Okay, let’s talk numbers – because I know some of you (like me!) like to keep an eye on what you’re eating. Here’s the breakdown for these crispy baked fish sticks, based on using all the ingredients listed. But remember – these are estimates, and your exact numbers might vary depending on your specific ingredients and portion sizes.
- Serving Size: About 4-5 fish sticks (1/4 of the recipe)
- Calories: 280
- Total Fat: 12g (3g saturated, 7g unsaturated)
- Cholesterol: 120mg
- Sodium: 450mg
- Total Carbohydrates: 15g
- Fiber: 1g
- Sugar: 1g
- Protein: 25g
Now, here’s why I love this recipe nutritionally – compared to frozen or fried fish sticks, you’re getting:
- More protein – That 25g will keep you full for hours
- Less saturated fat – Baking instead of frying makes a huge difference
- No mystery ingredients – You know exactly what’s going into your body
Quick note: If you’re watching sodium, you can reduce the salt in the breading mixture. And for lower fat, try using cooking spray instead of drizzling olive oil (though they won’t get quite as crispy).
Remember: Nutritional values are estimates and vary based on ingredients used. But honestly? When something tastes this good and is this much better for you than the fried version, that’s what I call a win-win!
Frequently Asked Questions
I get asked about these crispy baked fish sticks all the time – seems like everyone wants to know the secrets to making them perfect! Here are the questions that pop up most often in my kitchen and inbox:
Can I use frozen fish for this recipe?
Absolutely! Just make sure to thaw it completely first. Here’s my method: move it to the fridge the night before or, if you’re in a hurry, seal it in a plastic bag and submerge in cold water for about 30 minutes. The key is to pat it super dry before cutting – frozen fish tends to be extra moist, and we don’t want soggy sticks!
How do I keep them from getting soggy?
Oh, the eternal crispy fish stick struggle! My three golden rules: 1) Pat your fish dry like it’s your job before coating, 2) Don’t overcrowd the baking sheet (steam = soggy), and 3) If reheating, use the oven or toaster oven, never the microwave. That broiler trick I mentioned earlier? Total game-changer for restoring crunch to leftovers!
What’s the best fish to use?
I swear by cod or haddock – they’re mild, flake beautifully, and hold their shape well. Tilapia works in a pinch, but it can be a bit more fragile. Avoid oily fish like salmon; the texture just isn’t right for fish sticks. Fun fact: I once made these with halibut when it was on sale – amazing but definitely a splurge!
Can I make these ahead of time?
You sure can! Here’s how: coat the fish sticks as directed, then arrange them on a parchment-lined baking sheet and freeze until solid (about 2 hours). Transfer to a freezer bag, and they’ll keep for up to a month. When you’re ready, bake straight from frozen – just add a few extra minutes to the cooking time. Perfect for meal prep!
Are these gluten-free?
They can be! Just swap regular breadcrumbs for gluten-free panko or crushed gluten-free crackers. I’ve had great results with rice crackers too. Double-check your other ingredients (especially the Parmesan – some brands use anti-caking agents with gluten), and you’re good to go. My gluten-free friends say they’re just as crispy as the original!
Final Thoughts
There you have it – my all-time favorite way to make crispy baked fish sticks that actually stay crispy! I can’t tell you how many times this recipe has saved me on busy nights when the kids are hangry and I’m exhausted. The best part? Watching their faces light up when they realize these taste even better than the fried version.
I’d love to hear how yours turn out! Did you try any fun variations? Maybe your family went crazy for the cajun-spiced version or your gluten-free adaptation was a hit? Drop me a comment below – nothing makes me happier than hearing about your kitchen adventures. And if you snapped a photo of your golden, crispy masterpiece, share it with me! There’s something magical about seeing those perfectly crunchy fish sticks fresh out of the oven.
Remember, cooking is all about having fun and making memories around the table. These fish sticks have created so many happy moments in my kitchen – from toddler finger-painting with tartar sauce to teenager study-break snacks. Now it’s your turn to make them part of your family’s story. Happy baking, friends – may your fish sticks always be crispy and your dipping sauces never run dry!
Print
Irresistible 30-Minute Crispy Baked Fish Sticks Recipe
- Total Time: 30 minutes
- Yield: 4 servings 1x
- Diet: Low Fat
Description
Crispy baked fish sticks are a healthier alternative to fried versions. They are easy to make and perfect for a quick meal or snack.
Ingredients
- 1 lb white fish fillets (cod or haddock)
- 1 cup breadcrumbs
- 1/2 cup grated Parmesan cheese
- 1 tsp paprika
- 1/2 tsp garlic powder
- 1/2 tsp salt
- 1/4 tsp black pepper
- 2 eggs
- 2 tbsp olive oil
Instructions
- Preheat oven to 425°F (220°C). Line a baking sheet with parchment paper.
- Cut fish fillets into 1-inch strips.
- In a bowl, mix breadcrumbs, Parmesan, paprika, garlic powder, salt, and pepper.
- Beat eggs in a separate bowl.
- Dip each fish strip into the egg, then coat with the breadcrumb mixture.
- Place coated strips on the baking sheet. Drizzle with olive oil.
- Bake for 12-15 minutes, flipping halfway, until golden and crispy.
- Serve with your favorite dipping sauce.
Notes
- Use fresh or thawed fish for best results.
- For extra crispiness, broil for 1-2 minutes at the end.
- Store leftovers in an airtight container for up to 2 days.
- Prep Time: 15 minutes
- Cook Time: 15 minutes
- Category: Main Dish
- Method: Baking
- Cuisine: American
Nutrition
- Serving Size: 1 serving (4-5 sticks)
- Calories: 280
- Sugar: 1g
- Sodium: 450mg
- Fat: 12g
- Saturated Fat: 3g
- Unsaturated Fat: 7g
- Trans Fat: 0g
- Carbohydrates: 15g
- Fiber: 1g
- Protein: 25g
- Cholesterol: 120mg
Keywords: crispy baked fish sticks, healthy fish recipe, easy fish sticks

")
")
")
")