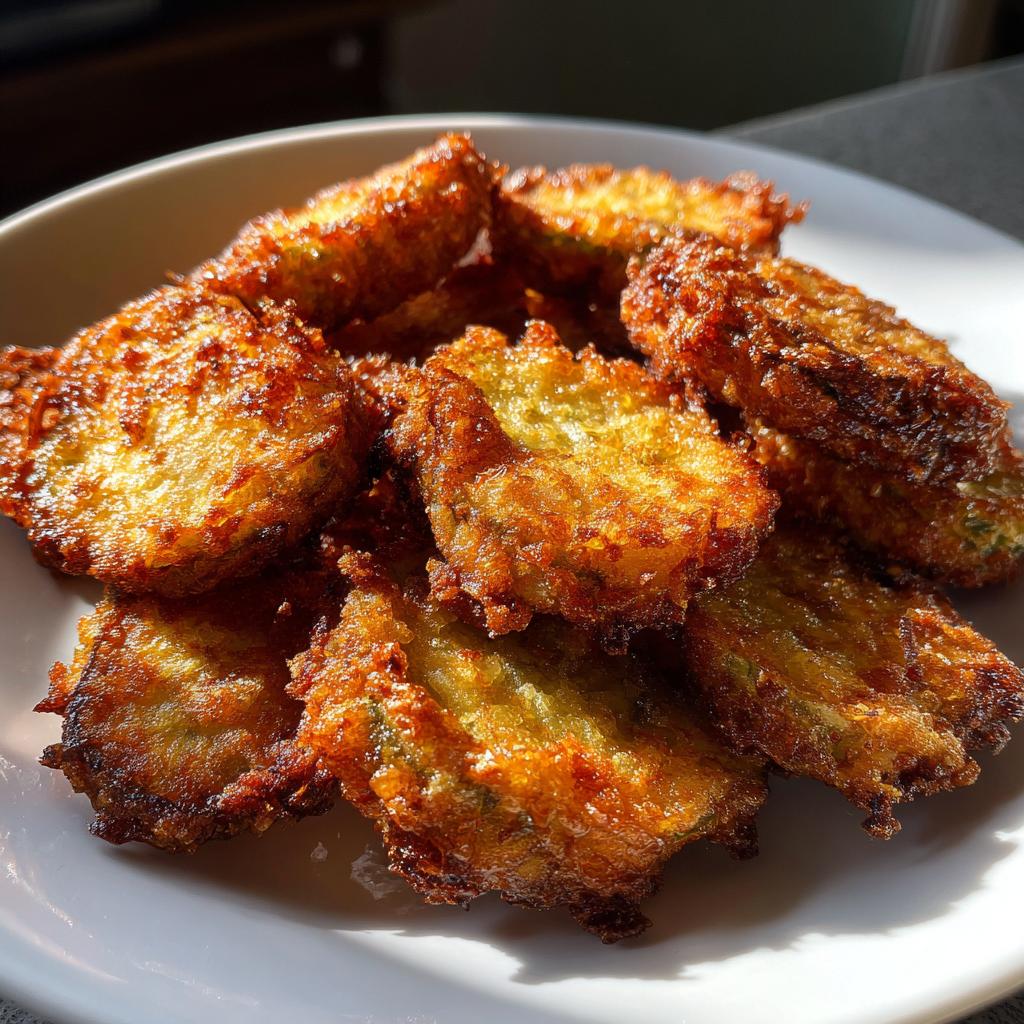
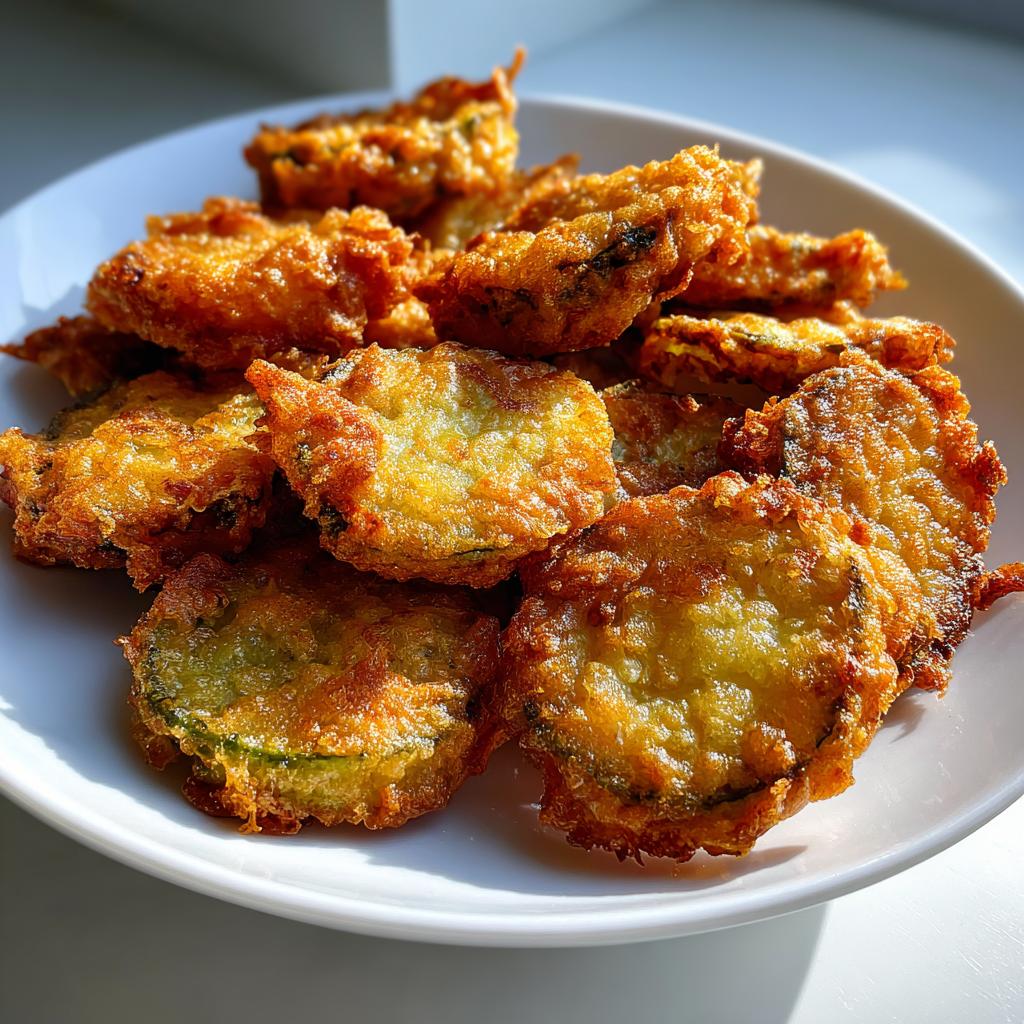
You know that moment when you bite into a perfectly fried pickle? That crispy, tangy crunch that makes your taste buds dance? Oh man, I live for those moments. My love affair with fried pickles started at this little roadside diner years ago – one bite and I was hooked. Now, after testing dozens of versions (some disastrous, some divine), I’ve nailed down the absolute best way to make them at home.
These fried pickles are ridiculously easy – ready in about 15 minutes flat – with that ideal golden crunch outside and that signature dill punch inside. They disappear fast at parties (trust me, I’ve learned to make double batches). Whether you’re craving a snack or need a killer appetizer that’ll wow guests, this recipe’s got your back. Let’s get frying!
Why You’ll Love These Fried Pickles
Listen, I don’t mess around when it comes to fried pickles. If you’re looking for that perfect balance of crunch and tang, this recipe is your golden ticket. Here’s why these bad boys will become your new favorite snack:
- That CRUNCH though: The secret’s in the double-dip method – buttermilk then seasoned flour creates this insane crispy shell that stays crunchy even after frying. No sad, soggy pickles here!
- 15 minutes flat: From fridge to plate in less time than it takes to decide what to watch on Netflix. Perfect when snack attacks hit hard.
- Party superstar: Game day? Girls’ night? Just because it’s Tuesday? These work anywhere. I’ve seen grown adults fight over the last one (okay, that was me last weekend).
Seriously, once you try homemade fried pickles, you’ll never go back to those freezer-bag versions. The fresh dill flavor punches through that crispy coating in the best way possible. And that paprika-garlic seasoning? *chef’s kiss*
Ingredients for Fried Pickles
Here’s everything you’ll need to make these addictive little crispy bites. I’ve grouped them so you can whip through prep without running back to the pantry five times (been there!).
- Pickles: 1 cup dill pickles, sliced into 1/4-inch rounds (about medium thickness – too thin and they’ll disappear in the fryer!)
- Dry mix: 1 cup all-purpose flour, 1 teaspoon garlic powder, 1 teaspoon paprika, 1/2 teaspoon salt, 1/2 teaspoon black pepper
- Wet mix: 1/2 cup buttermilk, 1 large egg
- For frying: Vegetable oil (enough for 1-2 inches in your pan – I use peanut oil for its high smoke point)
Ingredient Notes & Substitutions
Ran out of something? No sweat – here’s how to pivot:
- Buttermilk hack: Mix 1/2 tablespoon lemon juice or vinegar into 1/2 cup regular milk and let it sit 5 minutes. Greek yogurt thinned with milk works great too.
- Flour swaps: Gluten-free 1-to-1 blend works perfectly here – just don’t skip the seasoning!
- Pickle pro tip: Pat slices DRY with paper towels before coating (wet pickles = sad, clumpy batter). Sandwich slices work if you prefer spears.
- Oil options: Canola, vegetable, or peanut oil all work. Avoid olive oil – it can’t take the heat needed for proper frying.
One last thing – if you’re using leftover pickle juice, don’t toss it! Makes an incredible marinade for chicken or the base for a killer bloody mary. Waste not, want not!
Equipment You’ll Need
Okay, let’s talk gear—nothing fancy required, but having the right tools makes all the difference between fried pickle bliss and kitchen chaos. Here’s your no-stress checklist:
- Deep fryer OR heavy skillet: My grandma’s cast iron works magic, but any sturdy, deep pan will do. Just make sure it can handle 375°F heat without warping.
- Thermometer: Non-negotiable! Eyeballing oil temp leads to greasy disasters. I use a clip-on candy thermometer—cheap and foolproof.
- Tongs or spider strainer: For flipping and fishing out those golden beauties without losing a single one to the oil abyss.
- Paper towels + wire rack: Drain excess oil immediately (paper towels) but transfer to a rack after a minute—this keeps ’em crispy instead of steaming soggy.
- Two mixing bowls: One for dry ingredients, one for wet. Wide and shallow works best for easy dipping.
Bonus item? An apron—because buttermilk splatters are no joke, and pickle juice stains are real. (Ask me about my favorite white shirt casualty.)
How to Make Fried Pickles
Alright, let’s get down to business! Making perfect fried pickles is easier than you think—just follow these steps and you’ll be snacking in no time. I’ve burned (literally) through enough test batches to know exactly what works.
- Heat that oil right: Pour 1-2 inches of oil into your deep fryer or heavy skillet. Clip in your thermometer and heat to 375°F (190°C). This is the sweet spot – any lower and they’ll soak up oil, any higher and they’ll burn before cooking through.
- Prep your stations: In one bowl, whisk together all the dry ingredients. In another, beat the egg into the buttermilk until smooth. Line up: pickles → buttermilk → flour → empty plate for coated pickles. Assembly line efficiency, baby!
- The double-dip magic: Working in batches, take 5-6 pickle slices at a time. Dunk in buttermilk, let excess drip off, then toss in flour until fully coated. Shake off extra flour—you want an even, thin layer. Pro move: Let them rest 30 seconds before frying so the coating sets.
- Fry to golden perfection: Carefully lower pickles into the hot oil using tongs. Don’t crowd the pan! Fry about 2-3 minutes until deep golden brown, flipping once halfway. They should sizzle merrily but not violently. If the oil stops bubbling, it’s too cool.
- Drain like a pro: Transfer fried pickles to paper towels to blot excess oil, then move to a wire rack immediately. This keeps them crispy all around instead of getting soggy bottoms. Sprinkle with a pinch of salt while still hot.
Pro Tips for Perfect Fried Pickles
Want restaurant-quality results every time? These are the little tricks I’ve picked up after many, many pickle-filled experiments:
- Dry those pickles! Water is the enemy of crispiness. Pat each slice thoroughly with paper towels before coating—it makes the batter stick perfectly.
- Maintain your oil temp: After each batch, let the oil come back to 375°F before adding more. I keep my thermometer clipped to the pan the whole time.
- Wire rack > paper towels: Draining on a rack lets air circulate underneath, preventing steam from softening your perfect crunch. Paper towels are just for the initial oil blot.
- Small batches win: Overcrowding drops the oil temp fast and leads to soggy, greasy pickles. Be patient—it’s worth it!
Bonus insider secret: If your coating seems too pale after frying, your oil probably wasn’t hot enough. No worries though—they’ll still taste amazing dipped in ranch!
Serving Suggestions
Oh man, let’s talk about the best part—eating these crispy little beauties! Fried pickles are like the social butterfly of snacks—they pair with practically anything. Here’s how I love to serve them (and trust me, I’ve tried every combo under the sun):
- Classic ranch: My go-to! The cool tang cuts through the crispy heat perfectly. Homemade ranch takes 2 minutes—just mix mayo, buttermilk, garlic powder, dill, and a squeeze of lemon.
- Spicy mayo kick: Stir sriracha or hot sauce into mayo (start with 1:4 ratio). The creaminess with that heat? Unreal. Bonus points for adding smoked paprika.
- Beer buddies: Serve with an ice-cold lager—the crisp bubbles cleanse your palate between bites. My husband insists they’re mandatory during football Sundays.
Pro tip: Eat them piping hot! That first 5-minute window out of the fryer is when the texture’s at its peak—crunchy outside, warm and tangy inside. I always make people gather ’round the kitchen so no one misses the golden moment.
For parties, I arrange them on a platter with small dipping bowls in the center—it looks fancy but takes zero effort. Leftovers? Ha! As if. But if you somehow have any, they’re shockingly good chopped up on salads the next day (though nothing beats fresh).
Storage & Reheating
Okay, real talk—these fried pickles are absolutely best eaten fresh, piping hot from the fryer. But I get it, life happens. Maybe you got overexcited and made a double batch (no judgment here). Here’s how to salvage that leftover crunch when snack emergencies strike:
- Short-term storage: Let leftovers cool COMPLETELY before storing (steam = soggy disaster). Pop them in an airtight container with a paper towel underneath to absorb excess oil. They’ll keep for 1-2 days max in the fridge—any longer and the coating turns unpleasantly soft.
- Reheating magic: Forget the microwave—that’ll give you sad, rubbery pickles. Instead, spread them on a baking sheet and crisp them up in a 375°F oven for 5-7 minutes until heated through. Even better? An air fryer at 400°F for 3-4 minutes gets them almost as good as fresh.
Pro tip: Refresh the seasoning! After reheating, sprinkle with a tiny bit of salt or extra garlic powder to wake up the flavors. They won’t be quite as perfect as day one, but dipped in ranch? Still dangerously snackable.
Honestly though? I usually just eat them cold straight from the fridge like some kind of pickle-obsessed raccoon. Don’t knock it till you try it—that dill flavor actually intensifies overnight!
Fried Pickles FAQ
I’ve gotten so many questions about these crispy little guys over the years—here are the answers to everything you might wonder (plus some mistakes I’ve made so you don’t have to!):
Can I bake these instead of frying?
You bet! Spread coated pickles on a greased baking sheet at 425°F for 15-20 minutes, flipping halfway. They won’t get quite as crazy crispy, but spraying lightly with oil helps. Honestly? It’s worth buying a $10 deep fry thermometer—the texture difference is night and day.
Why are my fried pickles soggy?
Three likely culprits: 1) Oil wasn’t hot enough (hello, thermometer!), 2) Pickles weren’t dried thoroughly, or 3) They got piled up while draining. Always fry in small batches and use that wire rack—steam is the enemy of crunch!
Can I use pickle spears instead of slices?
Absolutely! Just pat them extra dry since they hold more moisture. Fry for 3-4 minutes instead of 2-3—the thicker cut needs slightly more time for the coating to crisp up properly.
What’s the best oil for frying pickles?
I swear by peanut oil for its high smoke point and neutral flavor, but vegetable or canola work great too. Just avoid olive oil—it starts smoking way before reaching the ideal 375°F frying temp.
Can I make these gluten-free?
Easily! Swap the all-purpose flour for your favorite 1-to-1 gluten-free blend. The seasoning mix stays the same—nobody will know the difference. (My celiac friend said these were her favorite thing I’ve ever made!)
Nutritional Information
Let’s keep it real—these are fried pickles, not health food. But hey, everything in moderation, right? Here’s the nutritional lowdown per serving (about 1/4 of the recipe), but remember, these are estimates—your exact numbers might vary based on pickle brand, oil absorption, etc.
- Calories: 180 (Mostly from that delicious crispy coating!)
- Fat: 8g (Hey, it’s fried—what’d you expect? Worth every gram.)
- Sodium: 450mg (Blame the pickles—but that’s where the flavor comes from!)
- Carbs: 22g (A fair trade for that addictive crunch)
- Protein: 4g (Surprise! The egg and buttermilk add a little boost)
Quick disclaimer: These values can change based on how long you fry, how thick your pickle slices are, or if you go back for thirds (again, no judgment). I calculated based on using about 1 tablespoon of oil absorbed per serving, but your mileage may vary. The important thing? They’re absolutely delicious and perfect for treating yourself!
Pro tip: If you’re watching sodium, look for lower-salt pickles—just know they’ll be less tangy. And for fewer calories? Share your batch with friends (if you’re feeling generous).
Share Your Fried Pickles Experience
Alright pickle lovers, I’ve spilled all my fried pickle secrets—now it’s your turn! Did you nail that perfect golden crunch? Maybe you put your own spin on the seasoning? (Hot tip: I once added cayenne for extra kick and wowza!) Drop a comment below and let me know how yours turned out.
Better yet—snap a photo of your crispy creations and tag me on social! There’s nothing I love more than seeing your kitchen triumphs. Did your family go crazy for them like mine does? Were they gone before you could even sit down? Spill the juicy details!
Questions? Troubleshooting needed? Fire away—I’ve made every mistake in the book so you don’t have to. Whether it’s your first fry or hundredth, I’m here to celebrate your fried pickle victories!
Print
Crispy Fried Pickles in Just 15 Minutes—Addictive Crunch!
- Total Time: 15 mins
- Yield: 4 servings 1x
- Diet: Vegetarian
Description
Crispy fried pickles with a tangy flavor, perfect as a snack or appetizer.
Ingredients
- 1 cup dill pickles, sliced
- 1 cup all-purpose flour
- 1 teaspoon garlic powder
- 1 teaspoon paprika
- 1/2 teaspoon salt
- 1/2 teaspoon black pepper
- 1/2 cup buttermilk
- 1 egg
- Vegetable oil for frying
Instructions
- Heat oil in a deep fryer or large skillet to 375°F (190°C).
- In a bowl, mix flour, garlic powder, paprika, salt, and black pepper.
- In another bowl, whisk buttermilk and egg together.
- Dip pickle slices in the buttermilk mixture, then coat with the flour mixture.
- Fry pickles in hot oil until golden brown, about 2-3 minutes.
- Drain on paper towels and serve immediately.
Notes
- Use a thermometer to check oil temperature for best results.
- Serve with ranch dressing or your favorite dipping sauce.
- Prep Time: 10 mins
- Cook Time: 5 mins
- Category: Appetizer
- Method: Deep-frying
- Cuisine: American
Nutrition
- Serving Size: 1/4 batch
- Calories: 180
- Sugar: 1g
- Sodium: 450mg
- Fat: 8g
- Saturated Fat: 1g
- Unsaturated Fat: 6g
- Trans Fat: 0g
- Carbohydrates: 22g
- Fiber: 1g
- Protein: 4g
- Cholesterol: 30mg
Keywords: fried pickles, crispy pickles, snack, appetizer

")
")
")
")