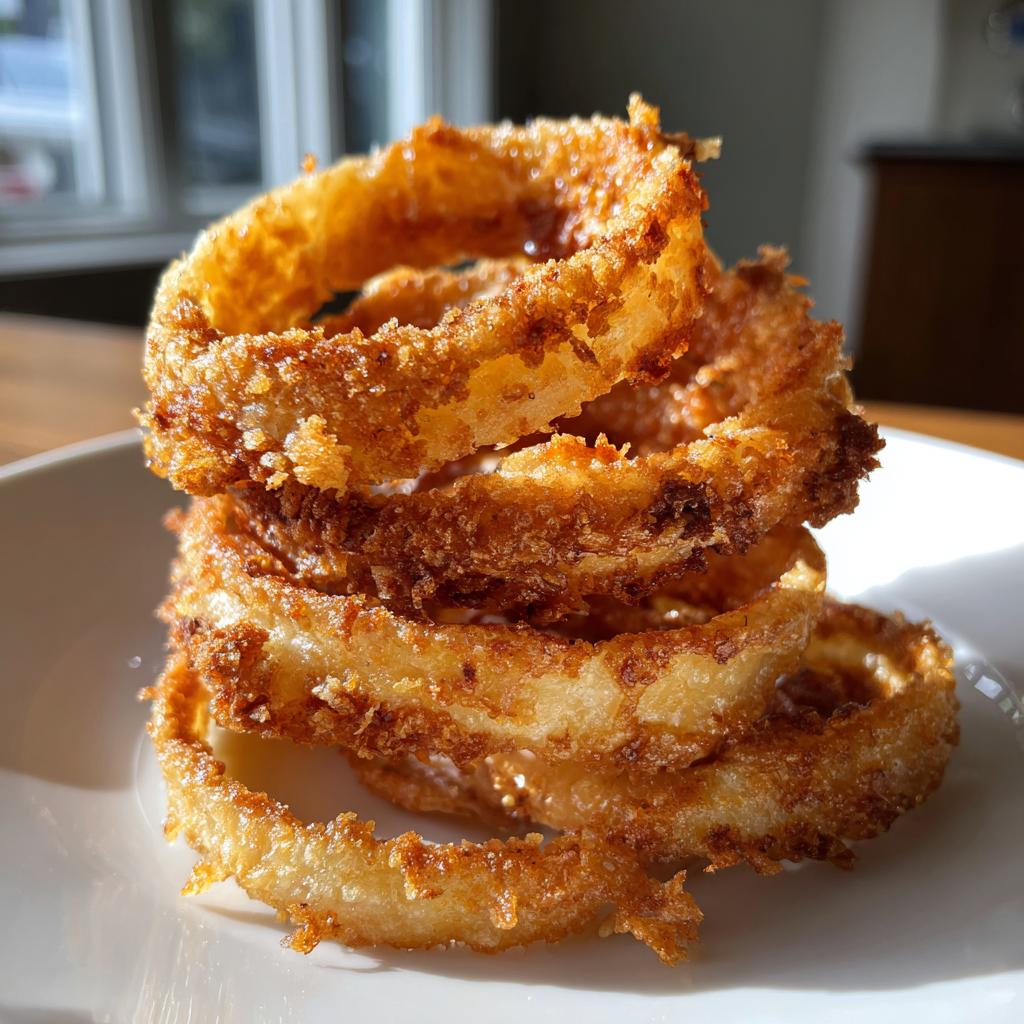
Oh, onion rings—how I love thee! There’s something magical about biting into those crispy, golden rings of joy. I remember the first time I made them at home—total disaster. The coating fell off, the oil wasn’t hot enough, and let’s just say they were more “soggy circles” than onion rings. But after years of trial and error (and maybe a few burnt fingers), I’ve cracked the code. These aren’t just any onion rings; they’re the kind that make you close your eyes and sigh after the first crunchy bite. Perfect for snacking, piling on burgers, or just devouring straight from the plate—trust me, they’re irresistible.
Why You’ll Love These Onion Rings
Okay, let me count the ways these onion rings will steal your heart:
- Crispy perfection: That satisfying crunch? It’s everything. Double-coated for maximum texture so every bite sings.
- Quick magic: From slicing to frying in under 25 minutes—faster than waiting for takeout!
- Pantry-friendly: Flour, breadcrumbs, onions—you probably have everything right now. (No fancy ingredients allowed!)
- Versatile star: Elevates burgers, salads, or just needs a dunk in your favorite sauce. Heck, eat ’em straight—I won’t judge.
Ingredients for Perfect Onion Rings
Here’s what you’ll need to make these crave-worthy onion rings (and why each one matters):
- 2 large yellow onions – Pick firm ones with tight skins for the sturdiest rings. Slice into ½-inch thick rounds—too thin and they’ll burn, too thick and they won’t crisp up right.
- 1 cup buttermilk (cold!) – The acidity helps tenderize the onions while the cold temperature keeps the coating crisp. No buttermilk? Mix 1 tbsp vinegar into regular milk and let it sit for 5 minutes.
- 1 cup all-purpose flour – Our trusty base for that first crispy layer. Want extra crunch? Swap half for cornstarch.
- 1 cup breadcrumbs – Panko gives maximum crunch, but regular works too. For gluten-free, crushed cornflakes are magic.
- 1 tsp each: salt, black pepper, paprika – The holy trinity of seasoning. Add garlic powder if you’re feeling fancy!
- Oil for frying
– Vegetable or peanut oil works best—they can take the heat without smoking.
Equipment You’ll Need
No fancy gadgets here—just a few trusty tools to make onion ring magic happen:
- Deep frying pan or Dutch oven: You want at least 2 inches of oil depth.
- Tongs: For flipping those rings without coating casualties.
- Paper towels: The crispy lifeline where golden rings drain (and stay crisp).
- Candy thermometer: Optional but golden—375°F is the sweet spot!
How to Make Crispy Onion Rings
Ready for onion ring glory? Follow these steps—they’re foolproof (and yes, I’ve tested them through many, many batches!).
Prep the Onions
First, grab those onions and slice off about ½ inch from the top and bottom—just enough to stabilize them. Peel off the papery skin, then slice into ½-inch rounds. Trust me, this thickness is key! Too thin and they’ll burn before crisping up; too thick and you’ll end up with raw onion inside that golden coat.
Now, carefully separate the rings—your fingers are the best tools here. Keep the medium and large rings for frying (save the tiny inner ones for salads or omelets). Bonus tip: If your eyes water like crazy, pop the onions in the freezer for 10 minutes before slicing!
Coat the Rings
Here’s where the magic happens for that perfect crunch. Set up your dipping station: flour mixture in one bowl, cold buttermilk in another, and breadcrumbs in a third. I like to line them up like a little assembly line.
Dip each ring in flour first (shaking off excess), then buttermilk (let excess drip off), then back into the flour. Yes, double-dipping is encouraged here! Finally, dunk it in buttermilk again and coat with breadcrumbs, pressing gently so they stick. Lay the coated rings on a wire rack while you heat the oil—this prevents soggy bottoms.
Fry to Golden Perfection
Heat about 2 inches of oil in your pan until it reaches 375°F (use that thermometer if you’ve got one!). No thermometer? Test with a breadcrumb—it should sizzle immediately when dropped in.
Carefully add 3-4 rings at a time—don’t crowd the pan! They’ll need about 2-3 minutes per side. Flip them with tongs when they’re golden brown on the bottom. Watch closely—they go from perfect to overdone fast!
Transfer finished rings to paper towels to drain. Sprinkle with a pinch of salt while still hot. Pro tip: Keep cooked rings warm in a 200°F oven while you fry the rest. Resist eating them straight from the pan—unless you’re okay with burned tongues!
Pro Tips for the Best Onion Rings
Want onion rings that’ll make you feel like a fry master? Here are my hard-earned secrets:
- Chill before frying: After coating, pop those rings in the freezer for 10 minutes. It helps the breading stick better and gives you an extra-crispy crunch.
- Oil temperature is king: A candy thermometer is your best friend—keep that oil at 375°F. Too cold = soggy, too hot = burnt outside, raw inside. (No thermometer? The breadcrumb test never lies!)
- Work in batches: I know it’s tempting to dump them all in, but overcrowding drops the oil temp fast. Patience = golden perfection.
- Season right after frying: A sprinkle of salt while they’re still piping hot makes all the difference. Try smoked salt or a pinch of cayenne for fun twists!
Serving Suggestions
Oh, the possibilities with these golden beauties! My favorite way? Stacked high on a juicy burger with melty cheese. But let’s be real—they’re stars on their own too. Try them with:
- Classic dips: Creamy ranch, spicy sriracha mayo, or tangy barbecue sauce
- Buddies: Next to fried chicken, piled on salads, or as the ultimate nacho topping
- Breakfast twist: Yes, I’ve totally served them with eggs—no regrets!
However you serve them, just make sure they’re piping hot—that first crispy bite is everything.
Storing and Reheating
Let’s be honest—these onion rings are best fresh, but I get it, sometimes you make too many (or, let’s face it, forget to share). Here’s how to keep them crispy:
- Store: Cool completely, then layer between paper towels in an airtight container. They’ll stay decent for 1-2 days—though I doubt they’ll last that long!
- Reheat: Skip the microwave unless you love soggy rings. Instead, pop them in a 375°F oven or air fryer for 3-5 minutes. That’ll bring back most of their crunch.
Pro tip: If you must microwave, place a cup of water in there too—it helps prevent total sogginess. But really, just eat them fresh—you deserve that perfect crunch!
Onion Rings FAQs
After years of frying (and eating) way too many onion rings, I’ve heard all the questions! Here are my honest answers to what people ask most:
Can I bake these instead of frying?
You can, but—and this is a big but—they won’t get as crispy. If you must bake, spray them generously with oil and crank your oven to 425°F. Use a wire rack over a baking sheet so air circulates. Flip halfway through. They’ll be tasty, but don’t expect that deep-fried magic.
Help! My breading keeps falling off—what am I doing wrong?
Been there! Three likely culprits: 1) Your oil wasn’t hot enough (test with a breadcrumb first!), 2) You didn’t shake off excess flour/buttermilk between dips, or 3) You moved the rings too soon after adding to oil—let them set for 30 seconds before flipping. The freezer trick I mentioned earlier helps tons too!
What onions work best for onion rings?
Yellow onions are my go-to—they’re sweet and sturdy. Red onions work but can be too sharp raw, and sweet onions (like Vidalias) sometimes get too soft. Avoid the tiny inner rings—they burn fast. Pro tip: If your onions are super strong, soak the rings in cold water for 10 minutes before coating.
Can I make these gluten-free?
Absolutely! Swap the flour for gluten-free flour mix, use GF breadcrumbs or crushed cornflakes, and ensure your buttermilk substitute is GF (almond milk + vinegar works). The method stays exactly the same—I’ve done this for my celiac friends with great success.
How do I keep onion rings crispy longer?
The enemy is steam! Don’t stack them hot—spread them in a single layer on paper towels. If serving at a party, keep them on a wire rack in a warm oven (200°F) with the door slightly ajar. And whatever you do, don’t cover them with foil—that’s a one-way ticket to Soggy Town.
Nutritional Information
Here’s the skinny on these crunchy delights (per serving): about 250 calories, 12g fat, and 30g carbs—worth every bite! Remember: Nutritional values are estimates and vary based on ingredients used and how much oil your rings actually absorb. My rings? They tend to “accidentally” absorb extra calories when I’m taste-testing!
Share Your Onion Rings!
Did you make these crispy wonders? I’d love to hear! Tag me with your onion ring masterpieces—the good, the golden, even the gloriously messy attempts. Let’s celebrate that crunch together!
Print
Crispy Onion Rings Recipe – 3 Secrets for Perfect Crunch
- Total Time: 25 mins
- Yield: 4 servings 1x
- Diet: Vegetarian
Description
Crispy, golden onion rings make a perfect snack or side dish. Easy to prepare with simple ingredients.
Ingredients
- 2 large onions, sliced into rings
- 1 cup all-purpose flour
- 1 cup breadcrumbs
- 1 tsp salt
- 1 tsp black pepper
- 1 tsp paprika
- 1 cup buttermilk
- Oil for frying
Instructions
- Slice onions into rings and separate them.
- Mix flour, salt, pepper, and paprika in a bowl.
- Dip onion rings in buttermilk, then coat with flour mixture.
- Dip again in buttermilk, then coat with breadcrumbs.
- Heat oil in a pan over medium-high heat.
- Fry onion rings until golden brown, about 2-3 minutes per side.
- Drain on paper towels and serve hot.
Notes
- Use cold buttermilk for a crispier coating.
- Make sure oil is hot enough before frying to prevent sogginess.
- For extra flavor, add garlic powder or cayenne pepper to the flour mix.
- Prep Time: 15 mins
- Cook Time: 10 mins
- Category: Appetizer
- Method: Frying
- Cuisine: American
Nutrition
- Serving Size: 1 serving
- Calories: 250
- Sugar: 3g
- Sodium: 400mg
- Fat: 12g
- Saturated Fat: 2g
- Unsaturated Fat: 8g
- Trans Fat: 0g
- Carbohydrates: 30g
- Fiber: 2g
- Protein: 5g
- Cholesterol: 5mg
Keywords: onion rings, crispy, snack, fried, appetizer
")
")
")
")