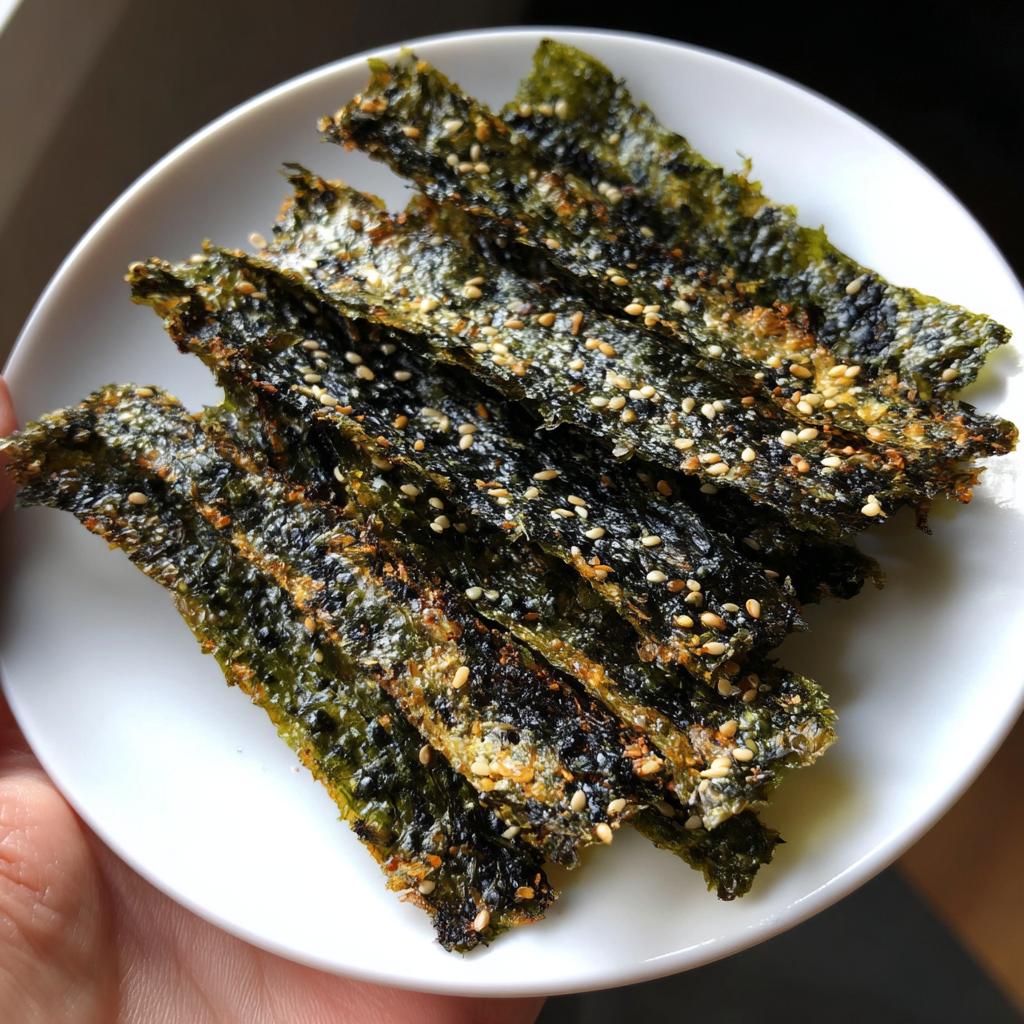
You know those moments when you’re craving something salty and crunchy but don’t want to feel guilty afterward? That’s exactly why I fell in love with homemade seaweed snacks! They’re ridiculously easy to make, packed with nutrients, and give you that satisfying crisp without any of the junk. Trust me, once you try roasting your own nori sheets with just a drizzle of sesame oil and a sprinkle of sea salt, you’ll never go back to store-bought versions. Plus, they’re naturally vegan, gluten-free, and ready in under 15 minutes—perfect for when that snack attack hits hard.
I first discovered seaweed snacks during a trip to Korea years ago, and I’ve been hooked ever since. There’s something magical about how these delicate sheets transform into crispy, savory bites with just a little heat. And the best part? You probably already have all the ingredients in your pantry right now. Whether you’re packing them for lunch, serving with sushi night, or just nibbling straight from the tray (no judgment here!), these little wonders are about to become your new snack obsession.
Ingredients for Seaweed Snacks
Gathering the right ingredients is half the battle with these crispy seaweed snacks, and luckily, you don’t need anything fancy. Just five simple things turn plain nori into something magical. I’ve learned through trial and error that quality makes a difference here—don’t skimp on the sesame oil!
- 10 sheets of dried seaweed (nori) – Make sure it’s the plain, untoasted kind (the ones marked “roasted” are already crispy and won’t work for this recipe). I like using the full-size sheets because they’re easier to handle.
- 1 tbsp sesame oil – The good, fragrant kind! Toasted sesame oil gives deeper flavor, but regular works too if that’s all you have. Keep a light hand—too much oil makes them soggy.
- 1/2 tsp sea salt – Flaky sea salt sticks better than fine table salt. I use Maldon when I’m feeling fancy, but any coarse salt will do.
- 1/2 tsp garlic powder – The secret weapon! This adds that addictive umami punch. If your powder’s old, smell it first—stale garlic powder tastes musty.
- 1/2 tsp onion powder – Balances the garlic perfectly. Pro tip: Mix the salt and powders together in a small bowl first for even sprinkling.
See? Nothing complicated. The beauty of this recipe is how these basic ingredients transform into something extraordinary. Keep an eye out for thick, dark green nori sheets—they crisp up better than the thin, brittle ones. And if you’re feeling adventurous, wait till you see the variations section where we play with these basics!
How to Make Seaweed Snacks
Okay, here’s where the magic happens! Making seaweed snacks is so simple you’ll wonder why you ever bought the expensive packaged ones. Just follow these steps, and in less time than it takes to watch a sitcom episode, you’ll have crispy, savory perfection. The key is patience—don’t rush the baking, or you’ll end up with chewy nori instead of that satisfying crunch we’re after.
Preparing the Seaweed Sheets
First, lay out your nori sheets on a clean surface. I like to work in batches of 2-3 sheets at a time so the seasoning doesn’t have time to make them soggy before they hit the oven. Here’s my foolproof method:
Grab a pastry brush (or even just a clean finger) and lightly dab sesame oil across each sheet. I mean light—you shouldn’t see pools of oil, just a faint sheen. Too much oil is the #1 reason homemade seaweed snacks turn out limp. Then, take your pre-mixed seasoning blend (remember that salt, garlic, and onion powder combo?) and sprinkle it evenly like you’re dusting snow over a winter scene.
Now for the fun part—cutting! Kitchen shears work best here. Snip the sheets into whatever size you like. I’m partial to 1-inch squares because they’re perfect for grabbing by the handful, but rectangles or even strips work great too. Just try to keep them roughly the same size so they bake evenly.
Baking Seaweed Snacks to Perfection
Preheat your oven to 300°F (150°C)—no hotter! Seaweed burns crazy fast, and low-and-slow is the name of the game here. While the oven heats, arrange your seasoned nori pieces in a single layer on a baking sheet. No overlapping allowed, or you’ll get uneven crispiness.

Slide them into the oven and set a timer for 5 minutes. When it dings, peek in—the edges should just be starting to curl. Give the pan a gentle shake (no flipping needed!) and bake another 1-2 minutes until they’re crisp but not browned. They’ll continue crisping as they cool, so don’t wait until they look “done” in the oven or they’ll taste burnt.
Here’s my favorite test: pull one piece out and let it cool for 30 seconds. If it snaps cleanly when bent, you’re golden! If it bends without breaking, give them another minute. Transfer to a wire rack immediately—letting them sit on the hot baking sheet is a surefire way to overdo it.
Why You’ll Love These Seaweed Snacks
Let me tell you why this recipe has become my go-to snack obsession—and why you’ll be just as hooked after your first batch. These little crispy wonders aren’t just delicious; they check every box for modern snack cravings. Here’s what makes them truly special:
- Ready in 12 minutes flat – From pantry to snack attack in less time than it takes to decide what to watch on Netflix. Perfect for last-minute guests or those “I need something NOW” moments.
- Naturally vegan & gluten-free – Works for almost every dietary need without any weird substitutions. My plant-based friends go crazy for these at parties!
- Crazy nutritious – Packed with iodine, iron, and vitamin B12 from the seaweed. At just 50 calories for 10 sheets, you can munch guilt-free.
- Endlessly customizable – Play with flavors by adding chili, furikake, or even a sprinkle of nutritional yeast. I’ve got more ideas in the variations section!
- Kids love them too – My nieces call these “dragon scales” and beg for them after school. Way better than handing out chips!
- Super affordable – Costs pennies compared to store-bought seaweed snacks. One $3 pack of nori makes multiple batches.
The best part? They satisfy that salty-crunchy craving without the post-snack regret. I always keep a jar on my desk for afternoon slumps—way better than reaching for cookies. Once you taste how fresh and vibrant homemade versions are, those packaged snacks will taste stale by comparison. Trust me, your tastebuds (and your waistline) will thank you!
Tips for the Best Seaweed Snacks
After making more batches of seaweed snacks than I can count (seriously, my friends now expect them at every gathering), I’ve picked up some priceless tricks that take them from good to absolutely addictive. These aren’t just tips—they’re the difference between “meh” and “wow!”
Use the right nori: Not all seaweed sheets are created equal! Look for thick, dark green sheets labeled for sushi—they crisp up beautifully. Avoid the pre-toasted or flavored varieties since they won’t transform properly in the oven. My favorite brand? The Korean ones with the little fisherman logo—they never let me down.
Seasoning application is everything: Here’s where most people go wrong—they dump seasoning straight from the container. Instead, mix your salt and spices in a small bowl first, then sprinkle from about a foot above the sheets. This “snowfall method” gives even coverage without clumps. And for Pete’s sake, season after oiling the sheets—otherwise the powder just slides right off!
Watch the clock like a hawk: Seaweed goes from perfectly crisp to burnt in about 30 seconds. Set multiple timers if you’re easily distracted (guilty!). When you smell that toasty sesame aroma strongly, they’re done—don’t wait for visual cues because by then it’s often too late.
The airtight container rule: I learned this the hard way after a batch turned soggy overnight. As soon as your snacks are completely cool (any warmth = condensation = sad limp seaweed), tuck them into an airtight jar with a silicone packet if you have one. Glass works better than plastic—for some reason, plastic seems to trap moisture more.
Customize your crisp: Prefer super-crackly? Bake an extra minute. Like a tiny bit of chew? Pull them out when they just start curling at the edges. The beauty of homemade is you control the texture. My sister likes hers borderline burnt—we don’t talk about that.
Refresh stale snacks: Did they lose their crunch? No worries! Spread them on a tray and pop into a 250°F oven for 2-3 minutes. They’ll come back to life like magic. Just don’t walk away—rebaked seaweed burns faster than new batches.
Last pro tip? Double the recipe right from the start. These disappear faster than you’d believe, and it takes barely any extra effort to make more. Happy snacking!
Variations of Seaweed Snacks
Oh, where do I even begin with the fun twists you can try with these seaweed snacks? Once you’ve mastered the basic recipe, the flavor possibilities are endless! I’ve spent many happy afternoons playing mad scientist with different seasonings—some winners, some… well, let’s just say my dog was very interested in the wasabi experiment. Here are my absolute favorite ways to mix things up:
Spice it up: Add 1/4 teaspoon of crushed red pepper flakes to your seasoning mix for a gentle kick. For real heat lovers, a tiny pinch of cayenne works wonders—just remember, seaweed amplifies spicy flavors, so go easy at first! My husband’s favorite is smoked paprika with a touch of chili powder—he calls it his “campfire snack.”
Umami bomb: Swap half the salt with mushroom powder or add 1/4 teaspoon of MSG (don’t look at me like that—it’s just pure umami goodness!). Nutritional yeast gives a cheesy vibe that’s perfect for popcorn lovers. Last week I tried truffle salt and nearly ate the whole batch before they cooled.
Oil alternatives: While sesame oil is classic, avocado oil keeps things neutral if you want the seasonings to shine. Olive oil works too—just know it’ll taste distinctly Mediterranean. For something wild, try brushing with chili oil or even a very light swipe of melted coconut oil with lime zest!
Sweet & savory: Sounds weird, but trust me—mix 1/2 teaspoon of brown sugar with your salt for a caramel-like contrast. My neighbor swears by a honey-sesame version where she brushes diluted honey before the oil. Just watch baking times carefully—sugar burns fast!
Furikake fun: Skip mixing your own seasonings and sprinkle Japanese furikake right after oiling. The sesame seeds, seaweed, and bonito flakes create instant complexity. I keep little jars of different furikake blends just for this purpose—the plum one is magical.
Citrus zest: Finely grated lime, lemon, or yuzu peel added post-baking gives incredible freshness. Pro tip: Zest directly over the hot snacks when they come out of the oven—the heat releases the oils beautifully. This works especially well with a sprinkle of flaky salt.
The best part? You can mix and match these ideas! Last movie night I made three batches—spicy sesame, garlic-parmesan, and lime-chili—and my friends demolished them all before the opening credits finished. Don’t be afraid to experiment with your favorite flavors. Just maybe write down what you do when you stumble upon something amazing… unlike me who can’t recreate that incredible ginger-scallion combo from last summer. Happy snacking!
Serving Suggestions for Seaweed Snacks
Okay, let’s be real—I’ve been known to eat these straight from the baking sheet like some kind of seaweed monster. But if you want to get fancy (or share, I guess), these crispy bites shine in so many ways beyond solo snacking. Here are my absolute favorite ways to serve them up:
With dips galore: Try pairing with wasabi mayo (just mix mayo with a squeeze of lime and wasabi paste to taste—start small, that stuff’s potent!), creamy avocado dip, or even hummus for extra protein. My weird-but-wonderful combo? Peanut butter with a drizzle of soy sauce—sweet, salty, and totally addictive.
Rice bowl superhero: Crumble them over buddha bowls, poke bowls, or even plain steamed rice with a fried egg. That salty crunch takes simple grains to new heights. I always pack extra in my lunchbox to sprinkle on sad desk salads—instant flavor upgrade!
Sushi night MVP: Serve alongside homemade rolls for extra texture, or use larger pieces as edible “chips” for scooping up spicy tuna or salmon salad. Kids love making mini sushi tacos with them—way less intimidating than rolling!
Soup’s best friend: Float a few pieces on miso soup or ramen instead of crackers. They soften just enough to give that satisfying nori flavor without getting mushy. Bonus: no more sad, soggy crackers at the bottom of your bowl.
Cocktail hour crunch: Surprise your guests by serving them instead of nuts with pre-dinner drinks. The salty-umami flavor pairs shockingly well with gin cocktails or crisp white wine. Last holiday party, I set out little bowls with different seasoning variations—gone in minutes!
Honestly? Half the fun is discovering your own favorite pairings. My niece eats them with apple slices (don’t knock it till you try it!), and my yoga teacher swears by crumbling them over cottage cheese. However you serve them, just make extra—they disappear faster than you’d believe!
Storing Seaweed Snacks
Here’s the thing about homemade seaweed snacks – they’re ridiculously addictive fresh from the oven, but if you miraculously have leftovers (it’s happened maybe twice in my kitchen), you’ll want to store them right to keep that perfect crisp. I learned this the hard way after a batch turned disappointingly chewy overnight. Now I’ve got my storage system down to a science!
The golden rule: Let them cool completely before storing. I spread mine on a wire rack for at least 30 minutes – any lingering warmth will create condensation in the container and ruin that beautiful crunch. While they’re cooling, resist the urge to stack them or they’ll steam each other soft.
Container matters: Glass jars with tight-sealing lids are my go-to. Plastic works in a pinch, but I’ve noticed it doesn’t keep moisture out quite as well. Those cute little mason jars you’ve been saving for crafts? Perfect size for a batch or two. If you’re fancy, toss in one of those silica packets that come with nori or seaweed snacks – they absorb any stray moisture like tiny superheroes.
Where to store: Keep them in a cool, dry place away from sunlight – my pantry shelf works great. Don’t refrigerate! The fridge is basically a humidity chamber that’ll turn your crispy treasures limp in no time. I made that mistake once and cried actual tears.
How long they last: Properly stored, they’ll stay crispy for about 5-7 days. But let’s be honest – they rarely last that long in my house. If by some miracle they’re still around after a week, just pop them in a 250°F oven for 2-3 minutes to revive the crunch. They won’t be quite as perfect as fresh, but still way better than anything store-bought!
Pro tip: If you’re making a big batch for gifting (these make amazing homemade presents!), include a little note about storage. My friends always appreciate when I remind them not to refrigerate – it’s the difference between “Wow!” and “What happened?” when they open the jar a few days later.
Nutritional Information for Seaweed Snacks
Let’s talk numbers—because one of the best things about these seaweed snacks is how they pack a nutritional punch without weighing you down. Now, I’m no dietitian, but I’ve done my homework (and eaten enough batches to know they’re guilt-free). Here’s the breakdown per serving (about 10 sheets), but remember—these are estimates since brands vary slightly.
- Calories: Around 50 – That’s less than half a banana! Perfect for when you want to munch without the calorie overload.
- Fat: 3g (mostly from the heart-healthy sesame oil) – The good kind of fat that keeps you satisfied.
- Carbs: 4g with 2g fiber – That fiber comes straight from the seaweed, keeping things moving smoothly if you know what I mean.
- Protein: 2g – Not huge, but every bit helps—especially for a plant-based snack.
- Sodium: 250mg – Mostly from our sea salt sprinkle. Easy to adjust if you’re watching sodium—just go lighter on the salt.
But wait—the real magic is in the micronutrients! Seaweed is nature’s multivitamin, packed with:
- Iodine: Essential for thyroid health—something most of us don’t get enough of.
- Iron: Great news for vegetarians looking for plant-based iron sources.
- Vitamin B12: Rare in plant foods, but seaweed’s got it—a vegan win!
- Antioxidants: Those dark green sheets are loaded with good-for-you compounds.
Important note: These values can change based on your specific ingredients. Different nori brands, oil amounts, or seasoning blends will tweak the numbers. My Korean nori runs slightly higher in iodine than some Japanese brands, for example. But no matter how you slice it (or season it!), you’re getting a snack that’s as nutritious as it is delicious!
Frequently Asked Questions About Seaweed Snacks
I get asked about these crispy seaweed snacks all the time—friends, neighbors, even that curious barista at my coffee shop! So I figured I’d share the answers to all those burning questions you might have too. These are the real-life queries that pop up most often in my kitchen:
Can I use flavored nori sheets instead of plain?
Oh honey, don’t do it! Those pre-seasoned or toasted nori sheets won’t crisp up properly in the oven—they’re already processed to be eaten straight from the package. Stick with plain, untoasted nori marked for sushi-making. Trust me, we’ll add way better flavors ourselves!
How long do homemade seaweed snacks stay fresh?
In an airtight container (I swear by my glass mason jars), they’ll keep their perfect crunch for about 5-7 days. But let’s be real—mine never last that long! If they do start to soften, a quick 2-minute refresh in a low oven brings them right back to life.
Can I make these in an air fryer instead?
Absolutely! I’ve tested this dozens of times—just do 250°F for 3-4 minutes max. The key is checking every 60 seconds after the 2-minute mark because air fryers can vary wildly. And don’t stack them—single layer only!
Why did my seaweed turn out chewy instead of crispy?
Two likely culprits: Either you used too much oil (easy to do—just a whisper-thin coating is enough), or they weren’t baked long enough. Seaweed needs that full 5-7 minutes at 300°F to transform properly. Next time, listen for that faint “snap” when testing doneness!
Are these safe for kids?
My nieces and nephews go wild for them! Just go lighter on the salt for little ones. Pro tip: Cut them into fun shapes with cookie cutters—kids love “seaweed stars” or “fish scales.” Bonus: no choking hazard since they dissolve easily.
Can I use olive oil instead of sesame oil?
You can, but expect a very different (more Mediterranean) flavor profile. Sesame oil gives that classic Asian taste we associate with nori. If using olive oil, I’d recommend adding some lemon zest to complement it beautifully!
Where do you buy your nori sheets?
Any Asian market will have them, but I’ve even found great options at my regular grocery store’s international aisle lately. Look for thick, dark green sheets—the ones labeled for sushi tend to be higher quality. My current favorite comes in a green package with gold lettering!
Got a question I didn’t cover? Drop it in the comments below—I check them all and love hearing about your seaweed snack adventures. Happy crunching!
Go Make Some Seaweed Magic!
Alright, my fellow snack enthusiast – it’s time to put all this seaweed wisdom into action! I can’t wait for you to experience that first incredible bite of your homemade crispy creation. There’s something so satisfying about transforming simple sheets of nori into golden, seasoned perfection with just a few pantry staples.
Don’t overthink it – grab that baking sheet and get started! I want to hear all about your seaweed snack adventures. Did you go classic sesame-salt? Try the spicy chili version? Maybe invent something wild like cocoa-dusted seaweed (okay maybe not that last one). Whatever you create, tag me on social or leave a comment – seeing your kitchen experiments absolutely makes my day.
Remember: even if your first batch isn’t perfect (mine certainly wasn’t!), that’s part of the fun. You’ll nail it by the second try, I promise. Now excuse me while I go make another batch myself – writing this made me crave that salty crunch something fierce! Happy snacking, friend.
Print
15-Minute Crispy Seaweed Snacks You’ll Crave Forever
- Total Time: 12 minutes
- Yield: 1 serving (10 sheets) 1x
- Diet: Vegan
Description
Crunchy and nutritious seaweed snacks made from roasted seaweed sheets, lightly seasoned for a savory taste.
Ingredients
- 10 sheets of dried seaweed (nori)
- 1 tbsp sesame oil
- 1/2 tsp sea salt
- 1/2 tsp garlic powder
- 1/2 tsp onion powder
Instructions
- Preheat oven to 300°F (150°C).
- Brush each seaweed sheet lightly with sesame oil.
- Sprinkle sea salt, garlic powder, and onion powder evenly.
- Cut sheets into small squares or rectangles.
- Place on a baking sheet in a single layer.
- Bake for 5-7 minutes until crispy.
- Cool before serving.
Notes
- Store in an airtight container to maintain crispiness.
- Adjust seasoning to your preference.
- For extra flavor, add a pinch of chili flakes.
- Prep Time: 5 minutes
- Cook Time: 7 minutes
- Category: Snack
- Method: Baking
- Cuisine: Asian
Nutrition
- Serving Size: 10 sheets
- Calories: 50
- Sugar: 0g
- Sodium: 250mg
- Fat: 3g
- Saturated Fat: 0.5g
- Unsaturated Fat: 2.5g
- Trans Fat: 0g
- Carbohydrates: 4g
- Fiber: 2g
- Protein: 2g
- Cholesterol: 0mg
Keywords: seaweed snacks, healthy snack, vegan snack, roasted seaweed


")
")
")
")