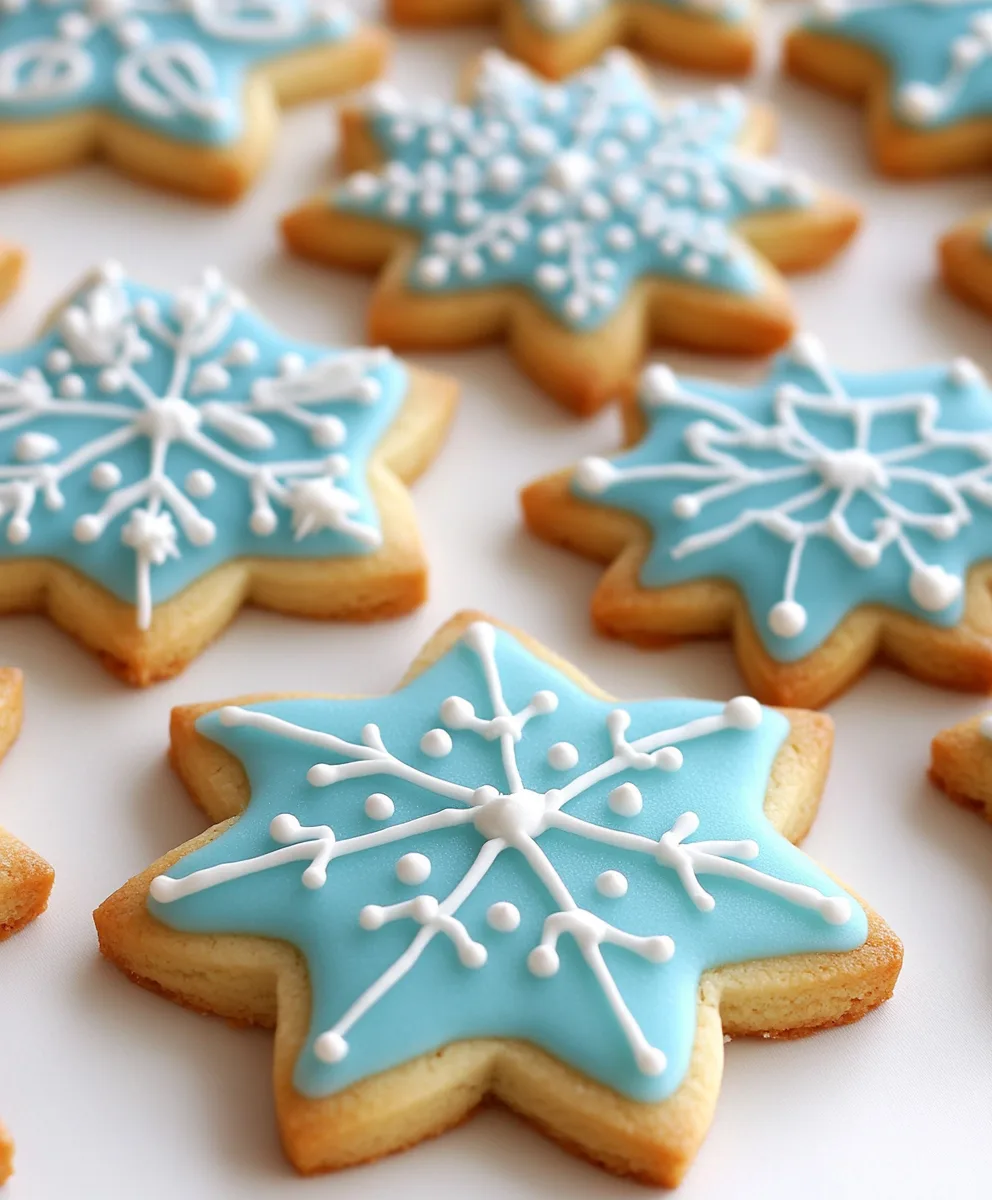
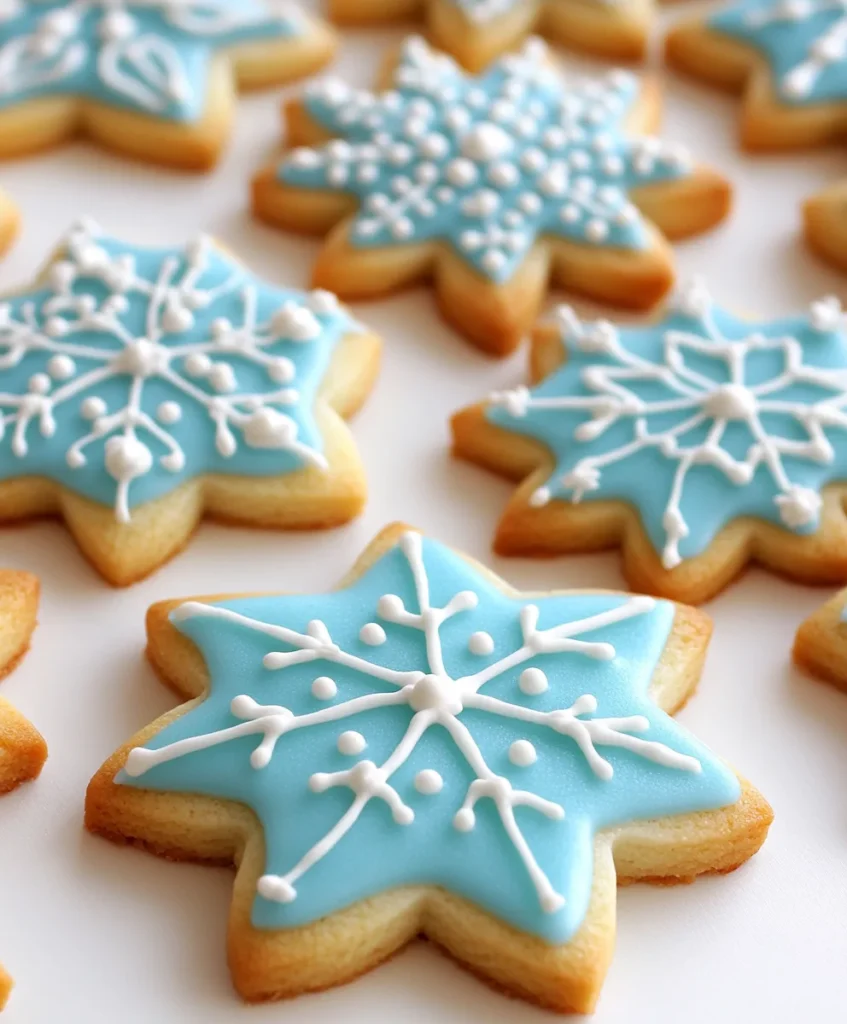
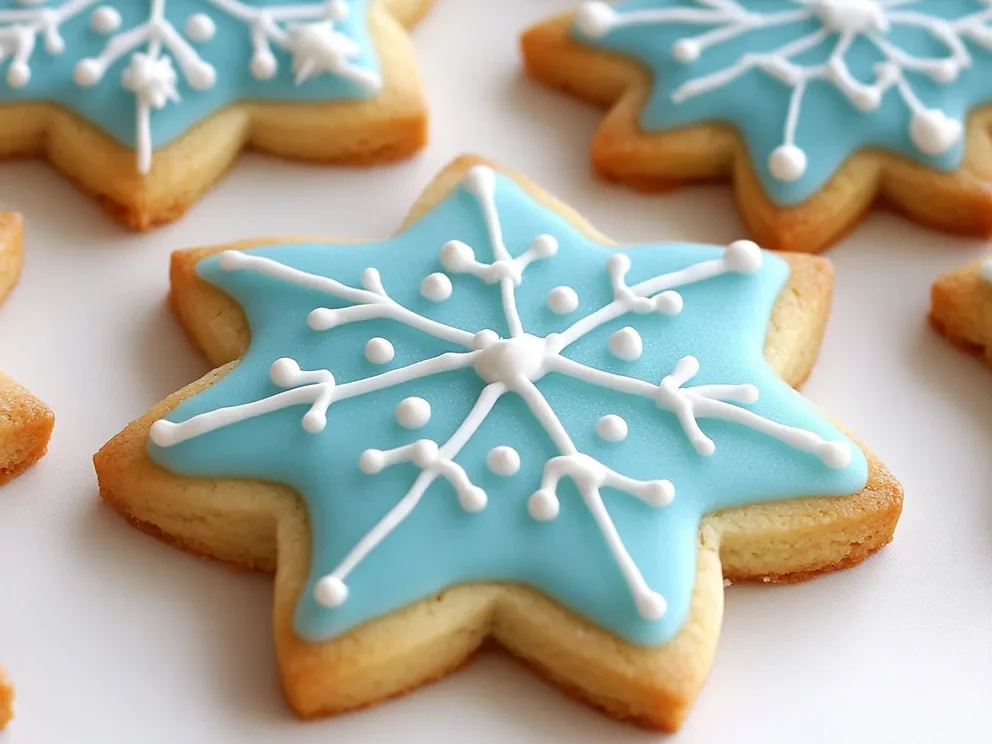
Decorative sugar cookie icing is a delightful way to elevate your baking game. It transforms simple cookies into stunning edible art. Whether you’re celebrating a birthday, holiday, or just want to add a personal touch to your treats, this icing is perfect for all occasions. With its smooth texture and vibrant colors, it allows for endless creativity in cookie decorating.
Ingredients for Decorative Sugar Cookie Icing
To create the perfect decorative sugar cookie icing, you’ll need a few simple ingredients. Each component plays a vital role in achieving the right texture and flavor. Here’s what you’ll need:
- Powdered Sugar: 3 cups. This is the main ingredient that gives the icing its sweetness and smooth texture.
- Milk: 4 tablespoons. Milk helps to thin the icing to the desired consistency, making it easier to work with.
- Light Corn Syrup: 1 1/2 tablespoons. This ingredient adds shine and helps the icing to set properly.
- Vanilla Extract: 1/2 teaspoon. This adds a lovely flavor to the icing. You can also use peppermint or orange extract for a twist!
- Salt: A dash. Just a pinch enhances the sweetness of the icing.
- Optional Food Coloring: As desired. Food coloring allows you to create vibrant shades for your designs.
- Plain Cooled Sugar Cookies: For decorating. Make sure your cookies are completely cooled before icing them.
Gathering these ingredients will set you on the right path to making beautiful and delicious decorative sugar cookie icing. Each ingredient contributes to the overall success of your cookie decorating adventure!
Tools Needed for Decorative Sugar Cookie Icing
To create stunning decorative sugar cookie icing, having the right tools is essential. These tools will help you mix, color, and apply the icing with ease. Here’s a list of the must-have tools for your cookie decorating journey:
- Mixing Bowl: A large mixing bowl is necessary for combining your ingredients. Choose one that’s easy to clean and big enough to hold all the icing.
- Whisk or Electric Mixer: A whisk is great for mixing by hand, while an electric mixer can save time and ensure a smooth consistency.
- Piping Bags: These are essential for decorating your cookies. They allow for precise application of icing. You can also use squeeze bottles if you prefer.
- Piping Tips: Different tips can create various designs. A round tip is perfect for outlining, while a star tip can add decorative edges.
- Toothpicks or Small Spatula: These tools are handy for spreading icing and creating designs. They help you manipulate the icing for a polished look.
- Food Coloring Gel: If you want vibrant colors, gel food coloring is the best choice. It won’t thin your icing like liquid coloring can.
- Cookie Sheet: Use a cookie sheet to hold your decorated cookies while they dry. This keeps them safe and organized.
- Cooling Rack: A cooling rack is useful for letting your cookies cool completely before decorating. This prevents the icing from melting.
Having these tools on hand will make your cookie decorating experience enjoyable and successful. With the right equipment, you can unleash your creativity and make beautiful decorative sugar cookie icing that will impress everyone!
Step-by-Step Preparation of Decorative Sugar Cookie Icing
Now that you have your ingredients and tools ready, it’s time to dive into the fun part: making your decorative sugar cookie icing! Follow these simple steps to create a smooth and colorful icing that will make your cookies shine.
Step 1: Prepare Your Workspace
Before you start, it’s important to set up your workspace. Clear a flat surface and gather all your ingredients and tools. Having everything within reach will make the process smoother. You might want to cover your workspace with parchment paper or a clean cloth to catch any spills.
Step 2: Mix the Base
In a large mixing bowl, add the 3 cups of powdered sugar along with a dash of salt. Using a whisk, mix them together well. This step is crucial as it helps to remove any lumps in the sugar, ensuring a smooth icing. If you have an electric mixer, you can use it for a quicker and easier mix.
Step 3: Add Wet Ingredients
Next, pour in 4 tablespoons of milk, 1 1/2 tablespoons of light corn syrup, and 1/2 teaspoon of your chosen extract. Mix everything together until the icing is smooth and well combined. If the icing seems too thick, don’t worry! Just add a little more milk, one teaspoon at a time, until you reach your desired consistency.
Step 4: Color the Icing
If you want to add some color to your icing, now is the time! Divide the icing into separate bowls based on how many colors you want to create. Add a few drops of food coloring to each bowl and mix until you achieve the shades you desire. Remember, a little goes a long way, so start with small amounts!
Step 5: Adjust Consistency
For the best results, you need to adjust the consistency of your icing. For outlining your cookies, keep the icing thicker. For flooding, which is filling in the outlines, thin the icing slightly by adding more milk. The icing should flow easily but still hold its shape when piped.
Step 6: Fill Piping Bags
Once your icing is ready, it’s time to fill your piping bags or squeeze bottles. If you’re using piping bags, cut a small tip off the end for precise decorating. This will help you control the flow of icing as you decorate your cookies.
Step 7: Decorate the Cookies
Start decorating your cooled sugar cookies by outlining the edges with the thicker icing. Allow it to set for a few minutes. After that, flood the center with the thinned icing. You can use a toothpick or a small spatula to spread it evenly if needed. This step is where your creativity can really shine!
Step 8: Create Designs
Once the base layer is set, you can add intricate designs using different colors. Use your piping bags to create borders, patterns, or even fun shapes. Let your imagination run wild! Allow the icing to dry completely, which may take several hours or even overnight, depending on the thickness.
Step 9: Store the Cookies
After the icing is fully dry, it’s important to store your decorated cookies properly. Place them in an airtight container to keep them fresh. This will help maintain their beautiful designs and delicious taste.
Step 10: Serve and Enjoy
Finally, it’s time to show off your beautiful creations! Present your decorated sugar cookies at gatherings, parties, or simply enjoy them yourself. Each cookie is a little work of art, and they’re sure to impress everyone who sees (and tastes) them!
Serving Suggestions for Decorative Sugar Cookie Icing
Once you’ve created your stunning decorative sugar cookies, it’s time to think about how to serve them. These cookies are not just a treat; they can also be a centerpiece for various occasions. Here are some delightful serving suggestions to make your cookies shine:
- Cookie Platters: Arrange your decorated cookies on a beautiful platter. You can mix different shapes and colors for a vibrant display. This is perfect for parties, holidays, or family gatherings.
- Gift Boxes: Package your cookies in decorative boxes or tins. Add a personal touch with a handwritten note. These make wonderful gifts for friends, family, or coworkers.
- Cookie Favors: For special events like weddings or baby showers, consider using your cookies as favors. Wrap them in clear bags tied with ribbons for a charming presentation.
- Holiday Displays: Use your cookies to create festive displays during holidays. For example, during Christmas, you can hang them on a tree or use them as table decorations.
- Cookie Decorating Parties: Host a cookie decorating party where guests can decorate their own cookies using your icing. Provide various colors and toppings for a fun and interactive experience.
- Pair with Beverages: Serve your cookies alongside hot cocoa, coffee, or tea. The sweet icing complements these drinks perfectly, making for a cozy treat.
These serving suggestions will not only enhance the enjoyment of your decorative sugar cookies but also create memorable experiences for you and your guests. So, get creative and have fun showcasing your delicious works of art!
Tips for Perfecting Decorative Sugar Cookie Icing
Creating beautiful decorative sugar cookie icing is an art that can be perfected with a few helpful tips. Whether you’re a beginner or an experienced baker, these suggestions will enhance your icing skills and ensure your cookies look stunning every time.
- Use Fresh Ingredients: Always use fresh powdered sugar and other ingredients. Stale ingredients can affect the taste and texture of your icing.
- Temperature Matters: Make sure your cookies are completely cooled before decorating. Warm cookies can cause the icing to melt, ruining your designs.
- Practice Piping: If you’re new to piping, practice on parchment paper before decorating your cookies. This will help you get a feel for the icing flow and pressure needed.
- Keep Icing Covered: Icing can dry out quickly. Keep any unused icing covered with a damp cloth or plastic wrap to prevent it from hardening.
- Experiment with Consistency: Don’t be afraid to play with the icing’s thickness. Thicker icing is great for outlines, while thinner icing works well for flooding. Finding the right balance is key!
- Use a Toothpick: A toothpick is a handy tool for fixing mistakes. You can use it to spread icing or pop any air bubbles that may form.
- Layering Techniques: For more complex designs, allow each layer of icing to dry before adding another. This prevents colors from bleeding into each other.
- Store Properly: Once your cookies are decorated, store them in a cool, dry place. Avoid stacking them until the icing is completely dry to prevent smudging.
- Have Fun with Colors: Don’t hesitate to mix colors to create unique shades. You can also use edible glitter or sprinkles for added flair!
- Be Patient: Good things take time! Allow your icing to dry completely before handling or serving the cookies. This ensures your designs stay intact.
By following these tips, you’ll be well on your way to mastering decorative sugar cookie icing. Remember, practice makes perfect, so keep experimenting and enjoy the process of creating beautiful cookies!
FAQs about Decorative Sugar Cookie Icing
How long does Decorative Sugar Cookie Icing take to dry?
The drying time for decorative sugar cookie icing can vary based on several factors. Generally, it takes about 4 to 6 hours for the icing to dry completely. However, if you’ve applied a thicker layer, it may take longer. For best results, allow your cookies to dry overnight. This ensures that the icing hardens properly, keeping your designs intact.
Can I use different flavors in Decorative Sugar Cookie Icing?
Absolutely! You can customize the flavor of your decorative sugar cookie icing by using different extracts. While vanilla is a classic choice, you can experiment with peppermint, almond, orange, or even lemon extracts. Just remember to adjust the amount based on the strength of the flavor. A little goes a long way, so start with a small amount and taste as you go!
What is the best way to store cookies decorated with Decorative Sugar Cookie Icing?
To keep your beautifully decorated cookies fresh, store them in an airtight container. Make sure the icing is completely dry before stacking the cookies to prevent smudging. If you have multiple layers of cookies, place parchment paper between them. This will help protect the icing and maintain the cookies’ appearance. Keep the container in a cool, dry place away from direct sunlight.
How can I achieve different consistencies with Decorative Sugar Cookie Icing?
Achieving different consistencies with decorative sugar cookie icing is all about adjusting the amount of liquid you add. For outlining, keep the icing thicker by using less milk. For flooding, thin the icing by adding more milk, one teaspoon at a time, until it flows easily but still holds its shape. A good rule of thumb is to aim for a consistency similar to that of honey for flooding and toothpaste for outlining. Practice will help you find the perfect balance!
Conclusion on Decorative Sugar Cookie Icing
In conclusion, decorative sugar cookie icing is a fantastic way to add a personal touch to your baked goods. With its simple ingredients and easy preparation, anyone can create beautiful and delicious cookies that are perfect for any occasion. Whether you’re celebrating a birthday, holiday, or just want to enjoy a sweet treat, this icing allows for endless creativity.
Print
Decorative Sugar Cookie Icing Enhances Your Baking Skills
- Total Time: 15 minutes
- Yield: Approximately 2 cups of icing
- Diet: Vegetarian
Description
Decorative sugar cookie icing is a delightful way to elevate your baking game, transforming simple cookies into stunning edible art.
Ingredients
- Powdered Sugar: 3 cups
- Milk: 4 tablespoons
- Light Corn Syrup: 1 1/2 tablespoons
- Vanilla Extract: 1/2 teaspoon
- Salt: A dash
- Optional Food Coloring: As desired
- Plain Cooled Sugar Cookies: For decorating
Instructions
- Prepare Your Workspace
- Mix the Base
- Add Wet Ingredients
- Color the Icing
- Adjust Consistency
- Fill Piping Bags
- Decorate the Cookies
- Create Designs
- Store the Cookies
- Serve and Enjoy
Notes
- Use Fresh Ingredients
- Temperature Matters
- Practice Piping
- Keep Icing Covered
- Experiment with Consistency
- Use a Toothpick
- Layering Techniques
- Store Properly
- Have Fun with Colors
- Be Patient
- Prep Time: 15 minutes
- Cook Time: 0 minutes
- Category: Dessert
- Method: Mixing and Decorating
- Cuisine: American
Nutrition
- Serving Size: 1 tablespoon
- Calories: 50
- Sugar: 12g
- Sodium: 10mg
- Fat: 0g
- Saturated Fat: 0g
- Unsaturated Fat: 0g
- Trans Fat: 0g
- Carbohydrates: 13g
- Fiber: 0g
- Protein: 0g
- Cholesterol: 0mg
Keywords: decorative sugar cookie icing, cookie decorating, baking, icing recipes


")
")
")
")