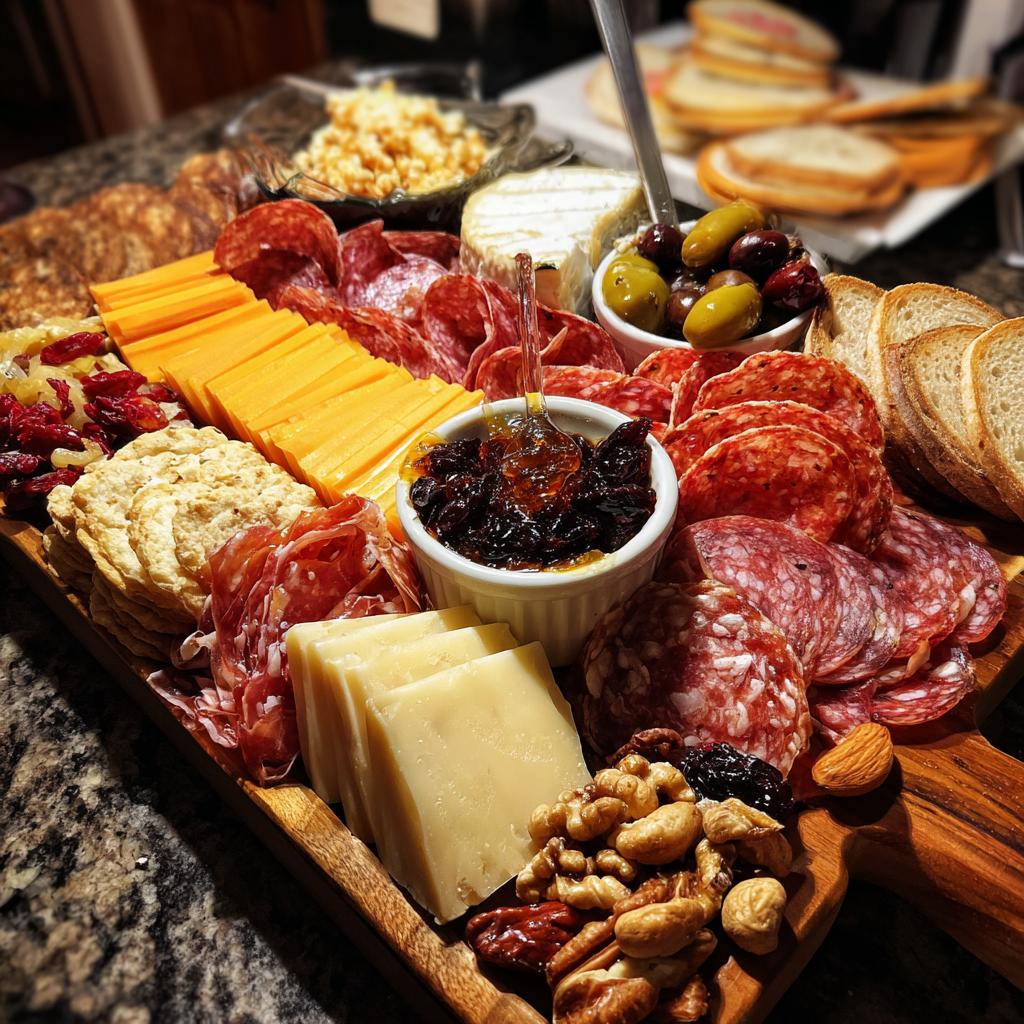
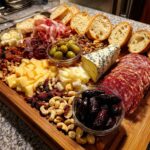
Oh, how I love a good charcuterie board! It all started when I hosted my first dinner party and panicked about what to serve. A friend suggested throwing together some meats, cheeses, and fruits – and just like that, my go-to entertaining lifesaver was born. The beauty of a charcuterie board is how effortlessly impressive it looks while being ridiculously simple to put together. No cooking required, just your favorite flavors artfully arranged. Whether it’s an impromptu gathering or a fancy soiree, this customizable spread always steals the show. Trust me, once you see how easy it is to create these edible masterpieces, you’ll be making them for every occasion!
Why You’ll Love This Charcuterie Board
This charcuterie board is my secret weapon for stress-free entertaining, and here’s why:
- No cooking required – just slice, arrange, and impress!
- Customizable for any taste – swap ingredients to match your guests’ preferences
- Perfect for any occasion from casual game nights to fancy dinner parties
- Visually stunning with minimal effort – it looks like you spent hours
- Great for last-minute hosting when unexpected guests drop by
Honestly, I’ve never met anyone who didn’t go crazy for a well-made charcuterie board. It’s the ultimate crowd-pleaser!
Charcuterie Board Ingredients
Here’s everything you’ll need to create the perfect charcuterie board – these are my tried-and-true favorites after years of experimenting!
- 200g assorted cured meats – I always include prosciutto (paper-thin slices), salami (folded into cute rosettes), and spicy chorizo (sliced into coins)
- 200g assorted cheeses – Aim for variety: sharp cheddar (cut into cubes), creamy brie (left whole with a knife), and smoked gouda (thin slices) are my go-tos
- 100g mixed nuts – Toasted almonds, walnuts, and cashews add crunch (I always keep them unsalted to balance the salty meats)
- 100g dried fruits – Sweet apricots, chewy figs, and plump raisins create beautiful color contrast
- 50g olives – Kalamata or green olives in a small bowl (don’t forget the toothpicks!)
- 50g honey or jam – For drizzling over cheeses (local honey or fig jam works wonders)
- 1 fresh baguette or crackers – Sliced and lightly toasted if serving immediately
Pro tip from my many charcuterie fails: always take cheeses out of the fridge 30 minutes before serving – cold cheese just doesn’t taste as good! And if you’re using fresh fruits like grapes or berries (which I highly recommend when in season), add them right before serving to prevent wilting.
How to Make a Charcuterie Board
After countless boards (and a few messy learning experiences), I’ve nailed down the perfect method. Follow these simple steps, and you’ll have a stunning spread that’ll make your guests think you’re a professional!
Step 1: Prepare Meats and Cheeses
First things first – let’s get those meats and cheeses ready! For prosciutto, I gently drape it in loose folds rather than laying it flat – it looks so much more elegant that way. Salami gets folded into quarters to make little rosettes (just pinch the center – so easy!). Chorizo I slice into thin coins about ¼ inch thick.
For cheeses, cube the cheddar into bite-sized pieces (about ½ inch), slice the gouda thinly (a cheese plane works wonders here), and leave the brie whole with a small knife beside it. Remember to do this about 30 minutes before serving so everything comes to room temperature – it makes ALL the difference in flavor!
Step 2: Arrange the Board
Now for the fun part! Start with your cheeses – place them at different points on the board to create visual balance. I like putting the brie in the center as a focal point. Next, tuck your folded meats around the cheeses, alternating types and colors. Don’t be afraid to let some pieces overlap – it looks more natural!
Fill in the gaps with your nuts and dried fruits, scattering them in small clusters rather than dumping them in one spot. Odd numbers always look best – three little piles of almonds here, five fig halves there. See how it’s starting to come alive?
Step 3: Add Accompaniments
Almost there! Nestle your small bowl of olives somewhere easily accessible (I usually put it near the center). Place another small bowl with honey or jam near the brie – the sweet pairing is heavenly! Finally, arrange sliced baguette or crackers around the edges, standing some upright in a small glass or leaning against other items for height variation.
My secret finishing touch? A sprinkle of fresh rosemary or thyme over everything – it adds a pop of color and wonderful aroma! Now step back and admire your masterpiece before your guests devour it.
Charcuterie Board Tips for Success
After making more charcuterie boards than I can count (and learning from plenty of mistakes), these are my golden rules for guaranteed success every time:
Use the rule of threes
Group items in odd numbers – three types of meats, five cheese varieties, seven grape clusters. It just looks more natural and appealing to the eye. I swear by this simple trick to make any board look professionally designed!
Play with height and texture
Don’t let everything lie flat! Prop some crackers upright in a small glass, fold meats into little rosettes, or stack cheese cubes. The variation makes the board more visually interesting and helps guests spot all the delicious options.
Seasonal is sensational
Fresh berries in summer, crisp apple slices in fall – rotating seasonal fruits keeps your board exciting. Right now I’m obsessed with adding pomegranate seeds in winter for their gorgeous pop of color and crunch.
Keep wet and dry separate
Learned this the hard way – don’t let juicy fruits touch crackers or bread for too long! Either add them last or put them in their own little bowls. Your board will stay crisp and beautiful much longer this way.
Charcuterie Board Variations
One of my favorite things about charcuterie boards is how endlessly customizable they are! Here are some delicious twists I’ve tried over the years that always get rave reviews:
- Vegan delight – Swap in marinated tofu slices, nut-based cheeses, and veggie “salami” with lots of colorful crudités
- Spice lover’s dream – Use pepperoni, hot capicola, and jalapeño-infused cheeses with spicy honey drizzle
- Mediterranean magic – Hummus, tzatziki, feta, kalamata olives, and flatbread instead of crackers
- Breakfast board – Smoked salmon, cream cheese, bagels, fresh berries, and honeycomb
- Sweet tooth special – Dark chocolate chunks, biscotti, mascarpone, dried fruits, and toasted coconut
My neighbor actually inspired my latest favorite – a tropical twist with mango slices, coconut cashews, pineapple, and ham with Hawaiian rolls. Don’t be afraid to get creative – the best boards often come from spontaneous pantry raids! Just remember to keep a balance of textures and flavors, and you really can’t go wrong.
Serving Suggestions for Your Charcuterie Board
Oh, the fun part – what to serve with your masterpiece! A crisp Sauvignon Blanc pairs beautifully with creamy cheeses, while a bold Cabernet loves those rich meats. No wine? Try crusty sourdough instead of baguette or gluten-free crackers for dietary needs. And always – I mean always – have extra napkins handy!
Storing Your Charcuterie Board
Okay, confession time – I’ve definitely left a charcuterie board out overnight more than once (oops!). But here’s what I’ve learned about proper storage to keep everything fresh and delicious:
First, cover and refrigerate any leftovers within 2 hours – food safety first! I like using beeswax wraps or just sliding the whole board (if it fits) into a large plastic bag. The meats and cheeses will keep for about 3-4 days this way.
Now, the golden rule: store components separately if possible. Those crackers and bread? They’ll turn into sad, soggy messes if left with moist ingredients overnight. I keep mine in an airtight container at room temperature and just add fresh ones when serving leftovers.
Pro tip: refresh your board when bringing it back out! Wipe down the platter, rearrange items, and add fresh garnishes. Nobody will ever know it’s not brand new – my little secret for effortless entertaining!
Charcuterie Board Nutritional Information
Now, let’s talk numbers – but don’t let them scare you! A charcuterie board is all about balance and enjoyment. Here’s the scoop on what you’re getting in each serving (and remember, these are just estimates – your actual values will vary based on the specific brands and portions you use).
Per serving (about 1/6 of the board):
- 350 calories – Perfect for grazing without overdoing it
- 25g fat (10g saturated) – Mostly from those delicious cheeses and nuts
- 20g carbs – With 3g fiber from fruits and whole grain crackers
- 15g protein – Thanks to the meats and cheeses keeping you satisfied
- 500mg sodium – Those cured meats pack a salty punch
Here’s my take – while the numbers matter, what really counts is how you enjoy your charcuterie experience. I like to balance richer bites with fresh fruits and veggies when I’m watching my intake. And honestly? Sometimes you just need to savor that extra slice of brie with honey – life’s too short not to!
Remember, these values can swing quite a bit depending on your ingredient choices. Going heavy on the meats? Sodium might be higher. Loading up on fruits and nuts? You’ll get more fiber. That’s the beauty of building your own board – you’re in complete control of what goes into your body.
Frequently Asked Questions
Can I make a charcuterie board ahead of time?
Absolutely! I prep my boards up to 4 hours in advance – just cover tightly with plastic wrap and refrigerate. Wait to add crackers and fresh fruits until right before serving to keep everything crisp. The flavors actually develop more when ingredients mingle a bit!
What are the best cheeses for beginners?
Start with these foolproof picks: a mild cheddar (always a crowd-pleaser), creamy brie (just leave the rind on – it’s edible!), and gouda (mellow but flavorful). These three give you variety without overwhelming anyone’s palate. Once you’re comfortable, branch out to blue cheeses or fun flavored varieties!
How much should I make per person?
From my party-hosting experience, plan for about 2-3 ounces each of meats and cheeses per person for an appetizer spread. For a main course situation (yes, I’ve done cheese board dinners!), bump it up to 4-5 ounces. Always better to have leftovers than hungry guests!
What’s your favorite unusual charcuterie board addition?
Oh, I love surprising people with unexpected touches! My current obsession is adding dark chocolate-covered almonds – they pair amazingly with sharp cheeses. I’ve also had great success with pickled vegetables for tangy contrast and artisanal mustard for dipping. Don’t be afraid to think outside the box!
Can I make a kid-friendly charcuterie board?
You bet! My niece inspired our “snackle box” version – cubed mild cheeses, pepperoni slices, pretzels, grapes, and mini cookies. I arrange everything in a tackle box with compartments (hence the name!). Kids go nuts for the fun presentation and getting to pick their favorites.
Effortless 200g Charcuterie Board That Wows Every Guest
- Total Time: 15 minutes
- Yield: 6 servings 1x
- Diet: Low Lactose
Description
A charcuterie board is a selection of cured meats, cheeses, nuts, fruits, and other accompaniments arranged for easy serving.
Ingredients
- 200g assorted cured meats (salami, prosciutto, chorizo)
- 200g assorted cheeses (cheddar, brie, gouda)
- 100g mixed nuts (almonds, walnuts, cashews)
- 100g dried fruits (apricots, figs, raisins)
- 50g olives
- 50g honey or jam
- 1 baguette or crackers
Instructions
- Slice cheeses and meats into bite-sized pieces.
- Arrange meats, cheeses, nuts, and fruits on a wooden board or platter.
- Fill small bowls with olives, honey, or jam and place them on the board.
- Add sliced baguette or crackers around the edges.
- Serve immediately or cover and refrigerate until ready to serve.
Notes
- Use seasonal fruits for freshness.
- Balance flavors by mixing salty, sweet, and tangy items.
- Keep cheeses at room temperature before serving for better taste.
- Prep Time: 15 minutes
- Cook Time: 0 minutes
- Category: Appetizer
- Method: No-Cook
- Cuisine: International
Nutrition
- Serving Size: 1 serving
- Calories: 350
- Sugar: 10g
- Sodium: 500mg
- Fat: 25g
- Saturated Fat: 10g
- Unsaturated Fat: 12g
- Trans Fat: 0g
- Carbohydrates: 20g
- Fiber: 3g
- Protein: 15g
- Cholesterol: 50mg
Keywords: charcuterie board, appetizer, cheese platter, party food

")
")
")
")