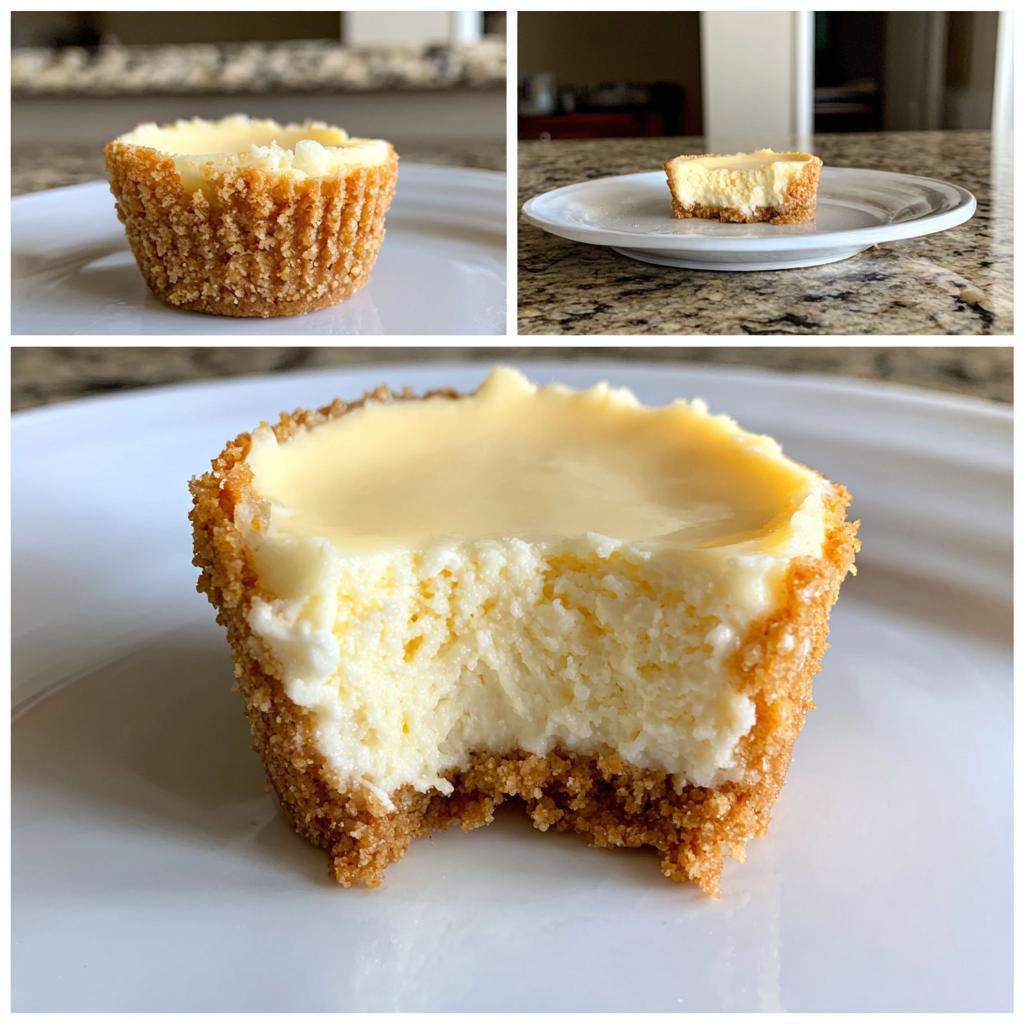
Oh my gosh, let me tell you about the first time I made mini cheesecakes for a party – total game changer! I was scrambling last minute (as usual) and needed something impressive but easy. These little beauties saved the day. They’re seriously foolproof – no fancy water bath, no stress about cracking, just creamy deliciousness in perfect bite-sized portions.
What I love most is how versatile they are. One basic recipe becomes a dozen different desserts depending on your toppings. Fresh berries? Chocolate drizzle? A dollop of lemon curd? Yes please! They always disappear fast at gatherings because everyone can grab their own little treat without the mess of slicing. Plus, they’re just so darn cute – like personal cheesecakes made just for you!
Why You’ll Love These Mini Cheesecakes
Let me count the ways these little guys will steal your heart:
- No water bath drama – Unlike their full-sized cousins, these minis bake up perfectly without that tricky water bath step
- Portion control magic – One or two satisfy that cheesecake craving without overdoing it (though I won’t judge if you eat three…)
- Customizable cuties – Top each one differently to please every picky eater at your party
- Quick and easy – From mixing bowl to table in under 30 minutes – perfect for last-minute guests
- Less mess, more wow – Individual servings mean no messy slicing and everyone gets picture-perfect cheesecake
Ingredients for Mini Cheesecakes
Here’s what you’ll need to make these adorable little cheesecakes – trust me, keeping the ingredient list simple is part of their charm!
- 1 cup graham cracker crumbs – Pack them lightly when measuring (I just crush whole crackers in a bag with a rolling pin – so therapeutic!)
- 2 tbsp melted butter – Unsalted is best so you control the saltiness
- 1 tbsp sugar – For that perfect sweet crunch in the crust
- 8 oz cream cheese – Must be softened to room temp or you’ll get lumpy filling (I leave mine out for 2 hours)
- 1/4 cup sugar – Granulated works great here
- 1 tsp vanilla extract – The good stuff makes all the difference
- 1 large egg – Room temp helps it blend smoothly into the filling
See? Nothing fancy – just pantry staples transformed into something magical!
Equipment You’ll Need
Don’t stress about special tools – you probably have everything already! Here’s what I grab:
- Mini muffin tin (the star of the show!)
- Mixing bowls – One for crust, one for filling
- Piping bag or ziplock (optional but makes filling so much neater)
- Measuring cups/spoons – For that perfect balance
- Spatula – To scrape every last bit of creamy goodness
That’s it! No fancy gadgets required for these little delights.
How to Make Mini Cheesecakes
Okay, let’s get to the fun part – making these adorable little cheesecakes! I promise it’s easier than you think, and I’ll walk you through each step with all my little tricks.
Step 1: Prepare the Crust
First things first – preheat that oven to 325°F (160°C). While it’s heating up, let’s make our crust. In a bowl, mix together your graham cracker crumbs, melted butter, and that tablespoon of sugar. You want it to look like wet sand – if it’s too dry, add just a smidge more butter.
Now for the crucial part: pressing it into the mini muffin tins. Use about a teaspoon of mixture per cup and press it firmly with your fingers or the back of a small spoon. But here’s my secret – don’t pack it too hard! Just enough to hold together when baked. The crust should come up the sides a tiny bit to form little cups.
Step 2: Make the Filling
This is where the magic happens! Take your softened cream cheese (see why we left it out?) and beat it with the sugar and vanilla until it’s completely smooth. I mean silky smooth – no lumps allowed! Scrape down the bowl often – those sneaky lumps hide in the corners.
Now add the egg last and mix just until combined. Overmixing here can make your cheesecakes puff up then collapse, and we don’t want that. The filling should be thick but pourable – think pancake batter consistency.
Step 3: Bake and Cool
Time to fill those crusts! You can spoon the filling in, but I swear by using a piping bag or ziplock with the corner snipped off – so much cleaner. Fill each cup nearly to the top, leaving just a tiny space.
Bake for 15-20 minutes until the edges look set but the centers still have a slight jiggle when you gently shake the pan. They’ll finish setting as they cool. And here’s my golden rule: let them cool completely in the pan before trying to remove them! This prevents cracks and helps them hold their shape. Patience is key – I know it’s hard when they smell so good!
Tips for Perfect Mini Cheesecakes
After making hundreds of these little guys, I’ve picked up some foolproof tricks for mini cheesecake perfection:
- Room temp is everything – Cold cream cheese = lumpy filling, cold eggs = uneven baking. Trust me, take the time to let ingredients warm up!
- Use liners for easy peasy removal – Those little paper liners aren’t just cute – they’re lifesavers when popping cheesecakes out of the pan.
- Chill before serving – I know it’s tempting to dig in, but an hour in the fridge firms them up beautifully.
- Wipe the knife – When slicing graham crackers for crumbs, wipe your knife between cuts for super fine crumbs that press perfectly.
- Don’t overfill – Leave just a smidge of space at the top so they don’t puff over the edges while baking.
Follow these simple tips and you’ll be the mini cheesecake hero at every gathering!
Mini Cheesecake Variations
Oh, this is where the real fun begins! The basic mini cheesecake is delicious on its own, but the topping possibilities? Endless! Here are my go-to favorites that always wow guests:
- Fresh berries – Strawberry slices or blueberries look gorgeous and add that pop of freshness
- Caramel drizzle – Just a little zigzag of caramel sauce makes them decadent
- Lemon zest – A sprinkle brightens up the whole flavor profile
- Chocolate chips – Press a few into the top before baking for melty goodness
- Crushed cookies – Oreo crumbs, anyone? Yes please!
Mix and match – sometimes I set up a little topping bar and let everyone decorate their own. So much fun!
Serving and Storage
Here’s the scoop on enjoying your mini cheesecakes at their best! I always serve mine chilled – that hour in the fridge makes the texture absolutely perfect. They’ll keep happily in an airtight container for about 3 days (if they last that long!). Want to make ahead? These freeze beautifully! Just pop them in a single layer in a freezer bag. No need to reheat – they’re delicious straight from the fridge or even slightly thawed. The crust stays surprisingly crisp!
Mini Cheesecakes Nutrition
Now, I’m no nutritionist, but here’s what you should know about these little treats. The nutrition values will vary depending on your specific ingredients and brands – that fancy European butter versus store brand makes a difference! These are rich little bites, so enjoy them in moderation (or not – I won’t tell!). The cream cheese gives them protein, and the graham crackers add carbs, making them a balanced-ish dessert. Just remember – happiness calories don’t count when shared with friends!
Mini Cheesecakes FAQ
I get asked these questions all the time about mini cheesecakes – let me share what I’ve learned through plenty of trial and error!
Can I substitute Greek yogurt for cream cheese?
Oh honey, don’t do it! I tried once when I ran out of cream cheese – disaster! Greek yogurt is too thin and makes the filling runny. Stick with full-fat cream cheese for that perfect creamy texture we love.
How far ahead can I make these?
Perfect for planners! They actually taste better after chilling overnight. Make them up to 2 days before your event – just keep them refrigerated in an airtight container. The flavors meld beautifully!
Help! My cheesecakes are sticking to the pan!
Been there! Either use those cute little paper liners (my favorite trick) or really grease the pan wells with butter. A light dusting of flour after greasing helps too. Let them cool completely before gently twisting them out with a small offset spatula.
Can I freeze mini cheesecakes?
Absolutely! They freeze like a dream. Just pop them in a single layer on a baking sheet to freeze solid first, then transfer to a freezer bag. Thaw in the fridge overnight when you’re ready to serve.
Final Thoughts
There you have it – my absolute favorite way to make mini cheesecakes that never fail to impress! I can’t wait for you to try this recipe and see how easy it is to create these adorable little treats. When you do, snap a picture and tag me – I’d love to see your topping creations! Nothing makes me happier than sharing recipes that bring people together over something delicious.
Print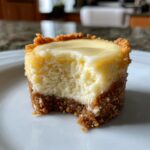
Irresistible Mini Cheesecakes Recipe in 30 Minutes Flat
- Total Time: 30 minutes
- Yield: 12 mini cheesecakes 1x
- Diet: Vegetarian
Description
Mini cheesecakes are bite-sized desserts perfect for parties or individual servings. They are creamy, delicious, and easy to customize with toppings.
Ingredients
- 1 cup graham cracker crumbs
- 2 tbsp melted butter
- 1 tbsp sugar
- 8 oz cream cheese, softened
- 1/4 cup sugar
- 1 tsp vanilla extract
- 1 egg
Instructions
- Preheat oven to 325°F (160°C).
- Mix graham cracker crumbs, melted butter, and 1 tbsp sugar.
- Press the mixture into mini muffin tins to form crusts.
- Beat cream cheese, 1/4 cup sugar, and vanilla until smooth.
- Add egg and mix well.
- Spoon filling over crusts.
- Bake for 15-20 minutes until set.
- Cool before serving.
Notes
- Use a piping bag for neat filling.
- Chill before serving for firmer texture.
- Top with fruit or chocolate if desired.
- Prep Time: 10 minutes
- Cook Time: 20 minutes
- Category: Dessert
- Method: Baking
- Cuisine: American
Nutrition
- Serving Size: 1 mini cheesecake
- Calories: 120
- Sugar: 8g
- Sodium: 90mg
- Fat: 8g
- Saturated Fat: 4g
- Unsaturated Fat: 3g
- Trans Fat: 0g
- Carbohydrates: 10g
- Fiber: 0g
- Protein: 2g
- Cholesterol: 35mg
Keywords: mini cheesecakes, dessert, easy recipe
")
")
")
")