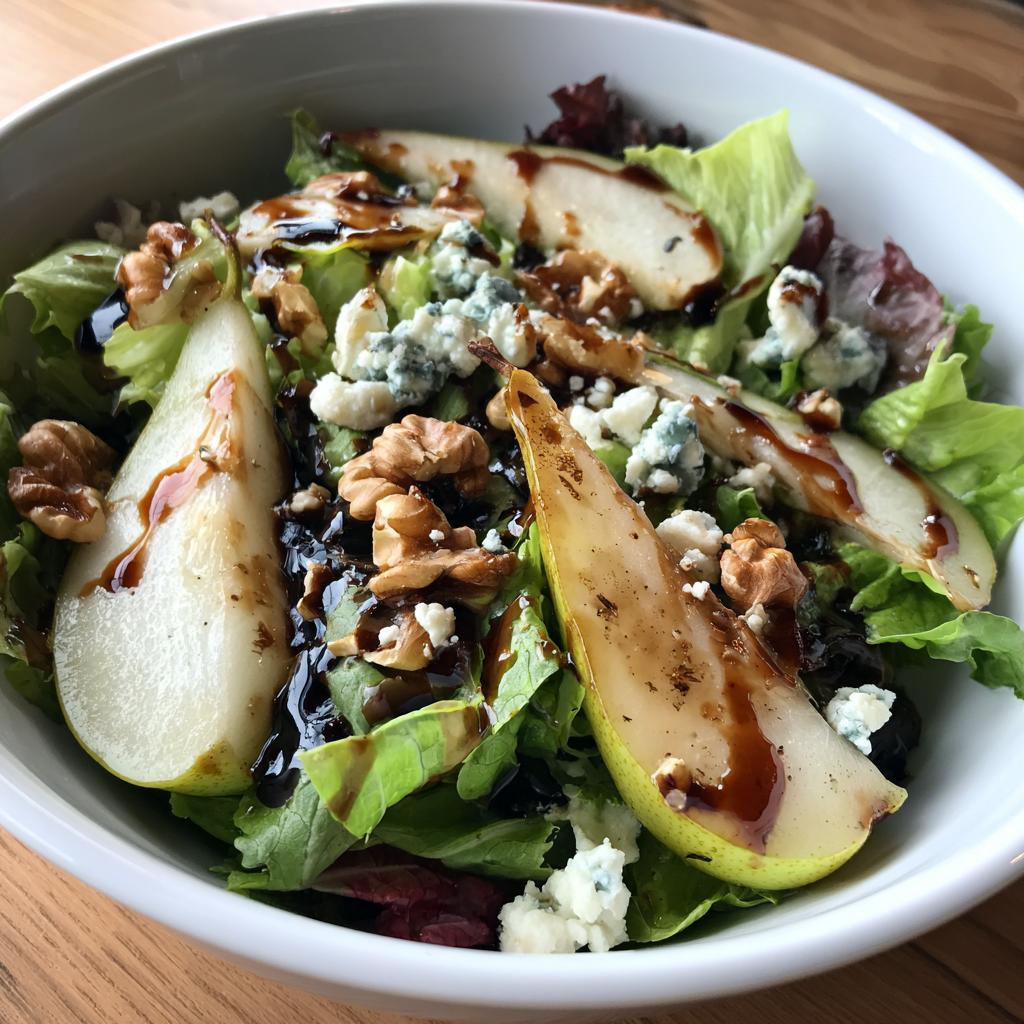
Oh, pear salad—how I love you! This simple, refreshing dish became my go-to lunch last summer when I needed something quick but felt fancy. Picture this: juicy ripe pears, crisp greens, crunchy walnuts, and that tangy blue cheese all dancing together in the bowl. The best part? It comes together faster than you can say “takeout.”
What makes this pear salad special is how effortlessly elegant it feels while being ridiculously easy to make. No cooking, just chopping and tossing. Perfect for those days when you want something light yet satisfying. Trust me, once you try this combination of sweet pears against the sharp cheese and nutty crunch, you’ll be hooked just like I was!
Why You’ll Love This Pear Salad
This pear salad checks all the boxes for a perfect light meal or side dish. Here’s what makes it a winner:
- Ready in minutes – No cooking means you can throw it together faster than ordering takeout
- Perfect balance – Sweet pears, tangy cheese, and crunchy walnuts create the most satisfying bite
- Endlessly adaptable – Swap ingredients based on what’s in your fridge (goat cheese instead of blue? Yes!)
- Always impressive – Looks fancy enough for company but easy enough for a quick weekday lunch
Seriously, this salad might just become your new obsession!
Ingredients for Pear Salad
Here’s everything you’ll need to make this gorgeous pear salad – the kind of simple ingredients that shine when combined:
- 2 ripe pears – sliced thin (I prefer Bartlett or Anjou, but use what’s sweetest!)
- 4 cups mixed greens – baby spinach and arugula work great here
- 1/4 cup walnuts – chopped and toasted if you’re feeling fancy
- 1/4 cup crumbled blue cheese – or goat cheese if you prefer something milder
- 2 tbsp olive oil – the good stuff for dressing
- 1 tbsp balsamic vinegar – aged is lovely if you have it
- Salt and pepper – to taste, of course
That’s it! Simple, fresh ingredients that let the flavors do all the talking.
How to Make Pear Salad
Making this pear salad is as easy as 1-2-3 – literally! Here’s how to bring all those beautiful flavors together:
- Prep your greens – Wash and thoroughly dry the mixed greens (wet leaves make sad, soggy salads). Tear any larger leaves into bite-sized pieces.
- Slice those pears – Core and thinly slice your pears just before assembling to prevent browning. Pro tip: leave the skins on for extra color and nutrients!
- Toast your walnuts – While optional, toasting the walnuts in a dry pan for 2-3 minutes adds incredible depth of flavor. Just watch them carefully – they burn fast!
- Assemble with care – In a large bowl, gently combine the greens, pear slices, walnuts, and crumbled cheese. I like to add the cheese last so it stays in pretty crumbles.
Preparing the Dressing
This simple dressing takes seconds to make but packs huge flavor! In a small bowl, whisk together the olive oil and balsamic vinegar until emulsified. Add a pinch of salt and pepper to taste. For a touch of sweetness, stir in 1/2 teaspoon of honey – it balances the tang beautifully. Drizzle over the salad just before serving and toss gently to coat everything evenly without bruising the delicate greens.
Serve immediately – This salad is best enjoyed fresh! The pears stay crisp, the greens stay perky, and every bite is pure perfection.
Tips for the Best Pear Salad
After making this pear salad more times than I can count, here are my foolproof secrets for the absolute best results:
- Choose pears that are firm but ripe – They should yield slightly when pressed near the stem but still hold their shape when sliced
- Wait to dress the salad – Add the vinaigrette just before serving to keep the greens crisp and prevent sogginess
- Toast those nuts – A quick toast brings out the walnuts’ natural oils for maximum flavor impact
- Slice pears last – Cutting them right before assembly prevents unappetizing browning
Follow these simple tricks, and your pear salad will turn out perfect every single time!
Pear Salad Variations
Oh, the possibilities! This pear salad is like your favorite little black dress – perfect as-is but so fun to accessorize. Here are my favorite ways to mix it up:
- Sweet twist – Toss in a handful of dried cranberries or cherries for pops of color and tartness
- Nut swap – Pecans or candied walnuts make fabulous stand-ins for regular walnuts
- Cheese change-up – Try feta for a saltier bite or brie for creamy indulgence
- Protein boost – Add grilled chicken or crispy prosciutto to turn it into a hearty meal
The best part? Every variation still keeps that magical sweet-savory balance we love!
Serving Suggestions
This pear salad shines as both a light meal and a stunning side! I love serving it with grilled chicken for protein-packed lunches, or alongside crusty bread and soup for cozy dinners. It’s also perfect as a starter for dinner parties – the elegant presentation always impresses!
Storing and Reheating Pear Salad
Here’s the truth – this pear salad is best enjoyed fresh! If you must store leftovers (though I rarely have any), keep the undressed greens, pears, and toppings separate in airtight containers in the fridge. The pears might brown slightly, but a quick squeeze of lemon juice helps. Never store it dressed – you’ll end up with a sad, soggy mess. Trust me, I learned that the hard way!
Pear Salad Nutrition
Here’s the scoop on what’s in each serving (about 1/4 of the recipe): roughly 180 calories with 4g fiber and 4g protein. Remember, nutrition varies based on your specific ingredients and brands – these are just happy estimates to guide you!
Frequently Asked Questions
Can I use canned pears?
Oh honey, I wouldn’t! The texture just isn’t the same. Canned pears turn mushy fast and lack that fresh, crisp bite that makes this salad special. If fresh pears aren’t available, try thinly sliced apples instead – they hold up beautifully.
How long does undressed salad last in the fridge?
You’ve got about 24 hours max if you store components separately. Keep the greens in one container, pears (with a squeeze of lemon) in another, and toppings in a third. The greens might wilt a bit after day one – this salad really prefers to be eaten right away!
What if I don’t like blue cheese?
No worries at all! Goat cheese is my favorite swap – still creamy and tangy but milder. Feta works great too, or skip cheese entirely and add avocado for creaminess. It’s your salad, make it yours!
Can I make this ahead for a party?
Absolutely! Prep everything separately the morning of, then assemble on a big platter right before serving. I even bring my dressing in a little jar to pour tableside. Looks so fancy, and no soggy greens!
Final Thoughts
There you have it—my absolute favorite way to enjoy pears beyond just snacking! If you try this pear salad, I’d love to hear how it turns out. Tag me or leave a note—happy tossing!
Print
Irresistible Pear Salad Recipe Ready in Just 5 Minutes
- Total Time: 10 minutes
- Yield: 4 servings 1x
- Diet: Vegetarian
Description
A refreshing and simple pear salad that combines sweet pears with crisp greens and a light dressing.
Ingredients
- 2 ripe pears, sliced
- 4 cups mixed greens
- 1/4 cup walnuts, chopped
- 1/4 cup crumbled blue cheese
- 2 tablespoons olive oil
- 1 tablespoon balsamic vinegar
- Salt and pepper to taste
Instructions
- Wash and dry the mixed greens.
- Slice the pears thinly.
- In a large bowl, combine mixed greens, pear slices, walnuts, and blue cheese.
- In a small bowl, whisk together olive oil, balsamic vinegar, salt, and pepper.
- Drizzle the dressing over the salad and toss gently.
- Serve immediately.
Notes
- Use firm but ripe pears for the best texture.
- Substitute goat cheese for blue cheese if preferred.
- Add a pinch of honey to the dressing for extra sweetness.
- Prep Time: 10 minutes
- Cook Time: 0 minutes
- Category: Salad
- Method: No-Cook
- Cuisine: American
Nutrition
- Serving Size: 1 serving
- Calories: 180
- Sugar: 10g
- Sodium: 150mg
- Fat: 12g
- Saturated Fat: 3g
- Unsaturated Fat: 8g
- Trans Fat: 0g
- Carbohydrates: 18g
- Fiber: 4g
- Protein: 4g
- Cholesterol: 5mg
Keywords: pear salad, easy salad, vegetarian salad
")
")
")
")