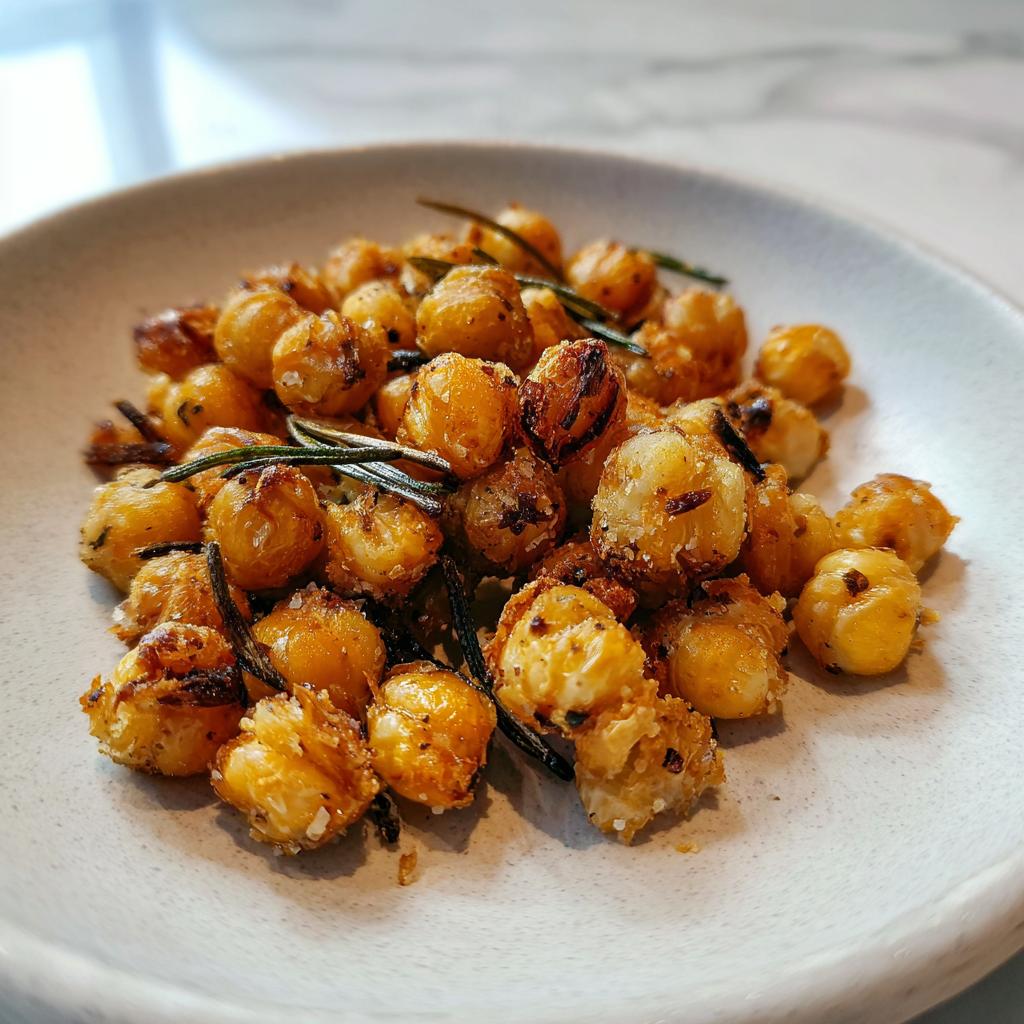
I’ll never forget the first time I made garlic and rosemary chickpea crisps—total kitchen magic! I was craving something crunchy but healthy, and after years of testing snack recipes, this one became my go-to. These little flavor bombs are packed with protein, naturally vegan, and so easy you’ll wonder why you ever bought store-bought chips.
One bite of these crispy, garlicky gems, and I was hooked. The rosemary adds this earthy freshness that pairs perfectly with the nutty chickpeas. Plus, they’re way more satisfying than you’d think—no weird ingredients, just simple, wholesome goodness. My kids now beg for them after school instead of reaching for junk food.
Why You’ll Love These Chickpea Crisps
- Protein-packed: A handful keeps you full thanks to those mighty chickpeas.
- Crazy easy: Just toss, bake, and snack—no fancy skills needed.
- Vegan-friendly: Perfect for plant-based eaters (or anyone who loves flavor).
- Snack hero: Great for lunches, movie nights, or sneaking straight from the jar.
Ingredients for Garlic and Rosemary Chickpea Crisps
Okay, let’s talk ingredients—because the magic is in those simple-but-mighty details! After testing this recipe a zillion times (my snack drawer is proof), I’ve learned these exact measurements create the perfect crispy, herby bite every time. Here’s what you’ll need:
- 1 can (15 oz) chickpeas – drained, rinsed, and thoroughly patted dry (trust me, moisture is the enemy of crispiness!)
- 1 tbsp olive oil – just enough to coat without making them greasy
- 1 tsp garlic powder – NOT granulated garlic (it’s all about that smooth, mellow flavor)
- 1 tsp dried rosemary – crush it between your fingers first to wake up those earthy oils
- 1/2 tsp kosher salt – flakes cling better than table salt
- 1/4 tsp freshly ground black pepper – because pre-ground just doesn’t have the same zing
See? Nothing weird or hard-to-find. Half these things are probably in your pantry right now! The rosemary might seem like a small amount, but it’s potent—you’ll taste it in every crunchy bite.
How to Make Garlic and Rosemary Chickpea Crisps
Alright, let’s get these addictive little crisps going! I promise it’s easier than you think—just follow these steps carefully and you’ll be snacking on golden, garlicky perfection in no time.
Step 1: Prep Like a Pro
First things first—preheat that oven to 400°F (200°C). While it’s heating up, grab those rinsed chickpeas and roll them around between two clean kitchen towels. This is my secret weapon for getting them bone-dry (wet chickpeas = sad, soggy crisps). You’ll actually hear them rattling around when they’re ready!
Step 2: Flavor Bomb Time
Now, toss your dried chickpeas in a bowl with the olive oil until they’re all glossy. Sprinkle on the garlic powder, rosemary, salt, and pepper—I like to crush the rosemary between my fingers first to release its fragrant oils. Mix it all up until every little chickpea is coated in herby goodness.
Step 3: Bake It Right
Spread them out in a single layer on a parchment-lined baking sheet (no crowding allowed!). Pop them in the oven and set your timer for 15 minutes. When it dings, pull them out and give the tray a good shake—this helps them crisp up evenly without burning. Back in they go for another 10-15 minutes until they’re golden brown and sound like tiny marbles when you shake the pan.
Step 4: The Patience Test
Here’s the hardest part—let them cool completely on the tray! I know it’s tempting, but snatching one too early means missing out on that perfect crunch. They’ll continue crisping up as they cool down to room temperature.
Pro Tips for Perfect Crispiness
Want next-level crunch? Try peeling the chickpea skins—they slip right off if you pinch them! It takes a few extra minutes but makes ALL the difference. Also, make sure your chickpeas aren’t touching each other on the tray—give them personal space to crisp up properly. Keep an eye on them during the last few minutes; the line between perfectly golden and burnt is thinner than you’d think!
One last trick: if your crisps lose their crunch after storing, just pop them back in a 350°F oven for 5 minutes to revive them. Works like magic!
Serving and Storing Garlic and Rosemary Chickpea Crisps
Now for the best part – eating these addictive little crisps! But first, let them cool completely on the baking sheet – I know it’s torture, but that final cooling time is when they develop their signature crunch. Once they’ve stopped singing (yes, you’ll actually hear them crackle as they cool), transfer them to an airtight container. They’ll stay crispy for about 3 days this way – if they last that long in your house!
These are amazing on their own, but I love serving them with hummus for dipping or sprinkling over salads for extra crunch. They’re also fantastic alongside cheese boards – the garlic and rosemary pair beautifully with sharp cheddar or creamy brie. My kids go crazy when I pack them in lunchboxes too!
If your crisps lose their snap after a day or two, don’t worry – just spread them on a baking sheet and pop them in a 350°F oven for 5 minutes to revive that perfect crunch.
Nutritional Information for Chickpea Crisps
Now, I’m no nutritionist, but I can tell you why these crisps make me feel good about snacking! While exact numbers will vary depending on your specific ingredients (different chickpea brands, oil measurements, etc.), the beauty of this recipe is what’s not in it—no artificial anything. These crisps pack plant-based protein, fiber from the chickpeas, and healthy fats from olive oil.
I always say homemade snacks let you control what goes into your body. Unlike store-bought chips, there’s no mystery preservatives or excessive sodium here—just real food ingredients I can pronounce. The rosemary and garlic add flavor without empty calories, making these way more satisfying than you’d expect from such a simple recipe!
For the most accurate nutritional info, I recommend plugging your exact brands and measurements into a recipe calculator. But honestly? When something tastes this good and makes your body happy, that’s all the numbers I need to know!
Frequently Asked Questions
Can I use fresh rosemary instead of dried?
Absolutely! Fresh rosemary works beautifully—just use about 1 tablespoon finely chopped instead of 1 teaspoon dried. The flavor will be brighter and more herbal. My trick? Rub the leaves between your palms first to release those fragrant oils before chopping. Fresh herbs can burn faster though, so keep an eye on them during baking!
How can I make these chickpea crisps spicier?
Oh, I love this question! For some heat, try adding 1/2 teaspoon of cayenne pepper or smoked paprika to the seasoning mix. My personal favorite is tossing the baked crisps with a sprinkle of chili flakes right when they come out of the oven—the residual heat wakes up the spices perfectly. If you’re feeling adventurous, a dash of hot honey takes these to a whole new level!
Why didn’t my chickpeas get crispy?
Been there! Usually it’s one of three things: First, make sure you dried the chickpeas thoroughly—I’m talking roll-them-in-a-towel-until-they-rattle dry. Second, check your oven temp with a thermometer; some ovens run cool. Finally, don’t overcrowd the pan! Chickpeas need space to crisp up properly. If all else fails, try baking them 5-10 minutes longer and let them cool completely—they often crisp up as they cool.
Ready to Make These Crisps?
I can’t wait to see your garlic and rosemary chickpea crisps! Snap a pic of your crunchy creation and tag me on Instagram—I love seeing your kitchen wins (and happy snack faces). Now grab those chickpeas and let’s get baking!
Equipment Note
For best results, use a rimmed baking sheet lined with parchment paper. The rim keeps those rolly chickpeas contained, and the parchment makes cleanup a breeze—win-win!
Ingredient Substitutions
Feel like mixing it up? Try smoked paprika instead of rosemary for a smoky kick, or add lemon zest with the garlic for a bright twist. The possibilities are endless—that’s the beauty of homemade snacks!
Print
5-Star Garlic and Rosemary Chickpea Crisps You’ll Crave
- Total Time: 35 mins
- Yield: 2 cups 1x
- Diet: Vegan
Description
Crunchy chickpea crisps flavored with garlic and rosemary. A healthy, protein-packed snack that’s easy to make.
Ingredients
- 1 can (15 oz) chickpeas, drained and rinsed
- 1 tbsp olive oil
- 1 tsp garlic powder
- 1 tsp dried rosemary
- 1/2 tsp salt
- 1/4 tsp black pepper
Instructions
- Preheat oven to 400°F (200°C).
- Pat chickpeas dry with a paper towel.
- Toss chickpeas with olive oil, garlic powder, rosemary, salt, and pepper.
- Spread evenly on a baking sheet.
- Bake for 25-30 minutes, shaking the tray halfway, until crispy.
- Let cool before serving.
Notes
- Store in an airtight container for up to 3 days.
- For extra crispiness, remove chickpea skins before baking.
- Prep Time: 5 mins
- Cook Time: 30 mins
- Category: Snack
- Method: Baking
- Cuisine: Mediterranean
Nutrition
- Serving Size: 1/2 cup
- Calories: 120
- Sugar: 2g
- Sodium: 300mg
- Fat: 5g
- Saturated Fat: 0.5g
- Unsaturated Fat: 4g
- Trans Fat: 0g
- Carbohydrates: 15g
- Fiber: 4g
- Protein: 5g
- Cholesterol: 0mg
Keywords: chickpea crisps, garlic rosemary snack, healthy vegan snack, roasted chickpeas
")
")
")
")