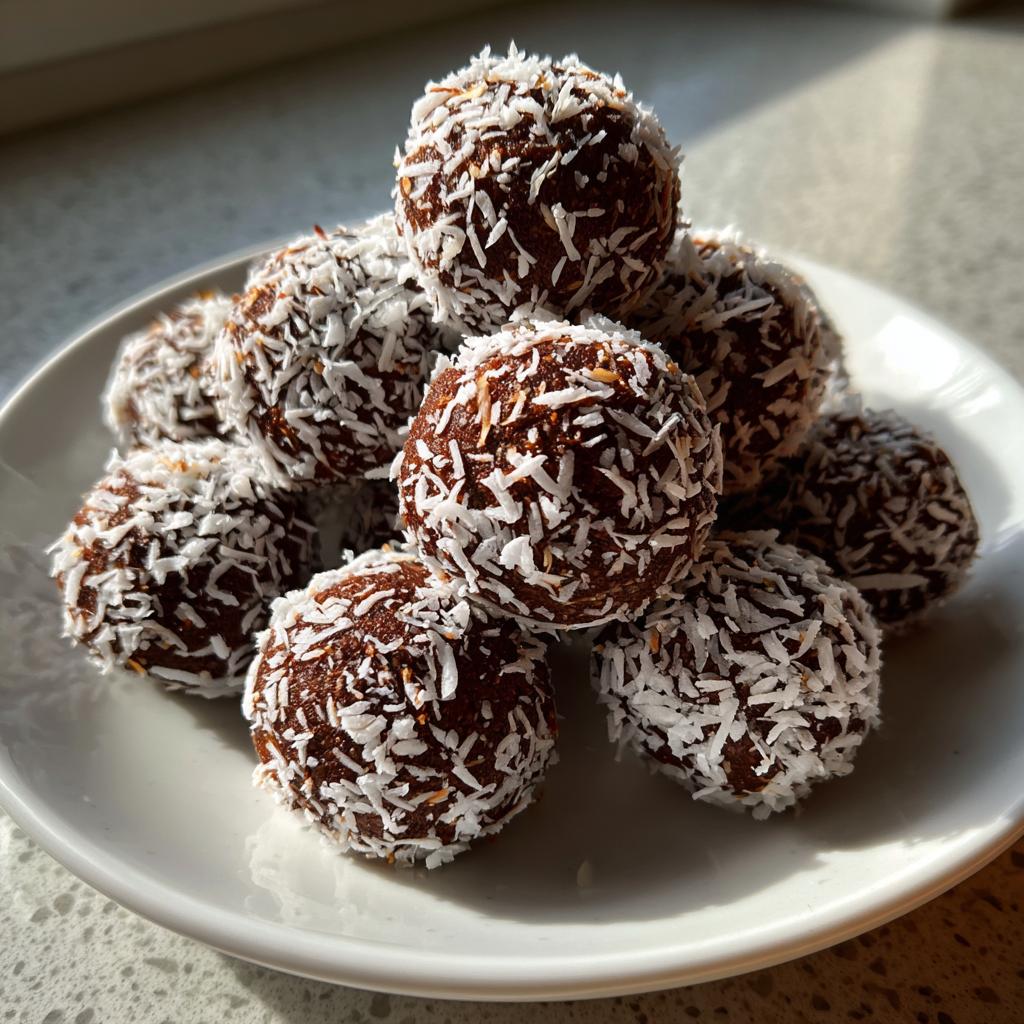
You know those days when the chocolate cravings hit hard, but you don’t want to undo all your healthy eating efforts? That’s exactly why I fell in love with these Healthy & No-Bake Truffles. I remember the first time I whipped up a batch—my kitchen was a mess of sticky fingers and coconut flakes, but one bite of those rich, chocolatey balls and I was hooked!
What makes these truffles so special is how they satisfy your sweet tooth without any guilt. Just imagine: dates for natural sweetness, almonds for crunch, and cocoa powder for that deep chocolate flavor—all rolled into perfect little bites. No oven needed, just a food processor and about 15 minutes of your time. They’ve become my secret weapon for last-minute potlucks, afternoon slumps, and those “I need chocolate NOW” moments.
The best part? Even my kids go crazy for them, and I don’t have to feel bad about letting them have seconds (or thirds!). These truffles prove that healthy treats can be just as indulgent as the sugar-loaded ones.
Why You’ll Love These Healthy & No-Bake Truffles
Let me tell you why these little gems have become my kitchen superstars. They’re the perfect combination of everything I want in a treat – delicious, nutritious, and ridiculously easy to make. If you’re looking for a snack that ticks all the boxes, you’ve found it!
Quick and Easy to Make
No oven? No problem! These truffles come together in about 15 minutes of active time – just blend, roll, and chill. I’ve made them while waiting for my coffee to brew! The food processor does all the hard work, and there’s no need to worry about precise baking times or temperatures. Perfect for those “I need dessert now” emergencies.
Packed with Nutritious Ingredients
Dates give natural sweetness without refined sugar, almonds add healthy fats and protein, and cocoa powder brings antioxidants to the party. Each bite gives you fiber, vitamins, and minerals – unlike those empty-calorie snacks that leave you crashing later. My nutritionist friend approves, and that’s saying something!
Perfect for Any Occasion
Whether you need:
- A mid-afternoon pick-me-up at your desk
- A fancy dessert for dinner parties (they look so elegant!)
- Post-workout fuel in your gym bag
- Or just something sweet after dinner
These truffles adapt to whatever your day throws at you. I always keep a batch in my fridge – they’re my secret weapon against snack attacks!
Ingredients for Healthy & No-Bake Truffles
Oh, let me tell you about the magical ingredients that make these truffles so special – each one plays an important role! I’ve made this recipe so many times I could probably do it in my sleep, and I’ve learned exactly what works best. Here’s what you’ll need to gather:
- 1 cup dates, pitted – Medjool dates are my absolute favorite for this because they’re so naturally sweet and sticky, but any soft pitted dates will work. Pro tip: if your dates seem dry, just soak them in warm water for 10 minutes first – it makes all the difference!
- 1/2 cup almonds – I love the crunch almonds add, but you can use walnuts or cashews instead if that’s what you have. Once I even used a mix of all three and it was delicious!
- 2 tbsp cocoa powder – The better quality your cocoa, the richer these will taste. I splurge on the good stuff because you can really taste the difference.
- 1 tbsp honey – This just boosts the natural sweetness from the dates. If you’re making these vegan, maple syrup works beautifully too.
- 1 tsp vanilla extract – That little splash of vanilla makes all the flavors pop. Don’t skip this – it’s the secret weapon!
- 2 tbsp shredded coconut – For coating the outside. Unsweetened is best so they’re not overly sweet, but use what you’ve got. Sometimes I add a pinch of cinnamon to the coconut for extra flavor.
See? Nothing fancy or hard to find – just simple ingredients that come together to make something magical. The best part is you probably have most of these in your pantry already! If not, they’re easy to find at any grocery store. Now let’s get to the fun part – making them!
How to Make Healthy & No-Bake Truffles
Now for the fun part – turning those simple ingredients into irresistible truffles! I love how this recipe comes together like magic. Don’t be surprised if you find yourself licking the food processor bowl clean (I won’t tell!). Follow these simple steps, and you’ll have perfect truffles every time.
Blend the Base Ingredients
First things first – grab your food processor (a blender works too in a pinch!). Toss in those gorgeous pitted dates and almonds. I like to pulse them first to break things up, then let the machine run for about 30-45 seconds until you get this wonderfully sticky, crumbly mixture clinging together. You’ll know it’s ready when you can pinch some between your fingers and it holds its shape. If it’s too dry, add a teaspoon of water – but be careful, you don’t want it too wet!
Add Flavor and Texture
Now for the flavor boosters! Sprinkle in that rich cocoa powder – I always inhale deeply at this point because the smell is heavenly. Drizzle in the honey and vanilla, then process again just until everything comes together into a dark, luxurious dough. Scrape down the sides if needed – you want every bit incorporated. The texture should be like firm playdough – moldable but not sticky. Taste it (my favorite step!) and add a pinch more cocoa if you want it extra chocolatey.
Shape and Coat the Truffles
Here’s where things get messy in the best way! Scoop out tablespoon-sized portions and roll them between your palms into neat little balls. Pro tip: if the mixture sticks to your hands, wet them slightly with water first. Now, spread your shredded coconut on a plate and roll each ball until coated all over. I sometimes do half in coconut and half in extra cocoa powder for variety – it looks so pretty on a plate! The truffles should be about the size of a large marble – perfect for popping in your mouth.
Chill and Serve
Last step – patience! Arrange your truffles on a parchment-lined tray and pop them in the fridge for at least 30 minutes. This helps them firm up and makes the flavors even richer. Trust me, it’s worth the wait! Once chilled, they’ll hold their perfect round shape when you serve them. I usually transfer them to an airtight container if we’re not devouring them immediately (which happens more often than not in my house!).
Tips for Perfect Healthy & No-Bake Truffles
After making dozens (maybe hundreds!) of batches, I’ve picked up some tricks that make these truffles foolproof. First – if your dates seem dry or hard, soak them in warm water for 10 minutes first. This makes them blend into that perfect sticky texture. And here’s my favorite storage tip: layer them between parchment paper in an airtight container – they’ll keep fresh for up to a week in the fridge!
Don’t be afraid to play with flavors either. Once I added a pinch of cinnamon to the coconut coating, and it was a game-changer. If your mixture seems too sticky while rolling, pop it in the fridge for 10 minutes – it firms up beautifully. And if you’re short on time, skip the coconut coating and just dust with cocoa powder. They’re still delicious!
Variations for Healthy & No-Bake Truffles
One of my favorite things about these truffles is how easily you can mix them up! I’m always experimenting with new versions – sometimes by accident when I’m out of an ingredient (whoops!), and sometimes on purpose when I’m feeling creative. Here are some of my favorite twists that never fail to delight:
Nutty Alternatives
While almonds are my go-to, you’d be amazed how different nuts change the personality of these truffles:
- Walnuts give a deeper, earthier flavor that pairs beautifully with the chocolate
- Cashews make them extra creamy – perfect when you want something more decadent
- Pecans add a buttery richness that’s amazing during the holidays
- Hazelnuts create a Nutella-like treat that my kids adore
Pro tip: Toast your nuts lightly first for an even deeper flavor!
Spice It Up
A pinch of spice can take these from simple to spectacular:
- Cinnamon (about 1/2 tsp) makes them taste like Mexican hot chocolate
- Cardamom (just 1/4 tsp) adds a warm, exotic note
- Cayenne pepper (a tiny pinch!) gives them a grown-up kick
- Orange zest (1 tsp) brightens everything up for spring
I once added allspice by mistake and discovered my new favorite autumn version!
Coating Creativity
The outer coating is like your truffle’s fancy outfit – have fun with it!
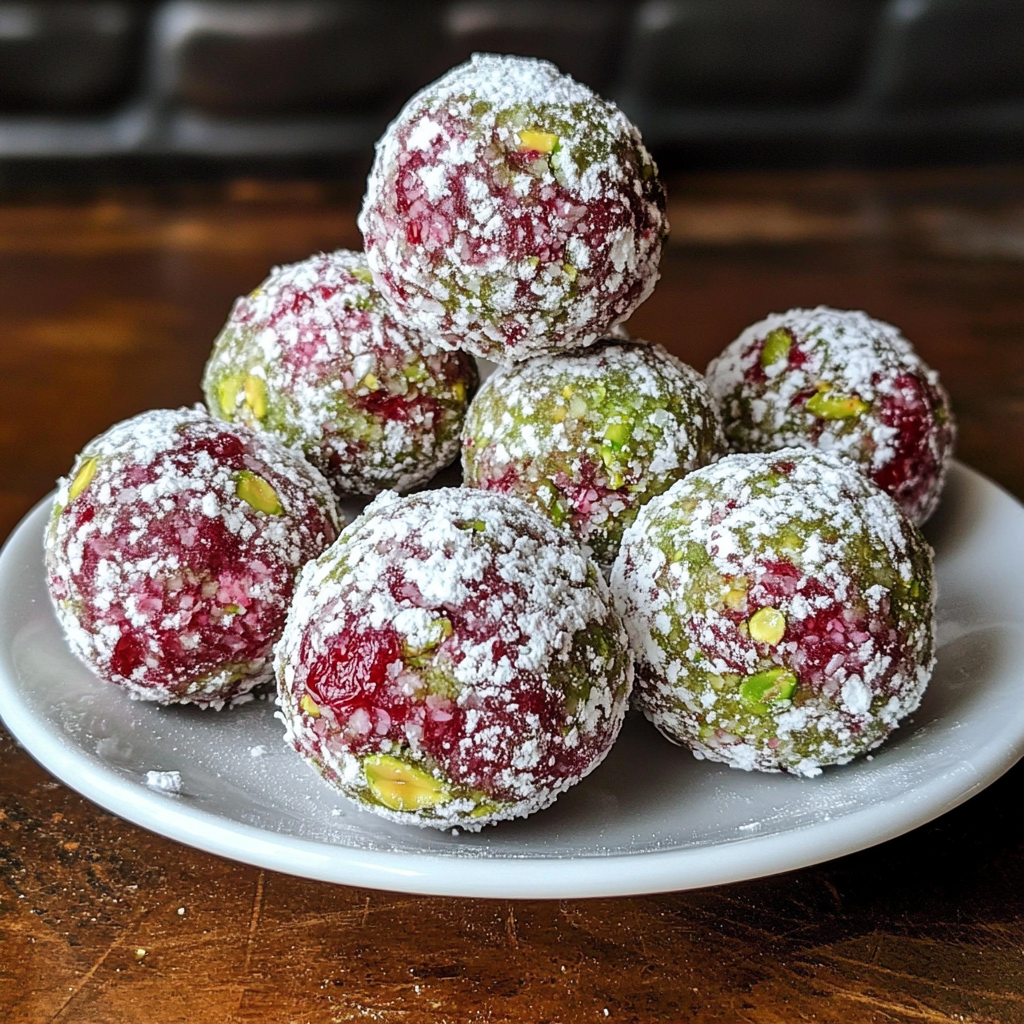
- Crushed freeze-dried raspberries for a tart, pretty pink finish
- Finely chopped pistachios for crunch and color
- Matcha powder when you want something Instagram-worthy
- Cacao nibs for intense chocolate lovers
My most “extra” version? A mix of edible gold dust and crushed rose petals for Valentine’s Day. Over-the-top delicious!
Really, the possibilities are endless – that’s what makes this recipe so special. Once you’ve mastered the basic version, you’ll start seeing truffle potential in everything in your pantry. The only limit is your imagination (and maybe how fast your family eats them before you can experiment!).
Serving and Storing Healthy & No-Bake Truffles
Now that you’ve made these gorgeous truffles, let’s talk about the best ways to enjoy them! I love serving them straight from the fridge – the cool temperature makes the chocolate flavor even more refreshing. They’re perfect just as they are, but if you want to get fancy, arrange them on a pretty plate with some fresh berries for color. My kids go wild when I stack them into little pyramids!
For gatherings, I like to offer different coatings on separate plates – maybe one with coconut, one with cocoa powder, and one with crushed nuts. It makes people feel special when they can choose their favorite. And here’s a secret from my catering days: drizzle a tiny bit of melted dark chocolate over the top right before serving for that professional bakery look!
Storage is super simple – these truffles actually get better after a day in the fridge as the flavors meld. Just pop them in an airtight container with parchment between layers (so they don’t stick together). They’ll keep beautifully for up to a week, though in my house they rarely last that long! If you want to freeze them for later, they hold up perfectly for about 3 months – just thaw in the fridge overnight. I always keep a stash in my freezer for unexpected guests or sudden chocolate emergencies.
One warning though – these tend to disappear quickly when left on the counter! I learned this the hard way when I left a batch out while cleaning the kitchen… came back to find nothing but a few coconut flakes and guilty-looking family members. Now I keep them safely tucked away in the fridge where they stay firm and delicious until I’m ready to share them properly!
Nutritional Information for Healthy & No-Bake Truffles
Let’s talk numbers – because I know you’re curious about what’s actually in these delicious bites! Here’s the beautiful thing: while these truffles taste indulgent, they’re packed with nutrients that make them way better for you than store-bought treats. Here’s the breakdown per truffle (based on making about 12 from this recipe):
- Calories: 85
- Fat: 3g (mostly the good kind from nuts!)
- Carbohydrates: 13g
- Fiber: 2g – that’s about 8% of your daily needs!
- Protein: 1g
- Sugar: 8g (all natural from the dates and honey)
Now, here’s my nutritionist friend’s favorite part – these contain zero cholesterol or trans fats, and only 2mg of sodium. Compared to traditional chocolate truffles that can run 150+ calories each with loads of refined sugar? This is a sweet treat you can actually feel good about!
Important note: these numbers can vary slightly depending on your exact ingredients. Using different nuts might change the fat content a bit, and if you add extra toppings, you’ll want to account for those. But the core benefits remain – you’re getting energy from whole foods rather than empty calories. I like to think of each truffle as a little package of fiber, antioxidants, and healthy fats – way better than reaching for that candy bar!
Pro tip: If you’re tracking macros closely, I recommend weighing your ingredients for the most accurate count. But honestly? I usually just enjoy them knowing they’re a healthier choice without getting too caught up in the details. Life’s too short not to savor good food!
Frequently Asked Questions About Healthy & No-Bake Truffles
I get so many questions about these truffles from friends and family – seems like everyone wants to know the secrets after they try them! Here are the answers to the questions I hear most often:
Can I use maple syrup instead of honey?
Absolutely! Maple syrup works perfectly if you’re making these vegan or just prefer its flavor. I’ve used both, and while honey gives a slightly thicker texture, maple syrup blends in beautifully. Start with 1 tablespoon like the recipe calls for, then add another teaspoon if your dates weren’t super sweet.
How long do these truffles last?
In an airtight container in the fridge, they’ll stay fresh for about a week – if they last that long! The dates act as a natural preservative. I’ve successfully frozen them for up to 3 months too – just thaw overnight in the fridge. They might be a tiny bit softer after freezing, but just as delicious.
My mixture is too sticky – what should I do?
Don’t panic! This happens to me sometimes when my dates are extra juicy. Just pop the mixture in the fridge for 10-15 minutes to firm up before rolling. You can also wet your hands slightly before shaping the balls – the water creates a barrier so the dough doesn’t stick to your palms.
Can I make these nut-free?
For sure! Swap the almonds for sunflower seeds or pumpkin seeds – they give a similar texture. I’ve even used rolled oats in a pinch (about 3/4 cup instead of the nuts). The texture will be slightly different but still yummy. Just process the oats first to break them down before adding the dates.
Why do my truffles sometimes fall apart?
Usually this means either:
- Your dates weren’t sticky enough (solution: soak them longer)
- You didn’t process the mixture enough (solution: blend a bit longer)
- Or you added too much liquid (solution: add a teaspoon of coconut flour to absorb excess moisture)
After a few batches, you’ll get the perfect dough consistency down pat!
Got more questions? Just ask in the comments below – I love helping troubleshoot and hearing about your truffle adventures!
Share Your Healthy & No-Bake Truffles Experience
I can’t wait to hear how your truffle adventure goes! Did you stick with my classic version or try any fun variations? Maybe you discovered an amazing new coating I haven’t tried yet (if so, tell me – I’m always looking for new ideas!). Snap a photo of your beautiful truffles and share it with me – nothing makes me happier than seeing your creations!
Leave a comment below with your favorite modifications, any brilliant shortcuts you discovered, or even your funny kitchen mishaps (we’ve all had them – I once coated an entire batch in turmeric by accident… not my best moment!). Your tips might help other readers too. And if you’ve got questions, ask away – I read every comment and love helping out!
Most importantly, did these truffles become your new go-to treat like they did for me? I have a feeling once you try them, you’ll be as addicted as I am. Happy truffle making, friends – can’t wait to hear all about it!
Print
11 Irresistible Healthy & No-Bake Truffles Everyone Loves
- Total Time: 45 mins (includes chilling)
- Yield: 12 truffles 1x
- Diet: Vegan
Description
Easy no-bake truffles made with wholesome ingredients. Perfect for a quick, healthy snack or dessert.
Ingredients
- 1 cup dates, pitted
- 1/2 cup almonds
- 2 tbsp cocoa powder
- 1 tbsp honey
- 1 tsp vanilla extract
- 2 tbsp shredded coconut (for coating)
Instructions
- Blend dates and almonds in a food processor until sticky.
- Add cocoa powder, honey, and vanilla extract. Blend again.
- Roll mixture into small balls.
- Coat each ball with shredded coconut.
- Refrigerate for 30 minutes before serving.
Notes
- Soak dates in warm water for 10 minutes if too dry.
- Store in an airtight container for up to a week.
- Substitute almonds with walnuts or cashews if preferred.
- Prep Time: 15 mins
- Cook Time: 0 mins
- Category: Dessert
- Method: No-Bake
- Cuisine: International
Nutrition
- Serving Size: 1 truffle
- Calories: 85
- Sugar: 8g
- Sodium: 2mg
- Fat: 3g
- Saturated Fat: 1g
- Unsaturated Fat: 2g
- Trans Fat: 0g
- Carbohydrates: 13g
- Fiber: 2g
- Protein: 1g
- Cholesterol: 0mg
Keywords: healthy truffles, no-bake dessert, vegan snacks, easy treats

")
")
")
")