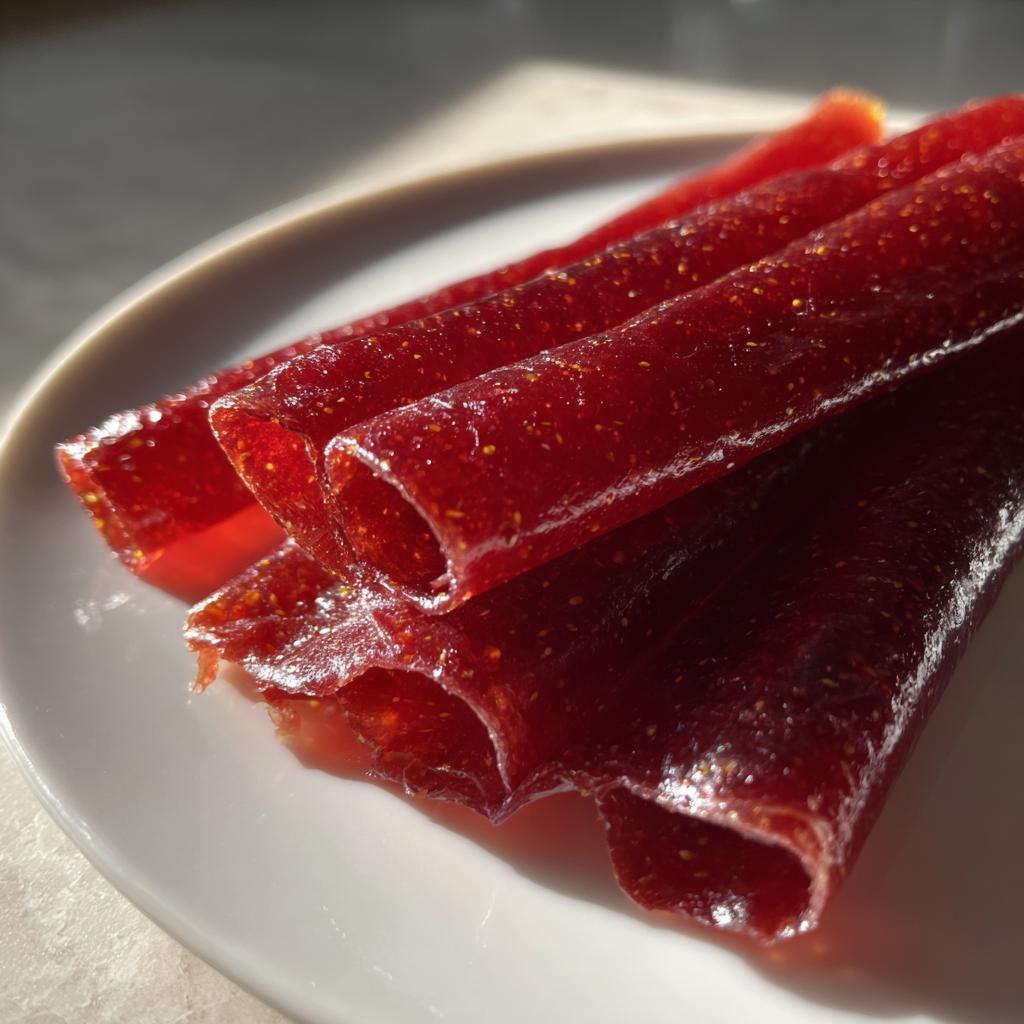
Let me tell you about my favorite trick for turning summer’s bounty into year-round goodness – homemade fruit leather! I stumbled onto this magic years ago when my kids kept begging for those expensive fruit roll-ups at the store. One hot July afternoon, with a mountain of ripe strawberries threatening to go bad, I decided to experiment. What emerged from my oven hours later tasted better than anything from a plastic wrapper – sweet, chewy, and bursting with real fruit flavor. Now I make batches every season, packing them for hikes, stashing them in lunchboxes, or just sneaking a strip when I need a little pick-me-up. The best part? You likely have everything you need right in your kitchen to make this healthy, no-fuss snack.
Why You’ll Love This Homemade Fruit Leather
Let me count the ways this fruit leather will become your new obsession:
- Pure ingredients: Just fruit + optional honey – no weird additives or excessive sugar hiding in there
- Endless flavor combos: Mix strawberries with basil, swirl in some peanut butter, or add cinnamon to apples – your imagination’s the limit!
- Kid-approved magic: My picky eaters go crazy for these (and I don’t feel guilty letting them have seconds)
- Pantry superhero: Stores beautifully so you’ll always have healthy snacks on hand
Seriously – once you taste that intense fruit flavor, you’ll never go back to store-bought!
Ingredients for Homemade Fruit Leather
Here’s all you need to make magic happen:
- 4 cups fresh fruit – strawberries (hulled), peaches (pitted), apples (peeled and cored), or whatever looks good at the market
- 1-2 tbsp honey or maple syrup (optional) – only if your fruit needs a little extra sweetness
- 1 tsp lemon juice (optional) – helps keep colors bright, especially with apples
That’s it! See why I love this recipe? You’re basically just concentrating fruit’s natural goodness.
Equipment You’ll Need
Don’t worry – no fancy gadgets required! Just grab:
- A blender or food processor (my old Oster does the job perfectly)
- Large baking sheet with edges (trust me, you want those sides)
- Parchment paper (not wax paper – learned that the messy way!)
That’s seriously the whole setup. See? I told you this was easy!
How to Make Homemade Fruit Leather
Okay friends, let’s get to the fun part – transforming that beautiful fruit into leathery goodness! I’ll walk you through each step like I’m right there in the kitchen with you (maybe pretend I’m sampling your creations too? No? Just me? Okay…)
Preparing the Fruit Mixture
First things first – get your fruit nice and cozy in the blender. You want it smooth but not watery – think thick smoothie consistency. Pro tip: If your berries are super juicy, you might want to drain some liquid after blending. Now’s when you’d add that drizzle of honey if you’re using it (I usually taste first – ripe summer fruit often doesn’t need it!). A quick squeeze of lemon brightens everything up beautifully.
Spreading and Baking
Here’s where the magic happens! Pour your fruity puree onto parchment-lined baking sheets. Use a spatula to spread it evenly – about 1/8 inch thick is perfect. Too thin and it’ll crisp up like a fruit chip (still tasty, but not what we’re going for!). Pop it in your preheated 175°F oven and let the slow heat work its magic. This isn’t a rush job – plan for 4-6 hours depending on your fruit’s juiciness.
Checking for Doneness
You’ll know it’s ready when the surface isn’t sticky to the touch but still flexible – think fruit jerky, not potato chips! The edges might dry faster, so test the center. If it peels away cleanly from the parchment with that perfect chewy texture, you’ve nailed it. Over-dried? No worries – just roll it up quickly before it cools completely and it’ll soften a bit.
Pro Tips for Perfect Homemade Fruit Leather
After making dozens (okay, maybe hundreds) of batches, here are my hard-earned secrets:
- Ripe = right: Wait for peak-season fruit – underripe ones taste blah and won’t blend smoothly
- Rotate for even drying: Switch tray positions halfway if your oven has hot spots (mine definitely does!)
- Test thickness: Spoon a small amount on parchment first – if it spreads paper-thin, add more fruit
- Patience pays off: Resist opening the oven too often – each peek adds 15 minutes to drying time
- Cut while warm: Use kitchen shears to slice strips before the leather cools completely
Follow these, and you’ll get that perfect chewy texture every single time!
Variations and Flavor Ideas
Oh my goodness, this is where the real fun begins! Once you’ve mastered the basic recipe, try these favorite combos from my kitchen:
- Tropical twist: Mango + pineapple with a pinch of coconut flakes
- Berry blast: Mixed strawberries, blueberries and raspberries
- Spiced comfort: Applesauce with cinnamon, nutmeg and a dash of vanilla
- Creamy dream: Banana puree swirled with almond butter
- Herb garden special: Peaches with fresh basil or strawberries with mint
Honestly, I treat my fruit leather like an artist’s palette – some batches turn out tie-dyed from swirling different flavors together! What wild combinations will you create?
Storing and Serving Homemade Fruit Leather
Here’s the best way to keep your fruit leather happy: roll up the cooled strips and tuck them into an airtight container (I reuse old oatmeal canisters – perfect size!). They’ll stay fresh for 2 weeks in the pantry, longer if refrigerated. I love packing them in lunchboxes, tossing a few in my hiking pack, or just grabbing one when that afternoon snack attack hits. Pro tip: Layer parchment between rolls if stacking to prevent sticking – learned that after opening a fruit leather brick one too many times!
Homemade Fruit Leather FAQs
Let me answer those burning fruit leather questions I get asked all the time:
Can I use frozen fruit?
Absolutely! Thaw it first and drain any excess liquid (save that juice for smoothies!). Frozen berries make great leather – just know colors may darken slightly. Pro tip: Spread frozen fruit puree slightly thicker since it releases more moisture.
Why is my leather sticky?
Two likely culprits: either it needed more drying time (add 30-60 minutes), or your fruit was extra juicy. Next time, try straining the puree through cheesecloth first. A little stickiness is normal though – that’s what makes it fun to peel off the parchment!
Can I make this without an oven?
Yes! A food dehydrator works beautifully at 135°F for 6-8 hours. Just watch the timing – dehydrator models vary. In sunny climates, you can even sun-dry fruit leather over 2-3 days (cover with mesh to keep bugs away).
How do I know when it’s done?
The perfect fruit leather should peel cleanly off the parchment but still bend without cracking. If it snaps like a cracker, it’s overdone (still edible though!). Undercooked? Just pop it back in the oven for another hour.
Can I double the recipe?
Of course! Just use multiple baking sheets – don’t crowd them. Rotate pans halfway through drying for even results. Want bigger batches? Invest in extra-large silicone mats made specifically for fruit leather.
Nutritional Information
Here’s the scoop on nutrition per strip (remember, exact numbers depend on your fruit choice!): About 45 calories, zero fat, and all the natural vitamins from whatever gorgeous fruit you used. No guilt here – just pure fruity goodness!
Share Your Creation!
I’d love to see your fruit leather masterpieces! Tag me or use #HomemadeFruitLeather so I can cheer you on.
Print
Irresistible 4-Ingredient Homemade Fruit Leather Recipe
- Total Time: 6 hours 15 minutes
- Yield: 10 strips 1x
- Diet: Vegan
Description
Make your own healthy fruit leather at home with just a few simple ingredients. Perfect for snacks, lunchboxes, or on-the-go energy.
Ingredients
- 4 cups fresh fruit (berries, apples, or peaches work well)
- 1–2 tbsp honey or maple syrup (optional)
- 1 tsp lemon juice (optional, to prevent browning)
Instructions
- Preheat your oven to 175°F (80°C). Line a baking sheet with parchment paper.
- Blend the fruit until smooth. Add honey or lemon juice if desired.
- Spread the mixture evenly on the parchment paper, about 1/8 inch thick.
- Bake for 4-6 hours until dry but still pliable.
- Cut into strips and roll up. Store in an airtight container.
Notes
- Use ripe fruit for the best flavor.
- Thicker layers take longer to dry.
- Store in a cool, dry place for up to 2 weeks.
- Prep Time: 15 minutes
- Cook Time: 6 hours
- Category: Snack
- Method: Baking
- Cuisine: International
Nutrition
- Serving Size: 1 strip
- Calories: 45
- Sugar: 8g
- Sodium: 0mg
- Fat: 0g
- Saturated Fat: 0g
- Unsaturated Fat: 0g
- Trans Fat: 0g
- Carbohydrates: 11g
- Fiber: 1g
- Protein: 0.5g
- Cholesterol: 0mg
Keywords: homemade fruit leather, healthy snack, dried fruit, vegan snack
")
")
")
")