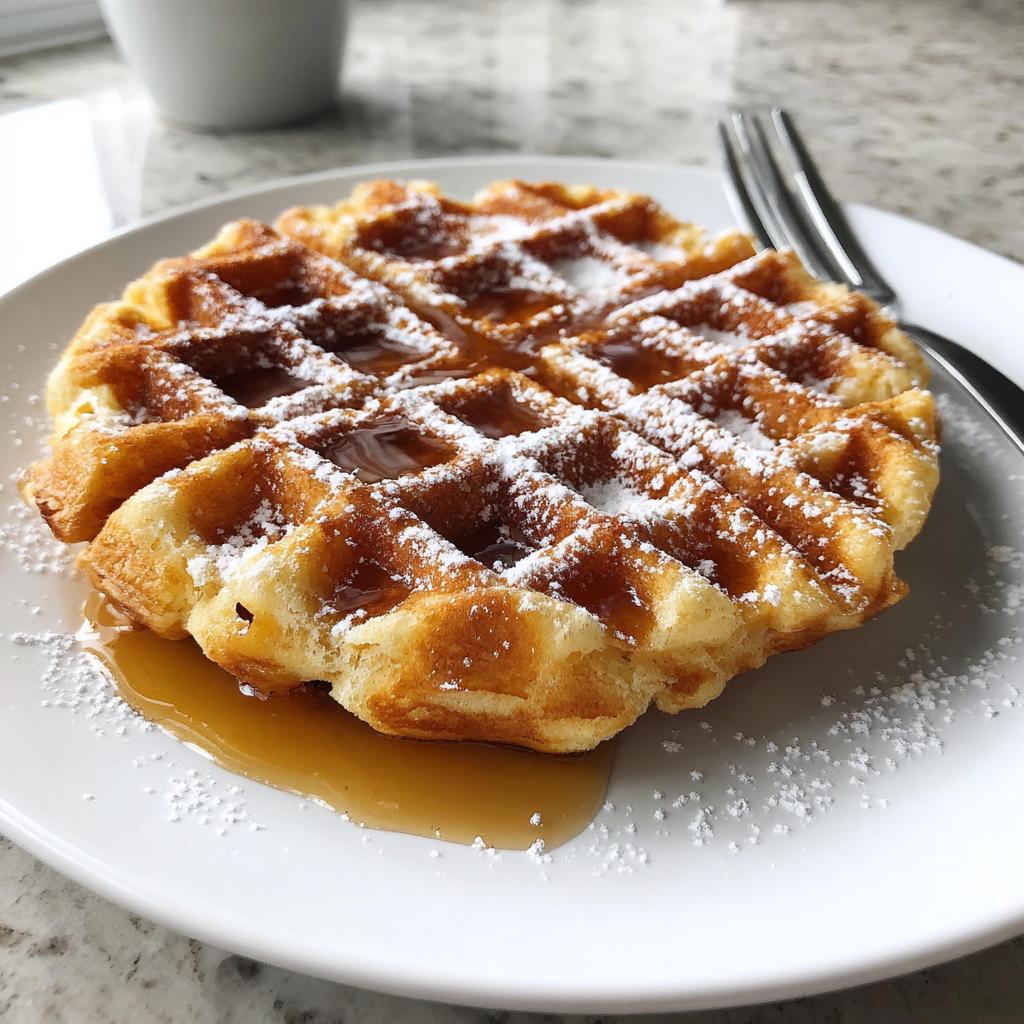
There’s nothing quite like the smell of homemade waffles filling your kitchen on a lazy weekend morning. That perfect crispness when you bite into them, the way they hold just enough butter and syrup without getting soggy—it’s pure breakfast magic. I’ve been making this recipe for years, tweaking it until I got that ideal balance of fluffy inside and golden crunch outside. What I love most? It’s so simple. Just pantry staples, a quick mix, and your waffle iron does the rest. No fancy techniques, no waiting hours for dough to rise. Just honest-to-goodness, crispy-edged homemade waffles ready in minutes. Trust me, once you taste these, the boxed mix will never make it back into your shopping cart.
Why You’ll Love These Homemade Waffles
Let me tell you why these waffles have become my weekend staple – they’re ridiculously easy yet deliver that diner-quality crisp you crave. The batter comes together in minutes with ingredients you probably already have. But the magic happens when they hit the waffle iron – that perfect golden crust forms while the inside stays light and fluffy. You’ll love how versatile they are too – dress them up fancy for brunch or keep it simple with just butter and syrup for a quick breakfast.
Perfect for Any Occasion
I’ve served these homemade waffles at everything from sleepy Sunday breakfasts to fancy bridal brunches. They’re equally happy topped with fresh berries and whipped cream for dessert as they are piled high with crispy bacon for a hearty morning meal. Honestly, there’s never a wrong time for waffles in my book!
Ingredients for Homemade Waffles
Gathering your ingredients is the first step to waffle bliss! Here’s exactly what you’ll need for perfect homemade waffles every time:
- 2 cups all-purpose flour – spooned and leveled (no packing!)
- 2 tablespoons sugar – regular granulated works great
- 1 tablespoon baking powder – yes, a full tablespoon!
- 1/2 teaspoon salt – brings out all the flavors
- 2 large eggs – straight from the fridge is fine
- 1 3/4 cups milk – whole milk makes them extra rich
- 1/2 cup vegetable oil – or melted butter if you prefer
- 1 teaspoon vanilla extract – the good stuff makes a difference
Ingredient Notes & Substitutions
Don’t stress if you’re missing something – waffles are super forgiving! Out of milk? Buttermilk adds tangy goodness (just reduce baking powder to 2 tsp). No vegetable oil? Melted coconut oil works beautifully. For a dairy-free version, almond milk and avocado oil swap in perfectly. My secret? Sometimes I add a mashed banana when I’m feeling wild. The batter thickens as it sits, so don’t panic if it seems thin at first – that’s normal!
Equipment You’ll Need
Alright, let’s talk gear! You don’t need anything fancy for perfect homemade waffles – just a few basics. Of course, a waffle iron is essential (I love my old flip-style one, but any type works). Grab a large mixing bowl for dry ingredients and a medium bowl for wet. You’ll want a whisk for blending and a measuring cups/spoons set. That’s it! No stand mixer needed – this is gloriously low-tech cooking at its best. Pro tip: Keep a silicone brush handy for greasing the iron between batches!
How to Make Homemade Waffles
Alright, let’s get to the fun part – making these golden beauties! I promise it’s easier than you think. The key is taking it step by step and not overthinking it. Waffles are wonderfully forgiving, so even if your batter isn’t perfectly smooth, they’ll still turn out delicious. Here’s exactly how I do it every weekend:
Step 1: Preheat and Mix Dry Ingredients
First things first – plug in that waffle iron and let it heat up while you prepare the batter. Trust me, you want it piping hot before any batter touches it. Now grab your large mixing bowl and whisk together the flour, sugar, baking powder and salt. Don’t skip the whisking – it’s crucial for eliminating lumps and evenly distributing the leavening agents. I like to make a little well in the center for the wet ingredients later. The dry mixture should look like a pale, sandy mixture – no big clumps!
Step 2: Combine Wet Ingredients
In your medium bowl, crack those eggs and give them a good beating until they’re nice and frothy. Then pour in the milk, oil and vanilla – the vanilla scent hitting your nose is the best part! Whisk everything together until it’s completely combined and slightly bubbly. The mixture will look like a thin, golden liquid at this point. Pro tip: If your eggs were cold from the fridge, don’t worry – the oil will keep the mixture from getting too chilly.
Step 3: Cook to Golden Perfection
Now the magic happens! Pour your wet ingredients into the dry mixture and gently stir until just combined – a few small lumps are totally fine. Overmixing makes tough waffles, so when in doubt, stop stirring! Lightly grease your hot waffle iron (I use about 1 tablespoon of batter to test if it’s ready). Pour about 1/2 cup batter into the center (it’ll spread), close the lid and resist peeking for at least 3 minutes. You’ll know they’re done when steam stops pouring out and they’re a deep golden brown. The first one might be a test, but soon you’ll have a stack of crispy, perfect homemade waffles!
Tips for the Best Homemade Waffles
Want your waffles to go from good to “Oh my goodness, how did you make these?” Here are my tried-and-true secrets! First, let the batter rest for 5 minutes after mixing – those bubbles you see forming mean extra crispiness is coming. Always preheat your waffle iron until it’s properly hot (test with a few drops of water – they should sizzle immediately). And here’s my weirdest tip: don’t stack waffles fresh from the iron! Lay them in a single layer on a wire rack to keep that perfect crunch. Last pro move? If you’re making a big batch, keep finished waffles warm in a 200°F oven while you cook the rest.
Serving Suggestions for Homemade Waffles
Now comes the best part – dressing up your golden homemade waffles! My classic go-to is a generous pour of real maple syrup and a pat of melting butter (because let’s be honest, is there anything better?). But when I’m feeling fancy, I love topping them with fresh berries, a dollop of whipped cream, and maybe even a sprinkle of powdered sugar. For savory lovers, crispy bacon or sausage links make the perfect salty-sweet pairing. Get creative – these waffles are your delicious canvas!
Storage & Reheating Instructions
Here’s the good news – homemade waffles freeze beautifully! Let cooled waffles rest on a wire rack until completely cool (about 30 minutes), then stack them with parchment paper between each one. Pop them in a freezer bag and they’ll keep for up to 3 months. To reheat, just toast frozen waffles straight from the freezer – they’ll come out crispy and fresh-tasting every time. No more soggy microwave waffles in this house!
Homemade Waffles Nutritional Information
Here’s the scoop on what’s in these tasty homemade waffles – but remember, your exact numbers might dance around a bit depending on your ingredients. Each golden-brown waffle comes in at about 250 calories, with 30g carbs and 6g protein to keep you going. The beauty? You control what goes on top, so drizzle (or don’t drizzle) to your heart’s content. My numbers are based on whole milk and vegetable oil – use buttermilk or swap in coconut oil, and you’ll see slight changes. At the end of the day, these are homemade treats meant to be enjoyed, not measured!
Frequently Asked Questions
Can I freeze these homemade waffles?
Absolutely! That’s one of my favorite things about this recipe. Just cool them completely on a wire rack, then stack with parchment paper between each waffle before freezing. They’ll stay perfect for up to 3 months – just pop them straight into the toaster from frozen when you’re ready to eat. The texture comes out almost as good as fresh!
Why aren’t my waffles crispy?
Oh, I’ve been there! The number one culprit is usually not letting your waffle iron heat up enough – it needs to be piping hot before adding batter. Also, try letting your batter rest for 5 minutes before cooking (those bubbles help create crispiness). And whatever you do, don’t stack them hot – the steam makes them go soggy fast.
Can I make the batter ahead of time?
You can mix it up the night before, but I’ll be honest – the texture won’t be quite as nice. The baking powder starts working right away, so your waffles might not puff up as much. If you must prep ahead, mix the dry and wet ingredients separately, then combine them in the morning for best results.
What’s the secret to perfect waffle shapes?
Don’t overfill! I use about 1/2 cup batter for standard round waffle irons – it spreads more than you’d think. And here’s a weird tip: wait until you see steady steam coming from the iron before checking. Peeking too soon can cause tearing. With practice, you’ll learn exactly when they’re ready by the smell alone!

Fluffy Homemade Waffles Recipe with 5 Secret Tips for Perfection
- Total Time: 25 minutes
- Yield: 6 waffles 1x
- Diet: Vegetarian
Description
Crispy, golden homemade waffles perfect for breakfast or brunch. Easy to make with simple ingredients.
Ingredients
- 2 cups all-purpose flour
- 2 tablespoons sugar
- 1 tablespoon baking powder
- 1/2 teaspoon salt
- 2 large eggs
- 1 3/4 cups milk
- 1/2 cup vegetable oil
- 1 teaspoon vanilla extract
Instructions
- Preheat your waffle iron.
- In a large bowl, whisk flour, sugar, baking powder, and salt.
- In another bowl, beat eggs, milk, oil, and vanilla.
- Pour wet ingredients into dry ingredients and stir until combined.
- Pour batter onto the hot waffle iron and cook until golden brown.
- Serve warm with toppings of your choice.
Notes
- For crispier waffles, let the batter rest for 5 minutes before cooking.
- You can substitute buttermilk for regular milk for extra flavor.
- Store leftovers in an airtight container and reheat in a toaster.
- Prep Time: 10 minutes
- Cook Time: 15 minutes
- Category: Breakfast
- Method: Waffle Iron
- Cuisine: American
Nutrition
- Serving Size: 1 waffle
- Calories: 250
- Sugar: 5g
- Sodium: 300mg
- Fat: 12g
- Saturated Fat: 2g
- Unsaturated Fat: 8g
- Trans Fat: 0g
- Carbohydrates: 30g
- Fiber: 1g
- Protein: 6g
- Cholesterol: 50mg
Keywords: homemade waffles, breakfast waffles, easy waffle recipe
")
")
")
")