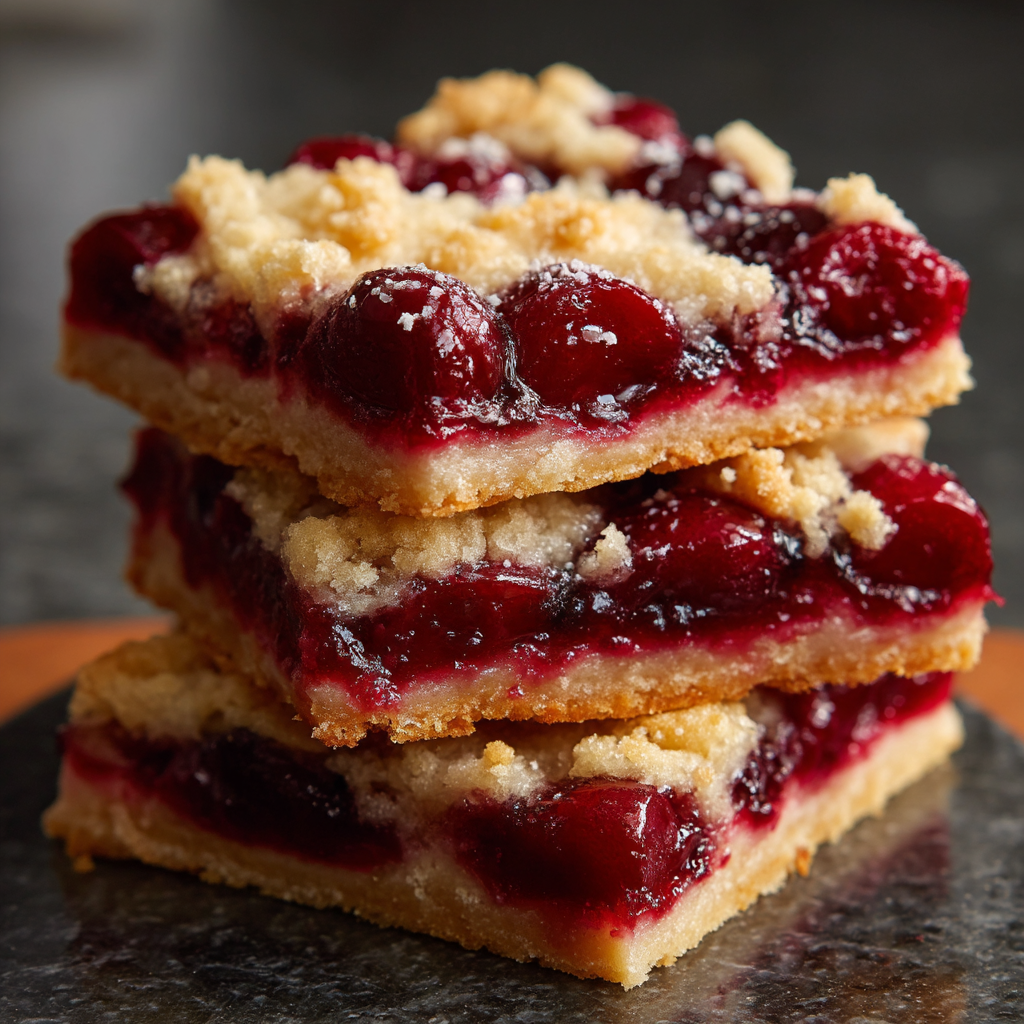
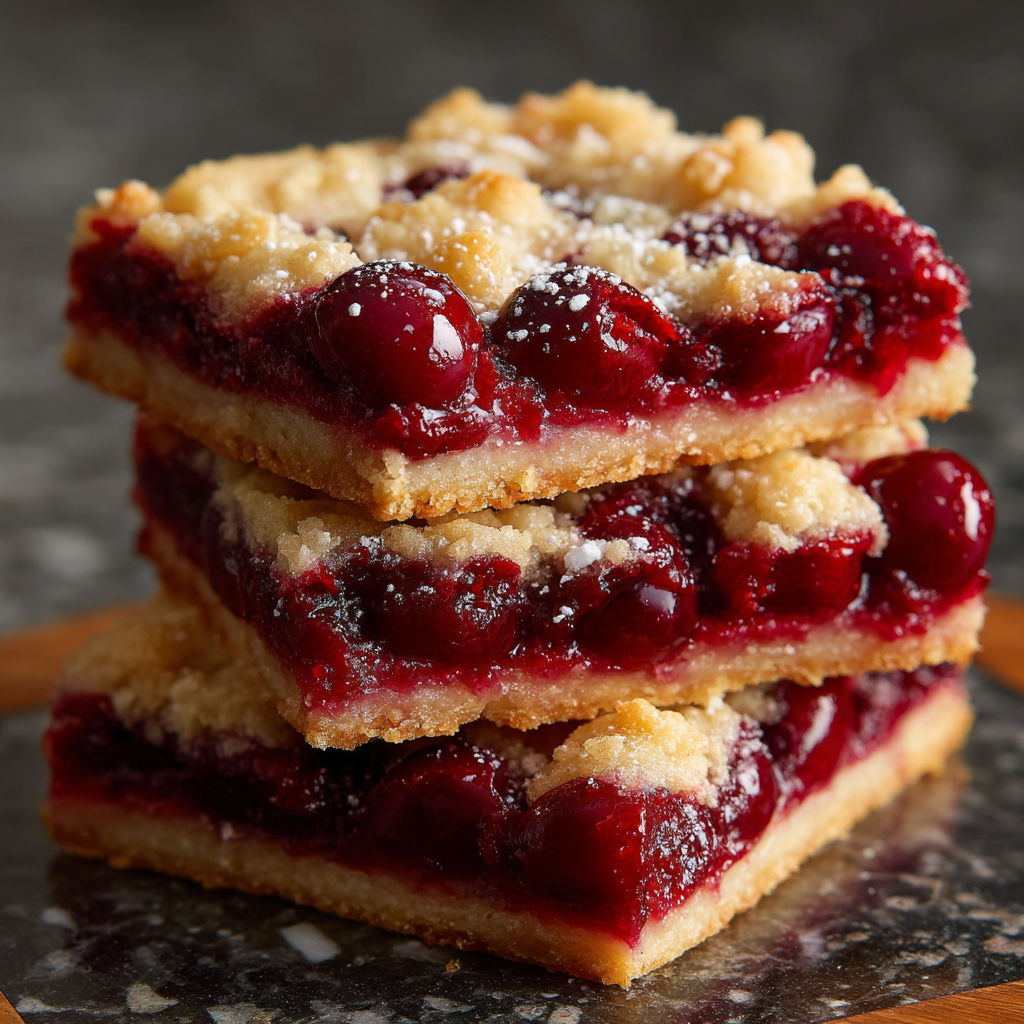
As a passionate home cook, I find joy in creating desserts that not only taste amazing but also bring a smile to everyone’s face. One of my all-time favorites is the Irresistibly Delicious Cherry Pie Bars. These delightful treats are like a warm hug on a plate, bursting with the sweet and tart flavors of fresh cherries. Every bite is a reminder of summer picnics and family gatherings, where laughter and love are shared over delicious food.
Ingredients for Irresistibly Delicious Cherry Pie Bars
Before we roll up our sleeves and get cooking, let’s gather all the ingredients needed to whip up these Irresistibly Delicious Cherry Pie Bars. I love how each ingredient plays a vital role in creating that perfect balance of flavors. Here’s what you’ll need:
- 🍒 Fresh cherries: 4 cups, pitted and halved. The star of the show! Fresh cherries bring a burst of sweetness and a hint of tartness that makes these bars shine.
- 🍬 Granulated sugar: 3/4 cup. This sweetener helps to balance the tartness of the cherries, making every bite a delightful experience.
- 🌾 All-purpose flour: 1 1/2 cups (divided). Flour is essential for both the crust and the cherry filling, giving structure to our bars.
- 🧈 Unsalted butter: 1/2 cup (1 stick), melted. Butter adds richness and flavor, creating that irresistible crumbly texture.
- 🌾 Rolled oats: 1 cup. Oats add a lovely chewiness to the crust and topping, making each bite satisfying.
- 🌿 Ground cinnamon: 1 teaspoon. A sprinkle of cinnamon brings warmth and depth to the flavor profile, making it feel like a cozy dessert.
- 🍋 Lemon juice: 1 tablespoon. This little splash of acidity brightens the cherry filling, enhancing the overall taste.
- 🧂 Salt: 1/4 teaspoon. Just a pinch of salt helps to elevate the sweetness and balance the flavors.
As I gather these ingredients, I can’t help but feel excited about the deliciousness that’s about to unfold. Each item is like a note in a beautiful melody, coming together to create something truly special. I often find myself daydreaming about the sweet aroma wafting through my kitchen as I prepare these bars. It’s a simple yet magical process that I can’t wait to share with you!
Tools Needed for Irresistibly Delicious Cherry Pie Bars
Before we dive into the delightful process of making Irresistibly Delicious Cherry Pie Bars, let’s make sure we have all the right tools at our fingertips. Having the right equipment not only makes the cooking experience smoother but also adds to the fun! Here’s a list of the essential tools I use when whipping up these scrumptious bars:
- 🍽️ 9×13-inch baking dish: This is the perfect size for our cherry pie bars. It allows for even baking and gives us those lovely, thick bars we all crave.
- 🥄 Mixing bowls: I like to have a couple of mixing bowls on hand. One for the cherry filling and another for the crust and topping. It keeps things organized and makes the process feel more enjoyable.
- 🔪 Knife: A sharp knife is essential for pitting and halving the fresh cherries. Trust me, it makes the task much easier and safer!
- 🍴 Spatula: A sturdy spatula is great for mixing and spreading the cherry filling and crust. I love using a silicone spatula because it’s flexible and easy to clean.
- 🥄 Measuring cups and spoons: Accurate measurements are key to achieving the perfect balance of flavors. I always keep my measuring cups and spoons handy to ensure I get it just right.
- 🧊 Cooling rack: Once the bars are baked, a cooling rack helps them cool evenly. This is especially important if you want to slice them into perfect squares without them falling apart.
- 📏 Paring knife or pizza cutter: For cutting the bars into neat squares, I find a paring knife or a pizza cutter works wonders. It makes the process quick and easy!
As I gather these tools, I can’t help but feel a sense of excitement bubbling inside me. Each tool has its purpose, and together they create a symphony of flavors and textures. I remember the first time I made these cherry pie bars; I was a bit clumsy with my knife, but with practice, I’ve become a pro! So, let’s get ready to roll up our sleeves and create something truly special. The kitchen is calling, and I can’t wait to share this delicious journey with you!
Step-by-Step Preparation of Irresistibly Delicious Cherry Pie Bars
Now that we have all our ingredients and tools ready, it’s time to dive into the step-by-step preparation of these Irresistibly Delicious Cherry Pie Bars. I love this part because it’s where the magic happens! Each step brings us closer to that sweet, cherry-filled goodness. Let’s get started!
Step 1: Preparing the Crust for Irresistibly Delicious Cherry Pie Bars
First things first, we need to create the base for our cherry pie bars. In a large mixing bowl, I combine 1 1/4 cups of all-purpose flour, 1 cup of rolled oats, 1/4 cup of granulated sugar, 1 teaspoon of ground cinnamon, and 1/4 teaspoon of salt. The aroma of cinnamon wafting through the air is simply delightful!
Next, I pour in the melted butter. As I mix everything together, I can feel the crumbly texture forming. It’s like creating a sandy beach with my hands! I use a fork or my fingers to combine the ingredients until they resemble coarse crumbs. This mixture will be both our crust and topping, so I make sure it’s well combined.
Once it’s ready, I take about two-thirds of this mixture and press it firmly into the bottom of my greased baking dish. I love the feeling of pressing it down, knowing that this will be the sturdy foundation for our cherry filling. It’s like building a cozy home for those juicy cherries!
Step 2: Making the Cherry Filling for Irresistibly Delicious Cherry Pie Bars
Now, let’s move on to the star of the show: the cherry filling! In a separate bowl, I toss together the 4 cups of pitted and halved fresh cherries with 1/2 cup of granulated sugar, 1 tablespoon of lemon juice, and 2 tablespoons of flour. The vibrant red cherries look so inviting, and I can already imagine the sweet-tart flavor they’ll bring.
As I gently mix everything together, I can see the cherries glistening with sugar and lemon juice. It’s like they’re getting ready for a party! I let this mixture sit for a few minutes, allowing the juices to develop. The anticipation builds as I think about how delicious this filling will be.
Step 3: Assembling the Irresistibly Delicious Cherry Pie Bars
With the crust and filling ready, it’s time to assemble our cherry pie bars! I spread the cherry filling evenly over the crust, making sure to distribute the cherries and their juices. It’s like painting a beautiful canvas with vibrant colors!
Next, I crumble the remaining oat mixture over the top of the cherries. This creates a lovely, crunchy topping that will contrast beautifully with the soft cherry filling. I can’t help but sneak a taste of the crumbly mixture—it’s so good! I always have to remind myself to save some for the bars.
Step 4: Baking the Irresistibly Delicious Cherry Pie Bars
Now comes the moment of truth: baking! I carefully place the baking dish in my preheated oven at 350°F (175°C). As the bars bake, the sweet aroma of cherries and buttery oats fills my kitchen, making my mouth water. I set a timer for 30-35 minutes and eagerly await the golden brown top.
When the timer goes off, I peek into the oven, and my heart skips a beat. The top is beautifully golden, and I can see the cherry filling bubbling underneath. It’s a sight to behold! I take the baking dish out of the oven, feeling a sense of accomplishment wash over me.
Step 5: Cooling and Slicing the Irresistibly Delicious Cherry Pie Bars
After baking, it’s important to let the cherry pie bars cool in the pan for at least 15-20 minutes. I know it’s hard to resist the temptation to dig in right away, but trust me, it’s worth the wait! Once they’ve cooled a bit, I transfer them to a cooling rack to cool completely. This helps them set up nicely, making slicing easier.
Once they’re completely cool, I grab my trusty paring knife and slice them into squares. Each cut reveals the beautiful layers of crust and cherry filling. I can hardly contain my excitement as I plate them up, ready to share with family and friends. The anticipation of that first bite is always thrilling!
And there you have it! The step-by-step preparation of Irresistibly Delicious Cherry Pie Bars is complete. I can’t wait for you to experience the joy of making these bars in your own kitchen. Let’s move on to some serving suggestions that will take these bars to the next level!
Serving Suggestions for Irresistibly Delicious Cherry Pie Bars
Now that we’ve created our Irresistibly Delicious Cherry Pie Bars, it’s time to think about how to serve them! Presentation can elevate any dessert, and I love to get a little creative when it comes to serving these delightful treats. Here are some of my favorite serving suggestions that will make your cherry pie bars even more irresistible!
Pairing Irresistibly Delicious Cherry Pie Bars with Ice Cream
One of the best ways to enjoy these cherry pie bars is by pairing them with a scoop of vanilla ice cream. The creamy, cold ice cream contrasts beautifully with the warm, fruity bars. I remember the first time I served them this way; the combination was a hit! As I scooped the ice cream onto the warm bars, I could see the ice cream slowly melting, creating a deliciously gooey mess. It was pure bliss!
For an extra touch, consider drizzling some chocolate or caramel sauce over the top. The rich flavors of the sauce blend perfectly with the sweet cherries, making each bite a heavenly experience. You can even sprinkle some chopped nuts for added crunch. Trust me, this simple addition takes your dessert to a whole new level!
Creative Serving Ideas for Irresistibly Delicious Cherry Pie Bars
If you’re feeling adventurous, there are plenty of creative ways to serve your Irresistibly Delicious Cherry Pie Bars. One idea is to turn them into a parfait! Layer crumbled cherry pie bars with whipped cream and fresh cherries in a glass. It’s a fun and visually appealing way to enjoy the flavors of the bars while adding a touch of elegance.
Another idea is to serve them with a dollop of whipped cream on top. I love to whip up some fresh cream and add a hint of vanilla for extra flavor. The light, airy texture of the whipped cream complements the dense bars perfectly. You can even add a sprinkle of cinnamon or a few chocolate shavings for a fancy touch!
Lastly, consider serving these bars at a picnic or outdoor gathering. Cut them into smaller squares and pack them in a cute container. They’re easy to transport and make for a delightful treat that everyone will love. I often find myself making these bars for summer picnics, where they disappear faster than I can say “cherry pie!”
With these serving suggestions, you can take your Irresistibly Delicious Cherry Pie Bars to new heights. Whether you choose to pair them with ice cream or get creative with your presentation, I’m sure they’ll be a hit at any gathering. Now, let’s move on to some tips for perfecting these bars!
Tips for Perfecting Irresistibly Delicious Cherry Pie Bars
As a passionate home cook, I’ve learned that even the simplest recipes can have their quirks. Making Irresistibly Delicious Cherry Pie Bars is no exception! To ensure your bars turn out perfectly every time, I’m excited to share some tips that I’ve gathered from my own kitchen adventures. Let’s dive into some common mistakes to avoid and storage tips to keep your bars fresh and tasty!
Common Mistakes to Avoid with Irresistibly Delicious Cherry Pie Bars
Even the most seasoned cooks can make a few missteps along the way. Here are some common mistakes I’ve encountered while making these cherry pie bars, along with tips to avoid them:
- 🍒 Using unripe cherries: Fresh cherries are the star of this recipe, so make sure to choose ripe, sweet cherries. Unripe cherries can lead to a tart filling that may not be as enjoyable. I always taste a few cherries before using them to ensure they’re just right!
- 🧂 Skipping the salt: It may seem small, but a pinch of salt is crucial! It enhances the sweetness of the cherries and balances the flavors. Don’t skip it, or your bars might taste flat.
- ⏰ Not letting the bars cool: I know it’s tempting to dig in right away, but allowing the bars to cool completely helps them set. If you cut them too soon, they may crumble and fall apart. Patience is key!
- 📏 Not measuring ingredients accurately: Baking is a science, and precise measurements matter. I always use measuring cups and spoons to ensure I get the right amounts. A little too much flour or sugar can change the texture and flavor.
By avoiding these common pitfalls, you’ll be well on your way to creating the most delicious cherry pie bars. Trust me, I’ve learned from experience, and these tips will save you time and frustration!
Storage Tips for Irresistibly Delicious Cherry Pie Bars
Once you’ve made your Irresistibly Delicious Cherry Pie Bars, you’ll want to keep them fresh for as long as possible. Here are some storage tips that I’ve found helpful:
- 🧊 Cool completely before storing: As mentioned earlier, let the bars cool completely before transferring them to an airtight container. This prevents condensation from forming, which can make them soggy.
- 🍰 Store in the refrigerator: These bars can be stored in an airtight container in the refrigerator for up to 3 days. The cool environment helps maintain their freshness and flavor.
- ❄️ Freezing for later: If you want to enjoy these bars later, they freeze beautifully! Cut them into squares and wrap each piece in plastic wrap, then place them in a freezer-safe container. They can be frozen for up to 3 months. When you’re ready to enjoy, simply thaw them in the refrigerator overnight.
- 🍽️ Reheat for a warm treat: If you prefer your bars warm, you can reheat them in the microwave for a few seconds or in the oven at a low temperature. Just be careful not to overheat them, or they may become too soft.
With these storage tips, you can savor your Irresistibly Delicious Cherry Pie Bars for days to come. Whether you’re enjoying them fresh out of the oven or after a few days in the fridge, they’re sure to bring a smile to your face. Now, let’s move on to some frequently asked questions about these delightful bars!
FAQs about Irresistibly Delicious Cherry Pie Bars
Can I use frozen cherries for Irresistibly Delicious Cherry Pie Bars?
Absolutely! While I love using fresh cherries, frozen cherries can work just as well in this recipe. They’re often picked at peak ripeness and flash-frozen, which means they still pack a punch of flavor. Just keep in mind that frozen cherries may release more juice as they bake, so you might want to add a little extra flour to the filling to help thicken it up. I’ve made these bars with frozen cherries on a busy day, and they turned out just as delicious! It’s a great option if fresh cherries aren’t available.
How do I know when my Irresistibly Delicious Cherry Pie Bars are done baking?
Knowing when your cherry pie bars are done baking is key to achieving that perfect texture. I usually look for a golden brown top and bubbling cherry filling. When you see those lovely golden edges, it’s a good sign! You can also gently press the top with a spatula; it should feel firm but slightly soft. If it’s too jiggly, give it a few more minutes in the oven. Remember, every oven is a little different, so keep an eye on them during the last few minutes of baking. The aroma wafting through your kitchen will be a delightful hint that they’re almost ready!
Can I make Irresistibly Delicious Cherry Pie Bars ahead of time?
Yes, you can! In fact, making these bars ahead of time can be a real lifesaver, especially for gatherings or busy weeks. You can prepare the bars a day in advance and store them in the refrigerator. Just make sure to let them cool completely before covering them with plastic wrap or placing them in an airtight container. If you want to make them even earlier, you can freeze them! Just remember to thaw them in the fridge overnight before serving. I often make a batch on the weekend to enjoy throughout the week, and they taste just as good!
What are some variations of Irresistibly Delicious Cherry Pie Bars?
Oh, the possibilities are endless! While I adore the classic cherry flavor, you can easily switch things up to suit your taste. Here are a few variations I’ve tried and loved:
- 🍏 Mixed Berry Bars: Swap out some of the cherries for blueberries or raspberries for a delightful berry medley.
- 🍑 Peach Cherry Bars: Combine fresh peaches with cherries for a sweet and juicy twist. The flavors complement each other beautifully!
- 🍫 Chocolate Cherry Bars: Add some chocolate chips to the oat mixture for a rich, decadent treat. Chocolate and cherries are a match made in heaven!
- 🌰 Nuts and Spices: Consider adding chopped nuts like walnuts or pecans for added crunch, or experiment with spices like nutmeg or ginger for a unique flavor profile.
These variations allow you to get creative and make the recipe your own. I love experimenting with different fruits and flavors, and each time I do, it feels like a new adventure in my kitchen!
Conclusion: Enjoying Your Irresistibly Delicious Cherry Pie Bars
As I wrap up this delightful journey of creating Irresistibly Delicious Cherry Pie Bars, I can’t help but feel a sense of warmth and satisfaction. There’s something truly special about sharing homemade treats with loved ones. Whether it’s a cozy family gathering or a sunny picnic in the park, these cherry pie bars are sure to bring smiles and happy memories.
Print
Irresistibly Delicious Cherry Pie Bars: A Sweet Delight!
- Total Time: 55 minutes
- Yield: 12 servings
- Diet: Vegetarian
Description
Irresistibly Delicious Cherry Pie Bars are a delightful dessert that combines the sweet and tart flavors of fresh cherries with a buttery, crumbly crust, perfect for sharing at gatherings.
Ingredients
- 🍒 Fresh cherries: 4 cups, pitted and halved
- 🍬 Granulated sugar: 3/4 cup
- 🌾 All-purpose flour: 1 1/2 cups (divided)
- 🧈 Unsalted butter: 1/2 cup (1 stick), melted
- 🌾 Rolled oats: 1 cup
- 🌿 Ground cinnamon: 1 teaspoon
- 🍋 Lemon juice: 1 tablespoon
- 🧂 Salt: 1/4 teaspoon
Instructions
- Prepare the crust by mixing 1 1/4 cups of flour, oats, sugar, cinnamon, and salt in a bowl. Add melted butter and mix until crumbly.
- Press two-thirds of the mixture into a greased 9×13-inch baking dish.
- Make the cherry filling by combining cherries, sugar, lemon juice, and flour in a separate bowl.
- Spread the cherry filling evenly over the crust.
- Crumble the remaining oat mixture over the top of the cherries.
- Bake in a preheated oven at 350°F (175°C) for 30-35 minutes until golden brown.
- Let cool for 15-20 minutes in the pan, then transfer to a cooling rack to cool completely before slicing.
Notes
- Using ripe cherries enhances the flavor.
- Do not skip the salt as it balances the sweetness.
- Allow bars to cool completely before slicing to prevent crumbling.
- Accurate measurements are crucial for the best results.
- Prep Time: 20 minutes
- Cook Time: 35 minutes
- Category: Dessert
- Method: Baking
- Cuisine: American
Nutrition
- Serving Size: 1 bar
- Calories: 250
- Sugar: 15g
- Sodium: 100mg
- Fat: 10g
- Saturated Fat: 5g
- Unsaturated Fat: 3g
- Trans Fat: 0g
- Carbohydrates: 38g
- Fiber: 2g
- Protein: 3g
- Cholesterol: 15mg
Keywords: cherry pie bars, dessert, baking, summer treats, easy recipes

")
")
")
")