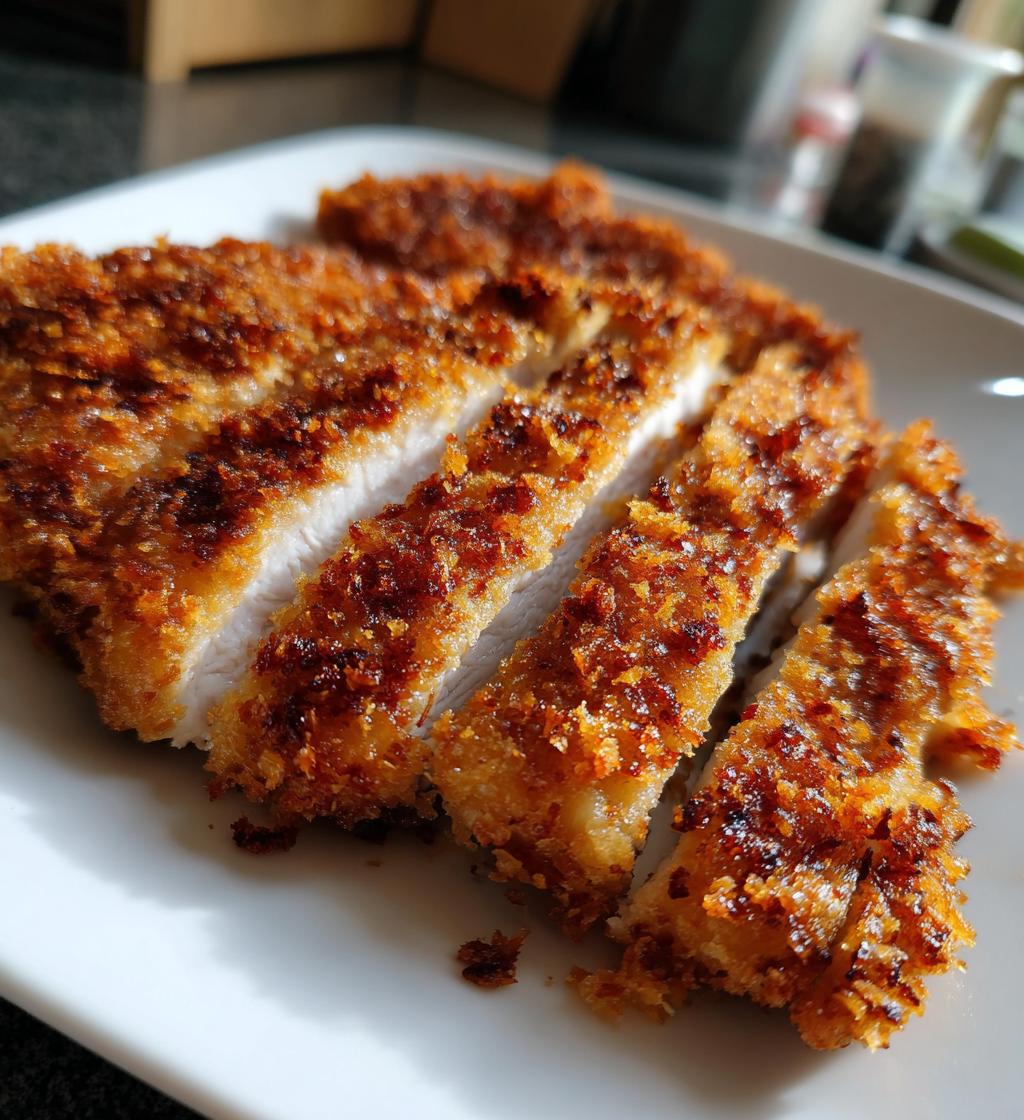
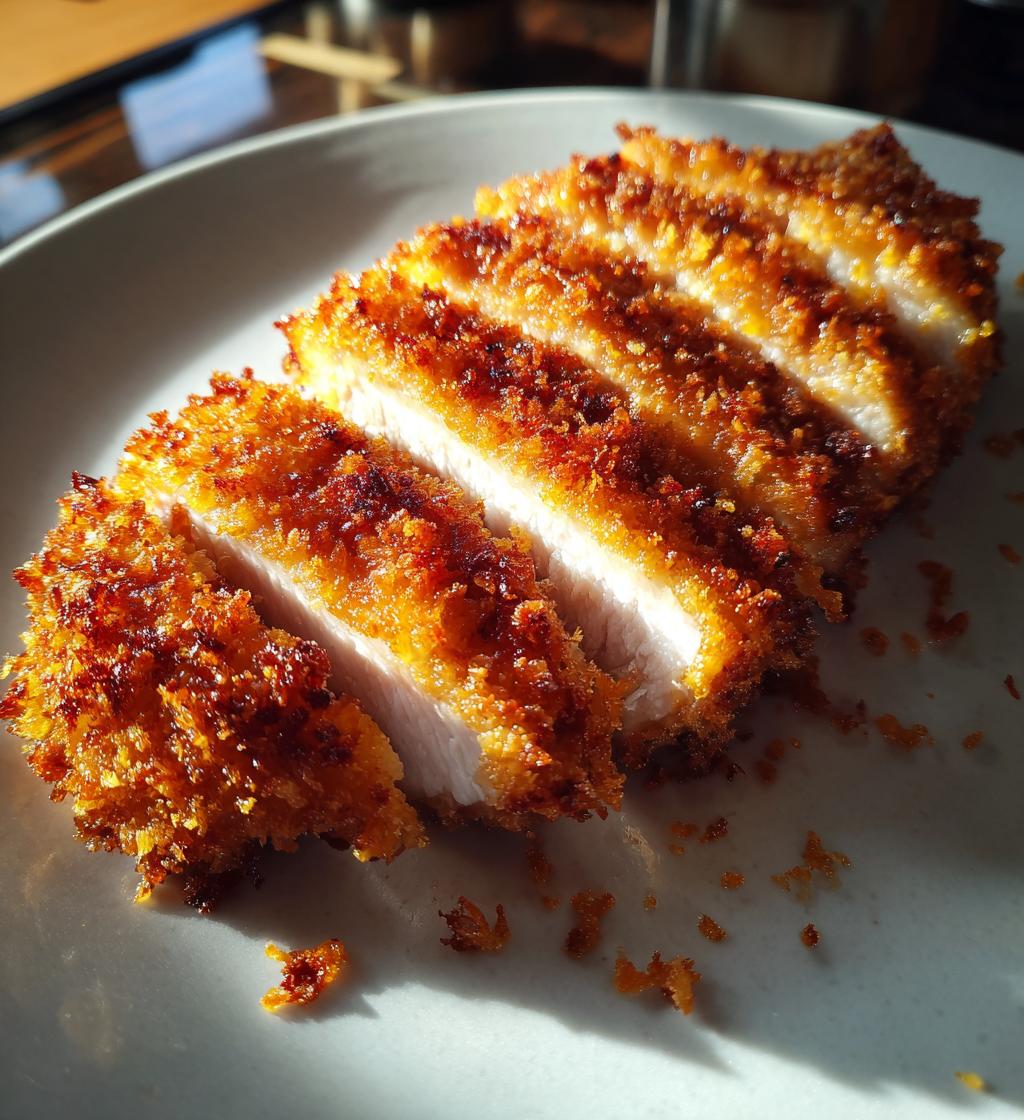
There’s something magical about that first bite of perfectly crispy katsu chicken—the satisfying crunch giving way to juicy, tender meat underneath. I still remember my first encounter with this Japanese classic at a tiny Tokyo eatery years ago. The golden-brown cutlet arrived sizzling hot, and I swear I heard angels singing when I dipped it in that tangy tonkatsu sauce! Now it’s my go-to comfort food whenever I need a taste of Japan at home.
What makes katsu chicken so special? It’s all about that panko breadcrumb crust creating that signature light-yet-crispy texture. Unlike regular fried chicken, there’s no heavy batter here—just simple ingredients transformed into something extraordinary. Whether you’re new to Japanese cooking or a seasoned pro, this katsu chicken recipe will become a favorite. Trust me, once you master this technique, you’ll be frying up batches weekly (your family will demand it!).
The best part? It comes together in about 20 minutes with ingredients you probably already have. So grab your rolling pin (or wine bottle—no judgment!) and let’s make some seriously addictive katsu chicken!
Why You’ll Love This Katsu Chicken Recipe
This katsu chicken recipe checks ALL the boxes for a perfect weeknight meal or impressive dinner party dish. Here’s why it’ll become your new obsession:
- That unbeatable crunch – The panko coating fries up into the most satisfyingly crisp shell that stays crunchy even after slicing
- Foolproof technique – No fancy skills needed, just a simple breading process anyone can master
- Authentic Japanese flavors – Tastes just like what you’d get at your favorite izakaya
- Endless serving options – Serve it sliced over rice, in sandwiches, or even chopped up for katsu curry
- Kid-approved – Even picky eaters go crazy for that crispy golden exterior
Seriously, once you taste that perfect balance of textures and flavors, you’ll understand why this dish has such a cult following!
Essential Ingredients for Perfect Katsu Chicken
Great katsu chicken starts with simple, quality ingredients – each playing a specific role in creating that signature crunch and flavor. After testing dozens of variations, here’s exactly what I always keep on hand:
- Boneless chicken breasts (2) – Pounded to 1/2-inch thickness for even cooking
- Panko breadcrumbs (1 cup) – MUST be Japanese-style panko (those big, flaky crumbs make all the difference)
- Large egg (1) – Lightly beaten with a splash of water to help the coating stick
- All-purpose flour (1/4 cup) – The first layer that helps the egg adhere
- Vegetable oil (1/2 cup) – Neutral oil with high smoke point for frying (I use canola)
- Salt (1/2 tsp) & black pepper (1/4 tsp) – Simple but essential seasoning
Pro tip: If your panko looks pale, toast it lightly in a dry pan first for extra color and crunch! And don’t skip pounding the chicken – it tenderizes the meat and ensures everything cooks evenly.
Step-by-Step Katsu Chicken Instructions
Alright, let’s get our hands dirty and make some seriously crispy katsu chicken! I’ve broken this down into simple steps so you can nail it on your first try. Grab your apron – we’re about to transform basic chicken into golden perfection.
Preparing the Chicken
First things first – we need to get our chicken ready for its crispy makeover. Place those breasts between two sheets of plastic wrap (or in a zip-top bag if you’re like me and always misplace the cling film). Now grab whatever heavy object you’ve got – rolling pin, wine bottle, even a sturdy mug works in a pinch!
Pound evenly until it’s about 1/2-inch thick all over. This step is crucial – it tenderizes the meat AND ensures even cooking. Season both sides generously with salt and pepper, then let it sit for 5 minutes while you set up your breading station. Trust me, those few minutes make all the difference in flavor absorption!
Breading Process
Here’s where the magic happens! Set up three shallow bowls: one with flour, one with beaten egg (add a splash of water to thin it slightly), and one with your glorious panko crumbs. The order matters – flour → egg → panko – like a crispy trifecta!
Dredge each piece first in flour (shake off excess!), then dip in egg letting the excess drip off, and finally press firmly into the panko. Really get in there – use your fingers to pat those flakes into every nook. For extra crunch heaven, repeat the egg and panko steps. It’s messy but SO worth it when you hear that first bite!
Frying to Perfection
Heat your oil in a heavy skillet (cast iron is my go-to) over medium heat until it shimmers – about 350°F if you’re using a thermometer. No thermometer? No problem! Test with a panko crumb – it should sizzle immediately when dropped in.
Gently lay in your breaded chicken (listen to that glorious sizzle!) and fry for 3-4 minutes per side until deeply golden brown. Resist the urge to poke or flip too soon – let that crust form! Drain on a wire rack or paper towels (never skip this – soggy bottoms are tragic). Let rest 2 minutes before slicing – that steam needs time to settle down!
Pro Tips for the Best Katsu Chicken
After making countless batches of katsu chicken (some glorious, some… learning experiences), I’ve nailed down the little tricks that take it from good to mind-blowing:
- Oil temperature is everything – Too hot and the coating burns before the chicken cooks; too cool and it gets greasy. Keep it steady at 350°F by adjusting the heat as needed. I keep extra panko crumbs nearby to test the oil.
- Drain like a pro – Never just plop fried chicken on a plate! Use a wire rack over paper towels so air circulates underneath, keeping every inch crispy.
- Patience pays off – Let the chicken rest 2-3 minutes before slicing. Those juices need time to redistribute, or you’ll end up with a dry disaster!
These tiny details make all the difference between “meh” and “more please!”
Serving Suggestions for Katsu Chicken
Now for the best part – dressing up your golden katsu chicken! My absolute must-have is a drizzle of tangy tonkatsu sauce (Bull-Dog brand forever has my heart) and a pile of crisp shredded cabbage. The cool crunch balances that rich fried goodness perfectly. Serve over steamed rice with miso soup for a classic Japanese teishoku (set meal).
Want to get fancy? Slice the katsu into strips for adorable bento boxes – pack with tamagoyaki, pickled veggies, and a little sauce container for dipping. Leftovers (if you have any!) make killer sandwiches the next day – just add mayo and lettuce between soft milk bread. Pure bliss!
Storing and Reheating Leftovers
Let’s be real—leftovers rarely happen with katsu chicken in my house! But if you somehow resist eating it all, here’s how to keep that crunch: store cooled cutlets in an airtight container in the fridge for up to 2 days. When reheating, skip the microwave (it turns the coating soggy) and use a toaster oven or regular oven at 375°F for 5-7 minutes. Even better? A quick pan-fry to revive that perfect crispiness!
Nutritional Information
Now, I’m no nutritionist, but I know many of you like to keep an eye on what you’re eating—especially when it comes to something as deliciously indulgent as katsu chicken! The numbers below are estimates based on standard ingredients, but remember: values can change depending on your exact chicken size, oil absorption, and specific brands used.
A typical serving (one cutlet with standard preparation) contains roughly:
- 350 calories – Most from that crispy panko crust and golden frying oil
- 28g protein – Chicken packs a serious protein punch
- 20g carbs – Thanks to our beloved panko breadcrumbs
- 18g fat – Mostly unsaturated from the vegetable oil
Pro tip: For a lighter version, try using an air fryer (though nothing beats that authentic pan-fried crunch!). And hey—everything in moderation, right? Sometimes your soul needs crispy katsu chicken more than your diet needs perfection!
Frequently Asked Questions
Over the years, I’ve gotten tons of questions about making the perfect katsu chicken. Here are the ones that come up most often – consider this your crispy chicken cheat sheet!
Can I use chicken thighs instead of breasts?
Absolutely! Thighs make wonderfully juicy katsu chicken – they’re actually my grandma’s preferred cut. Just remove any excess fat and tendons first, then pound to even thickness (they’ll need a bit more force than breasts). The cooking time may be slightly longer since thighs are darker meat, so check that internal temp hits 165°F.
What can I use if I don’t have panko?
While regular breadcrumbs work in a pinch, they won’t give you that signature katsu crunch. If you’re desperate, try crushing up cornflakes or crispy rice cereal for a decent substitute. But honestly? It’s worth tracking down real panko – that flaky texture makes all the difference! Most supermarkets carry it in the Asian aisle these days.
Can I make katsu chicken in an air fryer?
You bet! For air fryer katsu: Spray both sides with oil and cook at 375°F for about 12 minutes, flipping halfway. It won’t be quite as crispy as pan-fried, but still delicious. My trick? Finish with a quick broil to really crisp up that panko coating!
Why does my breading fall off when frying?
Ah, the great breading betrayal! This usually happens if you skip shaking off excess flour before the egg dip, or don’t press the panko on firmly enough. Also make sure your oil is hot enough before adding the chicken – if it’s too cool, the coating absorbs oil instead of sealing to the meat.
Can I prepare katsu chicken ahead of time?
For best results, I recommend breading and frying right before serving. BUT you can bread the chicken up to 2 hours ahead and refrigerate (place on a rack so the bottom doesn’t get soggy). Just let it sit at room temp for 10 minutes before frying. Cooked katsu reheats surprisingly well too – see my storage tips above!
Final Thoughts
There you have it—my foolproof secrets for making restaurant-quality katsu chicken right in your own kitchen! I hope this recipe brings you as much joy as it’s brought me over the years. Nothing makes me happier than hearing how these crispy cutlets turn out for you all.
If you try this katsu chicken recipe (and I really think you should!), I’d love to hear about your experience. Did you stick to the classic version or put your own twist on it? Maybe you discovered the perfect dipping sauce pairing or nailed that golden-brown crust on your first try? Drop a comment below—I read every single one!
And hey, if this recipe earns a spot in your regular dinner rotation like it has in mine, consider rating it so others can find this crispy gem too. Cooking should be fun, delicious, and full of those “wow” moments—just like that first perfect bite of homemade katsu chicken!
Print
Irresistible Crispy Katsu Chicken Recipe in Just 20 Minutes
- Total Time: 20 minutes
- Yield: 2 servings 1x
- Diet: Low Lactose
Description
Crispy and flavorful Japanese-style breaded chicken cutlets.
Ingredients
- 2 boneless chicken fillets
- 1 cup panko breadcrumbs
- 1 egg
- 1/4 cup flour
- 1/2 tsp salt
- 1/4 tsp black pepper
- 1/2 cup vegetable oil
Instructions
- Pound chicken fillets to even thickness
- Season chicken with salt and pepper
- Coat chicken in flour, then egg, then panko
- Heat oil in pan over medium heat
- Fry chicken until golden brown (3-4 minutes per side)
- Drain on paper towels
- Slice and serve
Notes
- Serve with tonkatsu sauce and shredded cabbage
- For extra crispiness, double coat with egg and panko
- Use chicken thighs for juicier results
- Prep Time: 10 minutes
- Cook Time: 10 minutes
- Category: Main Dish
- Method: Pan-frying
- Cuisine: Japanese
Nutrition
- Serving Size: 1 cutlet
- Calories: 350
- Sugar: 1g
- Sodium: 450mg
- Fat: 18g
- Saturated Fat: 3g
- Unsaturated Fat: 12g
- Trans Fat: 0g
- Carbohydrates: 20g
- Fiber: 1g
- Protein: 28g
- Cholesterol: 120mg
Keywords: katsu chicken, Japanese chicken, breaded chicken, panko chicken
")
")
")
")