Oh, lemon desserts – they’re my absolute weakness! I still remember the first time I made these lemon cheesecake bars for a backyard potluck years ago. I was so nervous, but one bite of that creamy filling with its perfect tangy-sweet balance had everyone begging for the recipe. What I love most (besides how ridiculously delicious they are) is how simple they come together. No water baths, no fussy techniques – just a buttery graham cracker crust and that luscious lemony filling that sets up beautifully in the oven. After baking cheesecakes for over a decade, I can tell you these foolproof bars give you all the decadence of traditional cheesecake with half the stress.
Why You’ll Love These Lemon Cheesecake Bars
Trust me, these bars are about to become your new go-to dessert. Here’s why:
- Creamy dreamy filling – That smooth, tangy cheesecake layer melts in your mouth with just the right amount of lemon zing
- Buttery, crumbly crust – The graham cracker base adds the perfect textural contrast to the velvety filling
- No-stress prep – Unlike traditional cheesecakes, these bars come together in minutes with no special equipment needed
- Crowd-pleaser magic – I’ve never brought these to a gathering without getting recipe requests
- Make-ahead friendly – They actually taste better after chilling, so you can bake them well before your event
Ingredients for Lemon Cheesecake Bars
Here’s everything you’ll need to make these sunshine-filled bars. I know it looks simple, but each ingredient plays a special role in creating that perfect balance of tangy and sweet. Measure everything before you start – trust me, it makes the process so much smoother when you’re not digging through cabinets mid-recipe!
- 1 1/2 cups graham cracker crumbs (about 10 full sheets, finely ground – I pulse mine in the food processor until they resemble sand)
- 1/4 cup granulated sugar (for the crust – this little bit helps the crumbs caramelize beautifully)
- 6 tablespoons unsalted butter, melted (the glue that holds our crust together – I always use real butter for best flavor)
- 16 oz (2 packages) cream cheese, softened (this is CRUCIAL – take it out 2 hours before baking or it’ll be lumpy city)
- 1/2 cup granulated sugar (for the filling – just enough to balance the lemon’s zing)
- 2 large eggs (room temperature helps them incorporate smoothly)
- 1/4 cup fresh lemon juice (about 2 medium lemons – please squeeze them fresh, it makes all the difference!)
- 1 tablespoon lemon zest (that bright yellow outer layer only – the white pith is bitter)
- 1 teaspoon pure vanilla extract (the secret harmony-maker between the lemon and cream cheese)
Ingredient Notes & Substitutions
Now, I’m usually a stickler for following recipes exactly (Grandma trained me right!), but I know sometimes you need to improvise. Here are my tested swaps:
- No graham crackers? Digestive biscuits or vanilla wafers work beautifully in the crust. Even gluten-free alternatives do the trick.
- Out of unsalted butter? Salted works, just skip any added salt in the recipe.
- Want a lighter filling? Replace up to 4 oz cream cheese with Greek yogurt, but know the texture will be slightly less firm.
- No fresh lemons? Bottled juice works in a pinch (3 tablespoons), but fresh really elevates the flavor.
- Room temperature tip: Cold cream cheese will make your filling lumpy – if you forgot to soften it, microwave in 15-second bursts at 50% power.
The one thing I wouldn’t substitute? The cream cheese. Low-fat versions tend to make the filling weep, and non-dairy alternatives just don’t set the same way. Some things are worth the indulgence!
Equipment You’ll Need
You won’t need anything fancy for these lemon cheesecake bars – just a few basic tools that most home bakers already have. I always gather everything before I start so I’m not scrambling mid-recipe (learned that lesson the hard way when I once had to zest a lemon with a vegetable peeler!). Here’s your simple checklist:
- 8×8-inch baking pan – Metal works best for even baking, but glass is fine too (just add a couple extra minutes to the bake time)
- Parchment paper – For lining the pan so you can lift the whole slab out cleanly (no more broken bars!)
- Mixing bowls – One medium for the crust, one large for the filling
- Hand mixer or stand mixer – Either works great for getting that silky smooth filling
- Microplane or fine zester – Essential for getting that bright lemon flavor without any bitter pith
- Spatula – For scraping down the bowl (those cream cheese bits love to hide!)
- Measuring cups and spoons – Because eyeballing measurements in baking is risky business
See? Nothing crazy! If you’ve baked cookies before, you’ve got everything you need. Now let’s make some magic happen.
How to Make Lemon Cheesecake Bars
Okay, let’s get baking! These lemon cheesecake bars come together in three simple stages, and I’ll walk you through each one. The secret is taking your time with each step – rushing leads to cracks or uneven texture. But don’t worry, it’s easier than it sounds!
Step 1: Prepare the Crust
First things first – preheat that oven to 350°F (175°C). While it’s heating up, let’s make our buttery foundation. In a medium bowl, mix the graham cracker crumbs and sugar together. Now drizzle in that melted butter and stir until every crumb is coated – it should look like wet sand and hold together when you pinch it.
Line your 8×8-inch pan with parchment paper, leaving some overhang on two sides (this will be your lifeline later!). Dump the crumb mixture into the pan and press it firmly into an even layer. I like to use the bottom of a measuring cup to really compact it – this prevents crumbling when you cut the bars later. Pop it in the oven for exactly 10 minutes – this quick bake sets the crust and gives it that perfect golden color.
Step 2: Make the Cheesecake Filling
While the crust cools slightly (about 5 minutes), let’s tackle the star of the show. In your large mixing bowl, beat the softened cream cheese until it’s completely smooth – no lumps allowed! This might take 2-3 minutes on medium speed. Scrape down the sides and bottom of the bowl (those sneaky lumps hide there!).
Now add the sugar and beat again until fully incorporated. Crack in the eggs one at a time, mixing just until combined after each addition – overbeating incorporates too much air and can cause cracks. Finally, mix in the lemon juice, zest, and vanilla. The filling should be silky smooth with tiny flecks of zest throughout. Pour this lemony goodness over your slightly cooled crust – it’s okay if the crust is still warm.

Step 3: Bake and Chill
Slide the pan into the center of your preheated oven. Bake for 25-30 minutes – you’ll know it’s done when the edges are set but the center still has a slight jiggle (like Jell-O) when you gently shake the pan. Don’t wait for it to be completely firm – it’ll continue setting as it cools.
Here’s the hardest part: patience! Let the bars cool completely at room temperature (about 1 hour), then refrigerate for at least 2 hours, preferably overnight. I know it’s tempting to cut into them right away, but chilling firms up the filling so you get those picture-perfect clean slices. When you’re ready to serve, use the parchment paper “handles” to lift the whole slab out before cutting into squares.
Tips for Perfect Lemon Cheesecake Bars
After making these lemon cheesecake bars more times than I can count (and eating even more!), I’ve picked up some foolproof tricks to guarantee perfect results every time. These little nuggets of wisdom will take your bars from good to “can I have the recipe?” amazing.
Room temperature is non-negotiable – I know I sound like a broken record, but cold cream cheese equals lumpy filling. Take it out 2 hours before baking, or use my quick-fix microwave method (15 seconds at 50% power, flip, repeat). Eggs should be room temp too – just pop them in warm water for 5 minutes if you forgot.
Fresh lemon juice makes all the difference – Bottled juice works in a pinch, but fresh-squeezed gives that bright, vibrant flavor we’re after. Pro tip: roll your lemons on the counter before juicing – you’ll get way more juice out!
Don’t overmix the filling – Once you add the eggs, mix just until combined. Overbeating incorporates too much air, which can cause cracks as it bakes. I stop the mixer as soon as I don’t see any streaks of egg.
Parchment paper is your best friend – That overhang isn’t just for looks! When it’s time to cut, lift the whole slab out using the parchment “handles” – you’ll get cleaner cuts than trying to slice in the pan.
The jiggle test never lies – When the edges look set but the center still jiggles slightly (think Jell-O, not water), it’s done. The bars will firm up as they cool. Overbaking leads to dry, cracked cheesecake – trust me, I learned this the hard way!
Chill time matters – I know it’s tempting, but don’t skip the 2-hour chill minimum. Overnight is even better – the flavors meld beautifully and the texture becomes perfectly sliceable.
Clean knife = clean cuts – For picture-perfect bars, wipe your knife clean with a damp towel between each cut. Hot water works wonders for melting away any sticky filling.
One last thing – these bars taste even better the next day! The lemon flavor mellows slightly and the texture becomes dreamier. If you can resist eating them all immediately, that is.
Serving and Storage
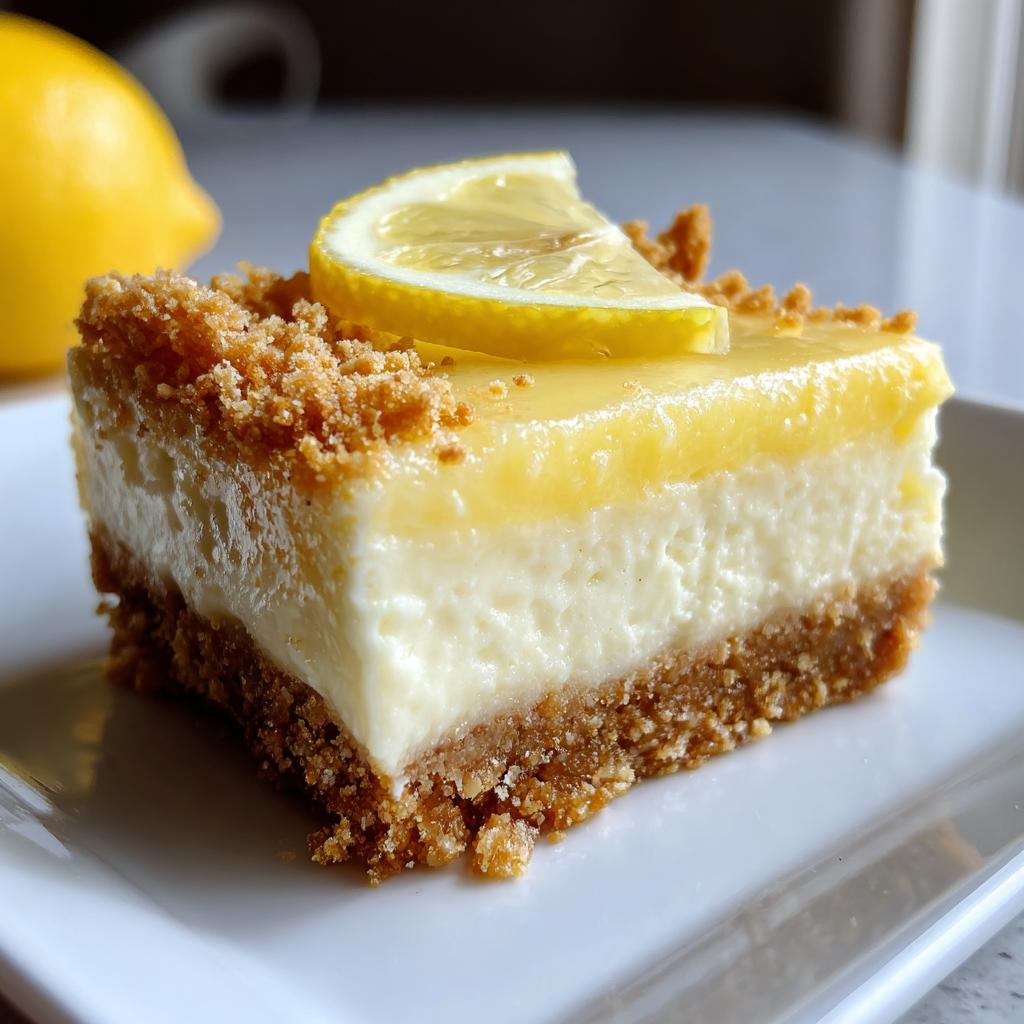
Now for the best part – eating these glorious lemon cheesecake bars! I love serving them straight from the fridge when they’re nice and chilled. The contrast between the cool, creamy filling and that crisp crust is absolute perfection. Here’s how I like to dress them up:
Garnish game strong: A dollop of fresh whipped cream and some berries make these bars look bakery-worthy. In summer, I’ll top them with raspberries or blueberries – the tartness plays beautifully with the lemon. For special occasions, a light dusting of powdered sugar or a drizzle of lemon curd takes them over the top. My kids love when I add a tiny mint leaf for that fancy café touch!
Storage smarts: These bars keep beautifully in the fridge for up to 3 days – just cover them tightly with plastic wrap or store in an airtight container. The crust might soften slightly by day 3, but the flavor actually improves as the lemon mellows into the cream cheese. Pro tip: place a paper towel underneath to absorb any condensation.
Freezer friendly: Yes, you can freeze them! I often make a double batch just for this. Once completely chilled, cut the bars and place them on a parchment-lined baking sheet. Freeze until solid (about 2 hours), then transfer to a freezer bag with parchment between layers. They’ll keep for up to 2 months. Thaw overnight in the fridge – they taste almost as good as fresh!
One warning though – these bars disappear fast! I’ve learned to hide a few in the back of the fridge if I want leftovers. They’re perfect for lunchbox treats, afternoon pick-me-ups, or midnight snacks (not that I’d know anything about that…).
Lemon Cheesecake Bars Nutritional Information
Okay, let’s talk numbers – but remember, these are just estimates! Your actual nutrition values might vary slightly depending on your exact ingredients (like how much lemon juice you squeezed or which brand of cream cheese you used). Here’s the breakdown per bar based on cutting the pan into 16 equal squares:
- Calories: 220
- Total Fat: 15g (8g saturated)
- Cholesterol: 60mg
- Sodium: 150mg
- Total Carbohydrates: 20g
- Sugars: 15g
- Protein: 3g
Now, if you’re watching your sugar intake, you can reduce the sugar in the filling by a couple tablespoons – the lemon zest still gives plenty of flavor. And for a lighter version, try swapping half the cream cheese for Greek yogurt (though the texture won’t be quite as rich). But let’s be real – these are dessert bars, and sometimes you just gotta enjoy that creamy, tangy goodness without overthinking it!
Disclaimer: Nutritional values are estimates only and will vary based on ingredient brands and specific measurements used. Values calculated using standard USDA data for generic ingredients.
FAQs About Lemon Cheesecake Bars
Over the years, I’ve gotten so many questions about these lemon cheesecake bars – and I’ve probably made every mistake possible while perfecting them! Here are the answers to the most common puzzlers:
Can I use bottled lemon juice instead of fresh?
You can, but fresh really makes a difference! Bottled juice works in a pinch (use 3 tablespoons instead of 1/4 cup), but it lacks that bright, vibrant flavor. If you must use bottled, add an extra teaspoon of zest to boost the lemon flavor.
Why did my bars crack on top?
Oh no! This usually happens from overmixing (too much air gets incorporated) or overbaking. Next time, mix just until ingredients are combined after adding eggs, and pull the bars when the center still has a slight jiggle. A little crack doesn’t affect taste though – just cover it with whipped cream!
How do I know when they’re done baking?
The edges should look set, and the center should wobble slightly like Jell-O when you gently shake the pan. It’ll continue setting as it cools. Overbaking leads to dry texture, so err on the side of underdone – you can always bake a few more minutes if needed.
Can I make these gluten-free?
Absolutely! Just swap the graham crackers for gluten-free cookies (I like gluten-free ginger snaps for extra zing). The filling is naturally gluten-free, so you only need to adapt the crust.
Why is my filling lumpy?
This breaks my heart! Lumps usually mean your cream cheese wasn’t soft enough. Next time, let it sit out longer or use my microwave trick (15 seconds at 50% power, flip, repeat). And always beat the cream cheese alone first until completely smooth before adding other ingredients.
Can I freeze these bars?
Yes! They freeze beautifully for up to 2 months. Cut them first, then freeze on a tray before transferring to a bag. Thaw overnight in the fridge – they’ll taste almost as good as fresh!
Share Your Feedback
Oh, I just love hearing how these lemon cheesecake bars turn out for you! Nothing makes me happier than knowing someone else is enjoying this recipe as much as I do. Did you add your own twist? Maybe some raspberry swirl or a coconut crust? I’m all ears!
If you make them, snap a photo – I wanna see those beautiful golden crusts and creamy fillings! Tag me on Instagram or leave a comment below. And if you run into any hiccups, tell me about those too – we’ve all been there (remember my lumpy filling disaster of 2017?), and I’m happy to help troubleshoot.
These bars have brought so much joy to my family over the years, and it means the world when they become part of your traditions too. Now go enjoy that first heavenly bite – you’ve earned it, baker friend!
Print
Creamy Lemon Cheesecake Bars – A Delicious 3-Step Recipe
- Total Time: 2 hours 45 minutes
- Yield: 16 bars 1x
- Diet: Vegetarian
Description
Delicious lemon cheesecake bars with a buttery crust and creamy filling. Perfect for any occasion.
Ingredients
- 1 1/2 cups graham cracker crumbs
- 1/4 cup granulated sugar
- 6 tbsp unsalted butter, melted
- 16 oz cream cheese, softened
- 1/2 cup granulated sugar
- 2 large eggs
- 1/4 cup lemon juice
- 1 tbsp lemon zest
- 1 tsp vanilla extract
Instructions
- Preheat oven to 350°F. Line an 8×8-inch pan with parchment paper.
- Mix graham cracker crumbs, sugar, and melted butter. Press into the pan.
- Bake crust for 10 minutes. Let cool slightly.
- Beat cream cheese and sugar until smooth. Add eggs, lemon juice, zest, and vanilla.
- Pour filling over crust. Bake for 25-30 minutes until set.
- Cool completely, then refrigerate for at least 2 hours before cutting.
Notes
- Use room-temperature cream cheese for smoother filling.
- Chilling ensures clean cuts.
- Adjust lemon zest for more or less tang.
- Prep Time: 15 minutes
- Cook Time: 30 minutes
- Category: Dessert
- Method: Baking
- Cuisine: American
Nutrition
- Serving Size: 1 bar
- Calories: 220
- Sugar: 15g
- Sodium: 150mg
- Fat: 15g
- Saturated Fat: 8g
- Unsaturated Fat: 5g
- Trans Fat: 0g
- Carbohydrates: 20g
- Fiber: 0g
- Protein: 3g
- Cholesterol: 60mg
Keywords: lemon cheesecake bars, creamy dessert, easy cheesecake recipe


")
")
")
")