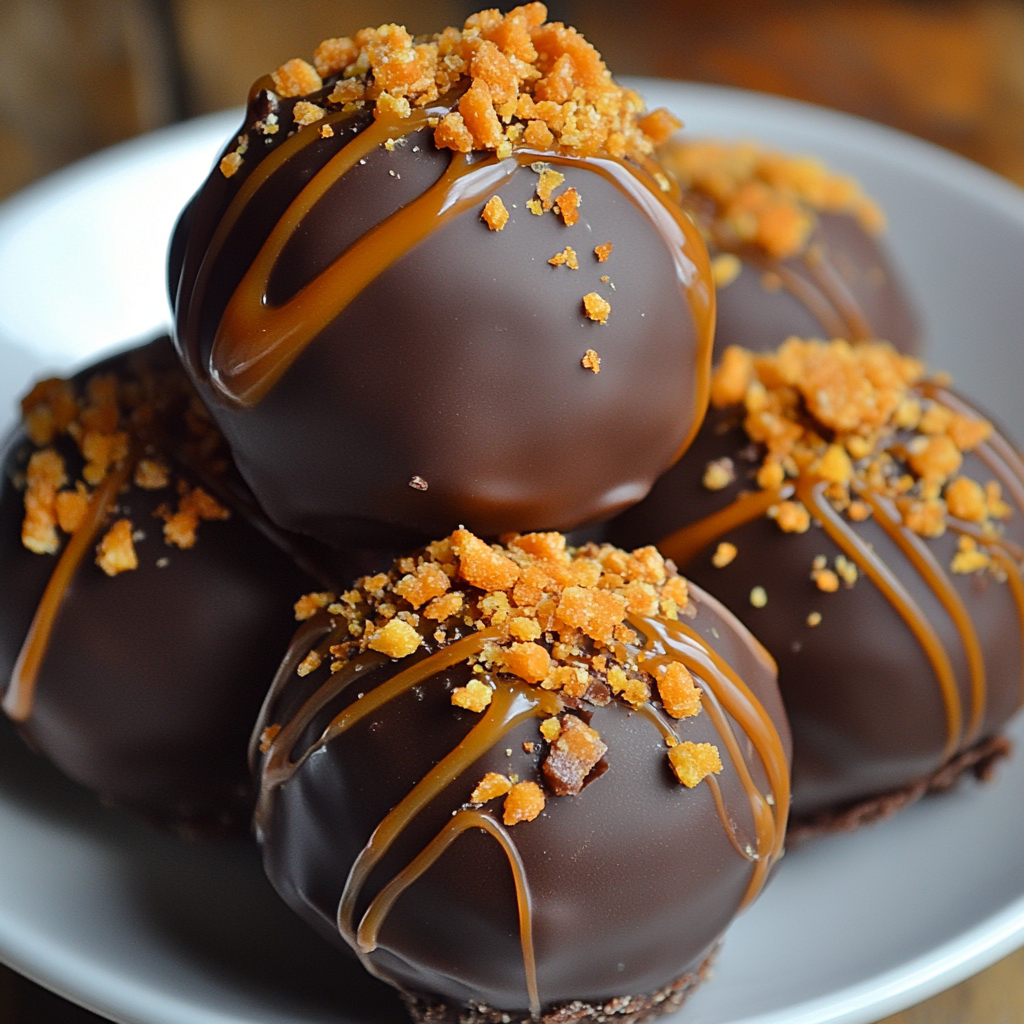
As a passionate home cook, I find joy in creating sweet treats that not only satisfy my cravings but also bring smiles to the faces of my loved ones. One of my all-time favorite recipes is the No Bake Butterfinger Caramel Crunch Truffles. These little bites of heaven are a delightful combination of creamy, crunchy, and sweet flavors that dance on your taste buds. Plus, they require no baking, which means less time in the kitchen and more time enjoying the delicious results!
Ingredients for No Bake Butterfinger Caramel Crunch Truffles
Before diving into the delightful world of No Bake Butterfinger Caramel Crunch Truffles, let’s gather our ingredients. I always find that having everything ready makes the cooking process smoother and more enjoyable. Here’s what you’ll need:
- 🍫 Butterfinger candy bars – 4 (about 200g), crushed
- 🧀 cream cheese – 8 oz (226g), softened
- 🍯 caramel sauce – 1/2 cup (120ml), plus extra for drizzling
- 🍪 crushed graham crackers – 1 cup (100g)
- 🍫 chocolate coating (melting chocolate or chocolate chips) – 12 oz (340g)
Each ingredient plays a vital role in creating the perfect truffle. The crushed Butterfinger bars bring that signature crunch and flavor that we all love. Cream cheese adds a creamy texture that balances the sweetness of the caramel sauce. The graham crackers not only help bind everything together but also add a subtle hint of flavor that complements the other ingredients beautifully. And of course, the chocolate coating is the cherry on top, making these truffles irresistible!
As I gather these ingredients, I can’t help but feel excited about the deliciousness that’s about to unfold. The sweet aroma of caramel and chocolate fills the air, and I can already imagine the smiles on my family’s faces when they take their first bite. So, let’s get ready to create some magic in the kitchen!
Tools Needed for No Bake Butterfinger Caramel Crunch Truffles
Before we embark on this sweet adventure, it’s essential to gather the right tools. Having the right equipment not only makes the process smoother but also adds to the fun of creating these delightful No Bake Butterfinger Caramel Crunch Truffles. Here’s a list of the tools I find indispensable when making these treats:
- 🍽️ Large mixing bowl – This is where all the magic begins! A sturdy bowl allows you to mix the ingredients thoroughly.
- 🥄 Spatula or wooden spoon – Perfect for combining the cream cheese, Butterfinger, and other ingredients. I love using a spatula for its flexibility!
- 🍪 Cookie scoop or tablespoon – This helps in portioning out the truffles evenly. It’s like having a little helper in the kitchen!
- 🧊 Baking sheet – Line it with parchment paper to prevent the truffles from sticking. It makes cleanup a breeze!
- 🍫 Microwave-safe bowl – For melting the chocolate coating. I always use a glass bowl; it’s perfect for watching the chocolate transform!
- 🍴 Fork – This is your trusty tool for dipping the truffles into the melted chocolate. It’s like a little dance as you lift them out!
- 🧊 Plastic wrap – To cover the mixture while it chills in the fridge. It keeps everything fresh and ready for the next step.
As I gather these tools, I can’t help but feel a sense of excitement. Each item has its purpose, and together they create a symphony of flavors and textures. The anticipation builds as I imagine the creamy, crunchy truffles that will soon emerge from my kitchen. So, let’s roll up our sleeves and get ready to create something truly special!
Step-by-Step Preparation of No Bake Butterfinger Caramel Crunch Truffles
Now that we have our ingredients and tools ready, it’s time to dive into the fun part: making the No Bake Butterfinger Caramel Crunch Truffles! I love this part because it’s where the magic happens. Each step is simple, yet it brings us closer to those delicious little bites of joy. Let’s get started!
Step 1: Prepare the Base Mixture for No Bake Butterfinger Caramel Crunch Truffles
First things first, we need to create the base mixture. In a large mixing bowl, I start by adding the softened cream cheese. It’s important that the cream cheese is at room temperature; this makes it easier to mix. I then toss in the crushed Butterfinger candy bars. The sound of the crunchy bits hitting the bowl is music to my ears! I mix them together until they form a creamy, dreamy blend. It’s like a sweet hug in a bowl!
Next, I add the caramel sauce. Oh, the aroma of caramel is simply irresistible! I stir it in gently, making sure every bit of the mixture gets coated in that luscious sweetness. Finally, I sprinkle in the crushed graham crackers. They add a delightful texture and help bind everything together. I mix until it’s thick and well combined, almost like a cookie dough. The anticipation builds as I can already imagine how delicious these truffles will be!
Step 2: Forming the Truffles
Once the mixture is ready, it’s time to form the truffles. I take a tablespoon or a small cookie scoop and scoop out a portion of the mixture. With my hands, I roll it into a ball, about 1 inch in diameter. It’s a bit sticky, but that’s part of the fun! I place each ball on a baking sheet lined with parchment paper. As I work, I can’t help but smile at how cute they look. Each truffle is like a little treasure waiting to be coated in chocolate!
As I roll the truffles, I often think about how these little bites can bring so much joy. They’re perfect for sharing, but I always make a few extra for myself. After all, a home cook deserves a treat too, right?
Step 3: Coating the Truffles
Now comes the exciting part—coating the truffles in chocolate! I grab my microwave-safe bowl and add the chocolate coating. I melt it in 30-second intervals, stirring in between until it’s smooth and glossy. The rich aroma of melted chocolate fills the kitchen, and I can hardly contain my excitement!
With a fork in hand, I dip each truffle into the melted chocolate, making sure it’s fully coated. I lift it out, allowing the excess chocolate to drip off. It’s like watching a beautiful transformation! I return the coated truffles to the parchment-lined baking sheet, and I can already picture how stunning they’ll look once they’re set.
Step 4: Chilling the Truffles
After all the truffles are coated, it’s time for them to chill. I place the baking sheet in the refrigerator for about 30 minutes. This step is crucial as it allows the chocolate coating to harden. While I wait, I often find myself daydreaming about the first bite. The combination of creamy, crunchy, and sweet flavors is simply irresistible!
Once the chocolate is set, I drizzle some extra caramel sauce over the top of each truffle for that finishing touch. It’s like adding a cherry on top of a sundae! The anticipation builds as I prepare to serve these delightful treats. I can’t wait to share them with my family and friends!

Serving Suggestions for No Bake Butterfinger Caramel Crunch Truffles
Now that our No Bake Butterfinger Caramel Crunch Truffles are ready, it’s time to think about how to serve them. Presentation can elevate any dish, and these truffles are no exception! I love getting creative when it comes to serving these little bites of joy. Here are some fun and delightful ways to present them:
Creative Ways to Serve No Bake Butterfinger Caramel Crunch Truffles
One of my favorite ways to serve these truffles is on a beautiful platter. I like to arrange them in a circle, drizzling extra caramel sauce over the top for a touch of elegance. It’s like a sweet centerpiece that draws everyone in! You can even sprinkle some crushed graham crackers around the truffles for added texture and a pop of color.
If you’re hosting a party, consider placing the truffles in mini cupcake liners. This not only makes them easy to grab but also adds a festive touch. You can choose colorful liners that match your party theme. It’s a small detail, but it makes a big difference!
For a more interactive experience, set up a truffle bar. Place the truffles alongside various toppings like crushed nuts, sprinkles, or even shredded coconut. Guests can customize their truffles, making it a fun activity for everyone. I love watching the creativity unfold as people mix and match their favorite toppings!
Another idea is to serve the truffles in small mason jars. Layer them with whipped cream or even a scoop of ice cream for a decadent dessert. It’s a charming way to present them, and the jars can double as party favors for guests to take home. Who wouldn’t love a sweet treat to enjoy later?
Lastly, don’t forget about the power of pairing! These truffles go wonderfully with a cup of coffee or a glass of milk. The rich flavors of the truffles complement the warmth of coffee, creating a delightful experience. I often enjoy them with a cozy cup of hot chocolate, especially on chilly evenings.
As I serve these truffles, I can’t help but feel a sense of pride. Each bite is a little piece of happiness, and sharing them with others makes it even more special. So, whether it’s a casual family gathering or a festive celebration, these truffles are sure to be a hit!
Tips for Perfect No Bake Butterfinger Caramel Crunch Truffles
As I’ve made my fair share of No Bake Butterfinger Caramel Crunch Truffles, I’ve picked up a few tips along the way that can help you achieve truffle perfection. These little nuggets of joy are easy to make, but a few simple tricks can elevate them to a whole new level. Let’s dive into some of my favorite tips!
Common Mistakes to Avoid
One of the most common mistakes I see is not letting the cream cheese soften enough. If it’s too cold, it won’t mix well with the other ingredients, and you’ll end up with lumps. Trust me, a smooth mixture is key to a creamy truffle!
Another pitfall is not chilling the mixture long enough before rolling. If the mixture is too soft, your truffles will lose their shape. I always set a timer for 30 minutes, but sometimes I let it chill a bit longer for extra firmness.
When it comes to melting the chocolate, be patient! Melting it too quickly can lead to a grainy texture. I prefer to melt it in short bursts, stirring in between. It’s worth the wait for that silky smooth finish!
Variations to Try with No Bake Butterfinger Caramel Crunch Truffles
If you’re feeling adventurous, there are so many fun variations to try! For a nutty twist, consider adding chopped peanuts or almond pieces to the mixture. It adds a delightful crunch and enhances the flavor profile.
Feeling a bit fruity? You can mix in some finely chopped dried fruits like cranberries or cherries. They add a pop of color and a hint of tartness that balances the sweetness beautifully.
For a touch of spice, try adding a pinch of cinnamon or even a dash of sea salt to the chocolate coating. It creates a lovely contrast that makes each bite even more exciting!
Lastly, if you want to switch things up completely, consider using different candy bars. Snickers or Reese’s Peanut Butter Cups can create a whole new flavor experience. The possibilities are endless, and that’s what makes this recipe so much fun!
As I experiment with these variations, I find that each batch of truffles tells a different story. Whether I’m sticking to the classic recipe or trying something new, the joy of creating and sharing these treats never fades. So, roll up your sleeves and let your creativity shine!
FAQs about No Bake Butterfinger Caramel Crunch Truffles
How long do No Bake Butterfinger Caramel Crunch Truffles last?
One of the best things about these No Bake Butterfinger Caramel Crunch Truffles is that they can last quite a while! When stored in an airtight container in the refrigerator, they typically stay fresh for about a week. However, I find that they rarely last that long in my house! The creamy texture and sweet flavors make them a favorite among family and friends, so they tend to disappear quickly. If you want to keep them for a special occasion, just make sure to hide a few away for yourself!
Can I freeze No Bake Butterfinger Caramel Crunch Truffles?
Absolutely! Freezing these truffles is a fantastic way to enjoy them later. I often make a double batch and freeze half for a rainy day. To freeze, simply place the truffles in a single layer on a baking sheet and freeze until solid. Then, transfer them to an airtight container or a freezer bag. They can last up to three months in the freezer. When you’re ready to indulge, just take them out and let them thaw in the fridge for a few hours. It’s like having a little stash of happiness waiting for you!
What can I substitute for Butterfinger in No Bake Butterfinger Caramel Crunch Truffles?
If you’re looking to switch things up or if Butterfinger isn’t your favorite, there are plenty of delicious alternatives! You can use other candy bars like Snickers, Reese’s Peanut Butter Cups, or even Milky Way. Each option brings its own unique flavor and texture, making the truffles just as delightful. If you want a nutty twist, consider adding crushed nuts or even toffee bits for that same crunchy goodness. The beauty of this recipe is its versatility, so feel free to get creative!
Conclusion on No Bake Butterfinger Caramel Crunch Truffles
As I wrap up this sweet journey into the world of No Bake Butterfinger Caramel Crunch Truffles, I can’t help but reflect on the joy these little treats bring. From the moment I gather my ingredients to the final drizzle of caramel, every step is filled with excitement and anticipation. These truffles are not just a dessert; they’re a celebration of flavors and textures that come together in perfect harmony.
Print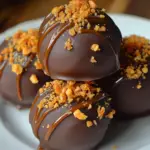
No Bake Caramel Crunch Butterfinger Truffles Delight!
- Total Time: 50 minutes
- Yield: 24 truffles
- Diet: Vegetarian
Description
No Bake Butterfinger Caramel Crunch Truffles are a delightful combination of creamy, crunchy, and sweet flavors that require no baking, making them a quick and easy treat.
Ingredients
- 🍫 Butterfinger candy bars – 4 (about 200g), crushed
- 🧀 cream cheese – 8 oz (226g), softened
- 🍯 caramel sauce – 1/2 cup (120ml), plus extra for drizzling
- 🍪 crushed graham crackers – 1 cup (100g)
- 🍫 chocolate coating (melting chocolate or chocolate chips) – 12 oz (340g)
Instructions
- In a large mixing bowl, add softened cream cheese and crushed Butterfinger candy bars. Mix until creamy.
- Add caramel sauce and crushed graham crackers to the mixture. Stir until well combined.
- Using a tablespoon or cookie scoop, portion out the mixture and roll into 1-inch balls.
- Place the truffles on a parchment-lined baking sheet.
- Melt the chocolate coating in a microwave-safe bowl in 30-second intervals, stirring until smooth.
- Dip each truffle into the melted chocolate, allowing excess to drip off, and return to the baking sheet.
- Chill the truffles in the refrigerator for about 30 minutes until the chocolate is set.
- Drizzle extra caramel sauce over the chilled truffles before serving.
Notes
- Ensure cream cheese is softened for easy mixing.
- Chill the mixture long enough to maintain truffle shape.
- Melt chocolate slowly to avoid graininess.
- Consider adding nuts or dried fruits for variations.
- Prep Time: 20 minutes
- Cook Time: 0 minutes
- Category: Dessert
- Method: No Bake
- Cuisine: American
Nutrition
- Serving Size: 1 truffle
- Calories: 150
- Sugar: 10g
- Sodium: 50mg
- Fat: 8g
- Saturated Fat: 4g
- Unsaturated Fat: 2g
- Trans Fat: 0g
- Carbohydrates: 18g
- Fiber: 1g
- Protein: 2g
- Cholesterol: 15mg
Keywords: No Bake, Butterfinger, Truffles, Dessert, Sweet Treats
")
")
")
")