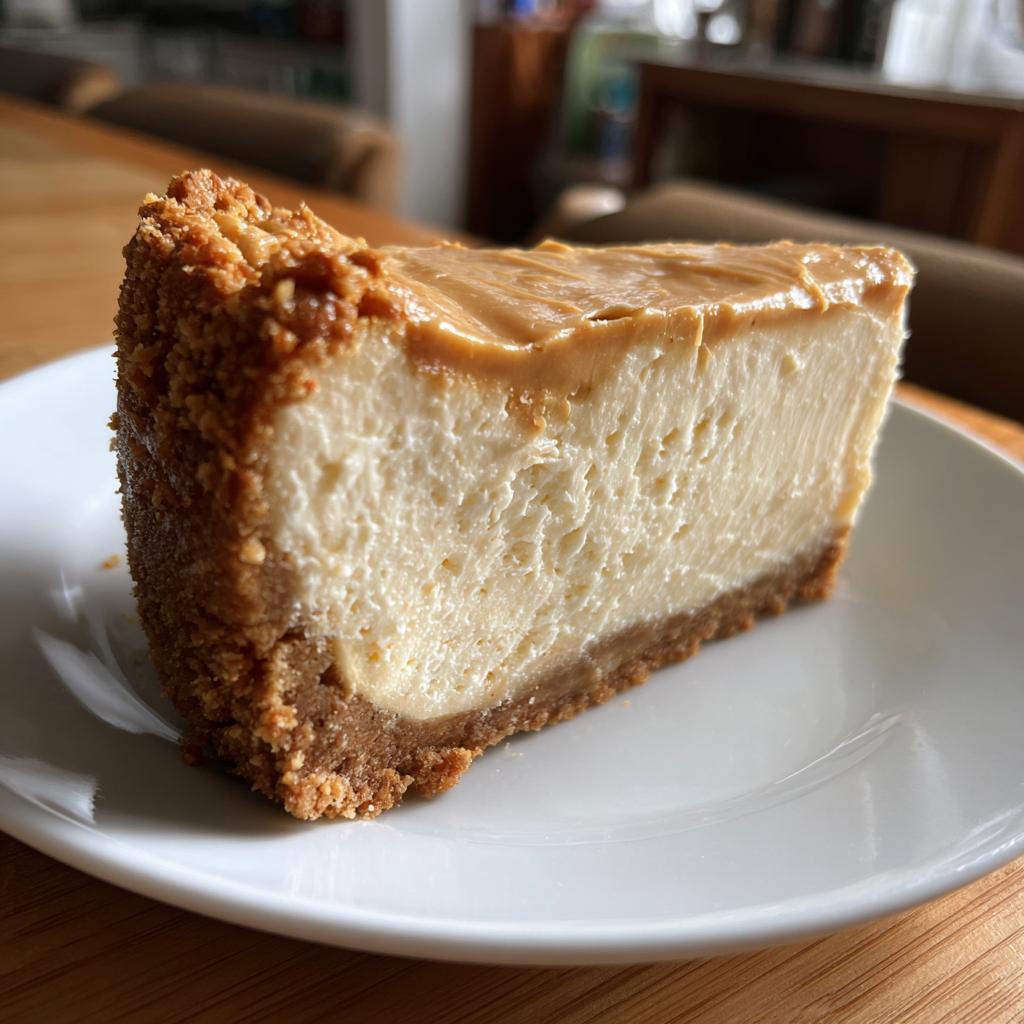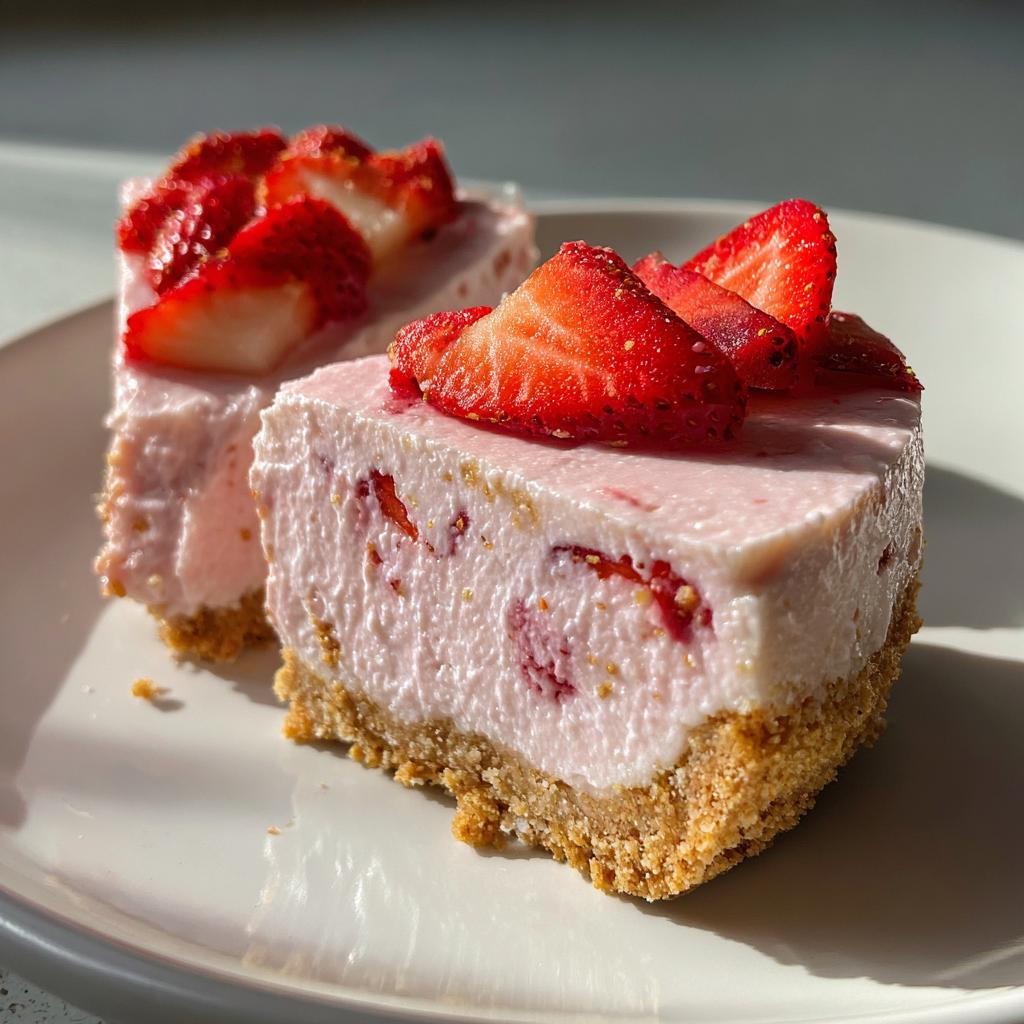
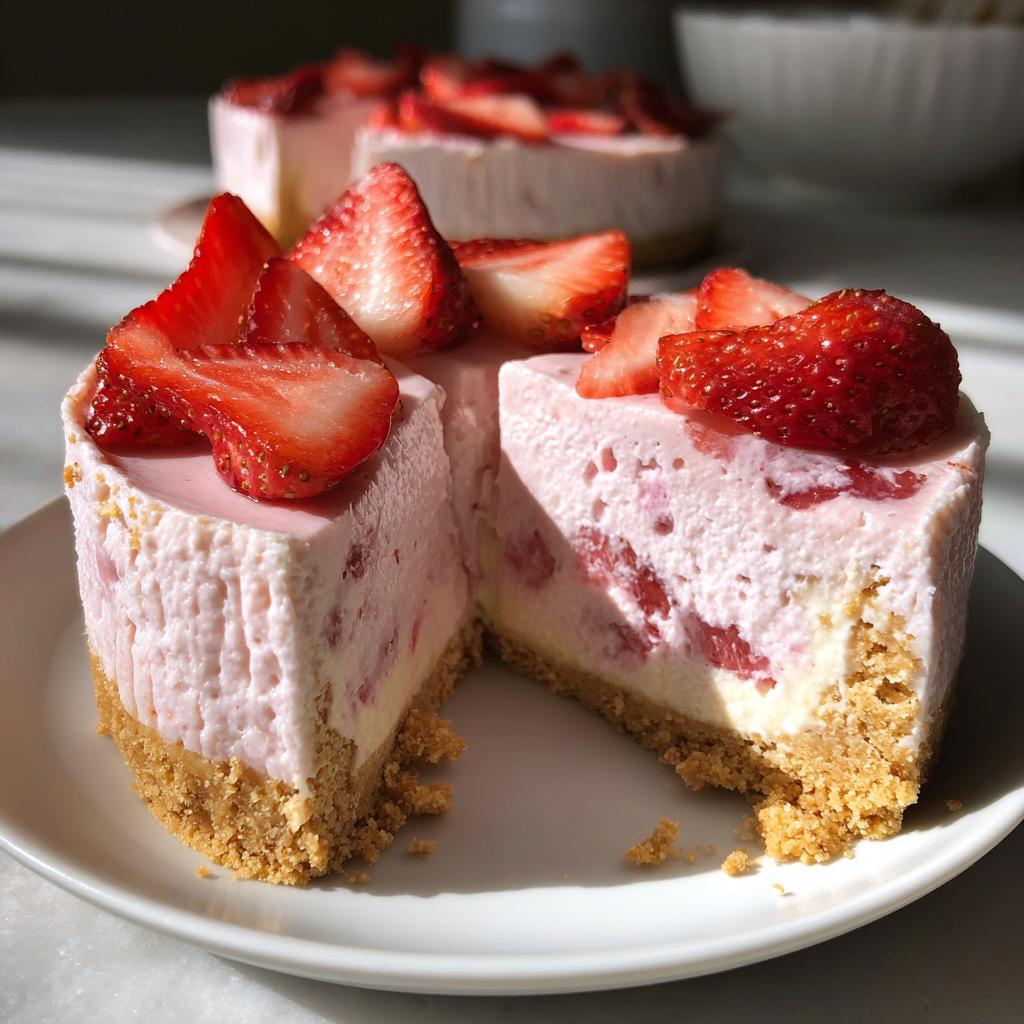
Nothing beats the pure joy of a creamy no-bake strawberry cheesecake on a hot summer day – no oven required! I first made this beauty for my niece’s birthday picnic when I realized last-minute that her outdoor party had no power outlets for baking. The panic was real until I remembered this lifesaver recipe. Now it’s my go-to for every potluck, baby shower, and “I-need-dessert-now” emergency.
What makes this no-bake strawberry cheesecake special? That luscious pink swirl of fresh strawberry puree folded into cloud-like cream cheese filling, all resting on a buttery biscuit crust that takes minutes to prepare. After years of testing no-bake desserts (and several gelatin disasters I won’t mention), I’ve perfected the balance between firm enough to slice and melt-in-your-mouth creamy. The secret? Patience while chilling – but trust me, the wait is worth it when you see that first perfect slice.
Why You’ll Love This No-Bake Strawberry Cheesecake
This recipe checks all the boxes for the perfect fuss-free dessert. Here’s why it’s become my absolute favorite:
- No oven needed – perfect for hot days or when you just can’t be bothered to bake
- Creamy dreamy texture that’s light yet rich enough to satisfy any cheesecake craving
- Bursting with fresh strawberry flavor – none of that artificial syrup taste
- Foolproof method – even my most kitchen-challenged friends have nailed this one
- Makes you look fancy with minimal effort (shh, I won’t tell your secret)
Seriously, this cheesecake disappears faster than I can make it at gatherings. The combination of that crisp biscuit base with the cloud-like strawberry filling? Absolute magic.
Ingredients for No-Bake Strawberry Cheesecake
Gather these simple ingredients – I promise you probably have most of them already! The magic happens when they all come together:
- 200g digestive biscuits (about 15 biscuits)
- 100g unsalted butter, melted (that’s about 7 tablespoons)
- 500g cream cheese, softened at room temperature (this is crucial!)
- 150g powdered sugar (sifted if you’re feeling fancy)
- 300ml heavy cream (chilled is best for whipping)
- 1 tsp vanilla extract (the good stuff makes a difference)
- 200g fresh strawberries, hulled and pureed (about 1½ cups)
- 10g gelatin powder (about 2½ teaspoons)
- 60ml cold water (for blooming the gelatin)
Pro tip: Leave your cream cheese out on the counter for at least 2 hours before starting. Trying to beat cold cream cheese is like wrestling with a brick – not fun and you’ll end up with lumpy filling!
Ingredient Notes and Substitutions
Don’t stress if you’re missing something – here are my tested swaps that still deliver amazing results:
- Biscuits: Graham crackers work beautifully instead of digestives. Use the same weight measurement.
- Strawberries: Frozen berries thawed and drained work in a pinch, but fresh really shine here.
- Gelatin: Vegetarians can use agar-agar powder (use about 1 tsp dissolved in hot water).
- Cream: Full-fat coconut cream can substitute heavy cream for a dairy-free version.
- Sweetener: Maple syrup or honey can replace powdered sugar, but reduce other liquids slightly.
My neighbor once used raspberries instead of strawberries when her kids ate all the strawberries (sound familiar?). Turned out delicious, so feel free to get creative with seasonal fruits!
Equipment You’ll Need for No-Bake Strawberry Cheesecake
You’ll be shocked how little gear you need for this showstopper dessert. Here’s my trusty toolkit that never lets me down:
- 8-inch springform pan – The removable sides are a lifesaver for clean slices
- Food processor or rolling pin – For crushing those biscuits into perfect crumbs (I’ve used a wine bottle in a pinch!)
- Electric mixer – A hand mixer works great, but stand mixers make the whipping effortless
- 2 mixing bowls – One for crust, one for filling (glass bowls are my favorite for seeing everything blend)
- Blender or food processor – For that silky strawberry puree (though a fork and elbow grease can work in small batches)
- Measuring cups and spoons – Precision matters with gelatin, so no eyeballing!
- Spatula – For scraping every last bit of that delicious filling
- Small saucepan – Just for melting the gelatin (microwave works too)
That’s it! No fancy gadgets required. My first time making this, I used a regular pie dish lined with parchment paper because I didn’t own a springform pan yet. The slices weren’t as pretty, but the taste? Still heavenly.
How to Make No-Bake Strawberry Cheesecake
Alright, let’s dive into the fun part! This no-bake strawberry cheesecake comes together in three simple stages – crust, filling, and the magical chilling time that transforms everything into dessert perfection. I’ll walk you through each step like I’m right there in your kitchen (wish I was – I’d steal a spoonful of that filling!).
Preparing the Crust
First, let’s tackle that buttery biscuit base – the foundation of every great cheesecake. Grab your digestive biscuits and get ready to release some stress! I like to toss them in a food processor and pulse until they’re fine crumbs (no big chunks!). No processor? No problem! Seal them in a zip-top bag and go at them with a rolling pin – my kids love helping with this part.
Mix those golden crumbs with melted butter until it looks like wet sand. Pour it into your springform pan and press firmly with the back of a measuring cup or your fingers. Get it nice and even across the bottom and just slightly up the sides. Pop this in the fridge for 30 minutes – this chill time helps the crust set so it won’t crumble when we add the filling.
Making the Strawberry Cheesecake Filling
Now for the star of the show! Start by sprinkling gelatin over cold water in a small bowl and let it “bloom” for 5 minutes – it’ll look like applesauce when it’s ready. Meanwhile, whip your chilled heavy cream to stiff peaks (but don’t overdo it or you’ll get butter!). Set this aside.
In another bowl, beat the room-temperature cream cheese until smooth – no lumps allowed! Add powdered sugar and vanilla, beating until creamy. Now heat your bloomed gelatin gently until dissolved (15 seconds in the microwave works), then stir it into the strawberry puree. Fold this gorgeous pink mixture into the cream cheese base gently – we want to keep all that air in the whipped cream we’re about to add.
Here’s the trick: add the whipped cream in three batches, folding gently with a spatula after each addition. Stop when you stop seeing white streaks – overmixing will deflate our fluffy filling!
Assembling and Chilling
Time to bring it all together! Pour that dreamy pink filling over your chilled crust and smooth the top with a spatula. Now comes the hardest part – walk away! This beauty needs at least 4 hours in the fridge (overnight is even better) to set properly. I like to cover it loosely with plastic wrap to prevent fridge smells.
When you’re ready to serve, run a knife around the edge before releasing the springform sides. Top with fresh strawberry slices or a dusting of powdered sugar – the presentation will wow everyone! Pro tip: Dip your knife in hot water and wipe dry between slices for picture-perfect cuts every time.
Tips for the Perfect No-Bake Strawberry Cheesecake
After making this cheesecake more times than I can count (and learning from all my mistakes!), here are my can’t-live-without tips for guaranteed success:
- Chill your mixing bowl before whipping the cream – I pop mine in the freezer for 10 minutes. Cold tools = faster, fluffier peaks!
- Test your gelatin by rubbing a bit between your fingers after dissolving – it should feel completely smooth with no gritty bits.
- Choose ripe, fragrant strawberries – they should smell sweet at the stem end. Underripe berries won’t give that vibrant flavor.
- Patience is key with chilling – rushing the 4-hour set time leads to sad, soupy slices. Overnight chilling gives the cleanest cuts.
Bonus trick from my grandma: If your filling seems too soft after mixing, pour it into the crust anyway and chill for 30 minutes before adding decorative strawberry slices on top – they’ll stay put beautifully!
Serving Suggestions for No-Bake Strawberry Cheesecake
Now for the best part – eating this gorgeous dessert! While it’s absolutely perfect on its own, I love dressing it up for special occasions. Here are my favorite ways to serve this no-bake strawberry cheesecake that’ll have everyone asking for seconds:
Fresh berry crown: Right before serving, I arrange a ring of halved strawberries around the edge – the ruby red against the pink filling is stunning. For summer parties, I’ll add blueberries and raspberries too for a patriotic look.
Whipped cream clouds: A dollop of freshly whipped cream on each slice takes it over the top. My secret? Add a splash of vanilla and a teaspoon of powdered sugar to the cream before whipping – it holds its shape better and adds just the right sweetness.
Chocolate drizzle magic: Melt some dark chocolate with a teaspoon of coconut oil, let it cool slightly, then zigzag it over the top with a spoon. The contrast between the tart strawberries and rich chocolate? Absolute perfection.
Portion perfection: This 8-inch cheesecake yields about 12 modest slices or 8 generous wedges. For parties, I cut smaller slices (about 16) since it’s so rich – plus it means more people get to try it!
Pro tip: Let the cheesecake sit at room temperature for 10 minutes before serving – the flavors bloom beautifully when it’s not ice-cold. And if you’re feeling fancy, garnish each plate with a mint leaf or edible flower for that restaurant-worthy presentation!
Storing and Reheating No-Bake Strawberry Cheesecake
Here’s the beautiful thing about this no-bake strawberry cheesecake – it actually gets better after a day in the fridge! The flavors meld together beautifully, and the texture becomes even more velvety. But you’ll want to store it right to keep that perfect consistency.
I always cover mine tightly with plastic wrap, making sure the wrap touches the surface of the cheesecake to prevent any condensation from forming. It’ll keep happily in the fridge for up to 3 days – if it lasts that long in your house (it never does in mine!).
Now, I know what you’re thinking – can I freeze this beauty for later? Trust me, I’ve tried (multiple times, hoping for different results!). While it technically will freeze, the texture changes in ways that just aren’t worth it. The filling becomes slightly grainy when thawed, and that gorgeous creamy mouthfeel gets lost. Plus, the strawberries can release extra water, making the texture a bit weepy.
If you absolutely must freeze it (maybe you made two for a party that got canceled), wrap individual slices tightly in plastic wrap then foil, and freeze for up to 2 weeks. Thaw overnight in the fridge – but don’t say I didn’t warn you about the texture change!
One last storage tip: If you’ve already garnished with fresh berries, remove them before storing and add fresh ones when serving. Those pretty strawberry slices turn mushy in the fridge after a few hours – learned that the hard way at my sister’s bridal shower!
No-Bake Strawberry Cheesecake FAQs
I’ve gotten so many questions about this recipe over the years – here are the ones that pop up most often with my tried-and-true answers!
Can I use frozen strawberries instead of fresh?
Absolutely! Thaw them completely first, drain any excess liquid, and pat dry with paper towels. The flavor won’t be quite as bright, but it still makes a delicious cheesecake. Pro tip: Save some of the thawed juice to brush over fresh strawberry garnishes – it gives them a gorgeous shine!
Why didn’t my filling set properly?
Oh honey, I’ve been there! Usually it’s one of three things: not enough chilling time (be patient!), gelatin that didn’t fully dissolve (test it between your fingers first), or overmixed whipped cream that lost its structure. Next time, make sure your gelatin is completely smooth before adding it, and don’t skimp on that 4-hour chill!
Can I make this without gelatin?
You sure can – agar agar powder works for a vegetarian version. Use about 1 teaspoon dissolved in hot water instead of the gelatin. The texture will be slightly firmer but still delicious. I’ve also had success with cornstarch slurry (2 tbsp mixed with 3 tbsp water, heated until thick) in a pinch!
My cream cheese filling is lumpy – how do I fix it?
This happens when the cream cheese is too cold. Next time, let it soften fully at room temperature. For now, try pressing the lumps through a fine mesh strainer or blending the mixture briefly with an immersion blender. A few tiny lumps won’t ruin it though – call it “rustic charm”!
How far in advance can I make this cheesecake?
It’s actually better the next day! Make it up to 24 hours ahead – just wait to add any fresh strawberry garnishes until right before serving. The flavors develop beautifully overnight. After 3 days, the crust starts to soften, so I don’t recommend making it further ahead than that.
Nutritional Information for No-Bake Strawberry Cheesecake
Now, I’m no nutritionist (just a cheesecake enthusiast!), but I know some folks like to have a general idea of what they’re enjoying. Keep in mind these numbers are rough estimates – your actual results will vary depending on your exact ingredients and how generous you are with those strawberry slices on top!
A typical slice of this no-bake strawberry cheesecake contains a good amount of calcium from the dairy and vitamin C from the fresh strawberries. The gelatin adds a protein boost too. Of course, it’s still a dessert meant to be savored in moderation (though I won’t judge if you go back for seconds – I always do!).
If you’re watching specific dietary needs, you can easily lighten it up by using reduced-fat cream cheese or less sugar. But let’s be real – sometimes you just need that full-fat, creamy indulgence! My philosophy? Life’s too short not to enjoy dessert, especially when it’s packed with real fruit like this beauty.
Remember, homemade treats like this will always be better than store-bought versions where you can’t control the ingredients. At least you know exactly what’s going into your dessert – no mysterious preservatives or unpronounceable additives here!
Share Your No-Bake Strawberry Cheesecake Experience
Nothing makes me happier than seeing your gorgeous cheesecake creations! Did you add a special twist? Maybe a splash of limoncello in the filling or a sprinkle of crushed pistachios on top? I want to hear all about it! Leave a comment below telling me how your no-bake strawberry cheesecake turned out – the good, the messy, and especially the delicious.
Snap a photo of your masterpiece (before it gets devoured!) and tag me on Instagram @CheesecakeObsessed. Seeing your variations inspires me to keep creating new recipes. And if you loved this recipe as much as I do, give it a 5-star rating – it helps other dessert lovers find this gem!
Your feedback means the world to me. Was the filling perfectly creamy? Did your kids go crazy for the pink swirls? Spill all the details – I read every single comment while nibbling on my own slice of cheesecake (research purposes, obviously!). Can’t wait to see what you create!
Print
Irresistible No-Bake Strawberry Cheesecake in 4 Hours
- Total Time: 4 hours 20 minutes
- Yield: 8 servings 1x
- Diet: Vegetarian
Description
A simple no-bake strawberry cheesecake with a creamy texture and fresh strawberry flavor.
Ingredients
- 200g digestive biscuits
- 100g unsalted butter, melted
- 500g cream cheese, softened
- 150g powdered sugar
- 300ml heavy cream
- 1 tsp vanilla extract
- 200g fresh strawberries, pureed
- 10g gelatin powder
- 60ml cold water
Instructions
- Crush the digestive biscuits into fine crumbs and mix with melted butter.
- Press the mixture into the base of a springform pan and refrigerate for 30 minutes.
- Dissolve gelatin in cold water and let it bloom for 5 minutes.
- Whip the heavy cream until stiff peaks form and set aside.
- Beat the cream cheese, powdered sugar, and vanilla extract until smooth.
- Heat the gelatin mixture until dissolved, then blend into the strawberry puree.
- Fold the strawberry mixture into the cream cheese mixture.
- Gently fold in the whipped cream.
- Pour the filling over the chilled crust and refrigerate for at least 4 hours.
- Garnish with fresh strawberries before serving.
Notes
- Ensure cream cheese is at room temperature for smooth mixing.
- Use fresh strawberries for the best flavor.
- Chill the cheesecake for at least 4 hours or overnight for best results.
- Prep Time: 20 minutes
- Cook Time: 0 minutes
- Category: Dessert
- Method: No-Bake
- Cuisine: American
Nutrition
- Serving Size: 1 slice
- Calories: 450
- Sugar: 25g
- Sodium: 200mg
- Fat: 30g
- Saturated Fat: 18g
- Unsaturated Fat: 10g
- Trans Fat: 0g
- Carbohydrates: 40g
- Fiber: 2g
- Protein: 6g
- Cholesterol: 80mg
Keywords: no-bake cheesecake, strawberry cheesecake, easy dessert

")
")
")
")