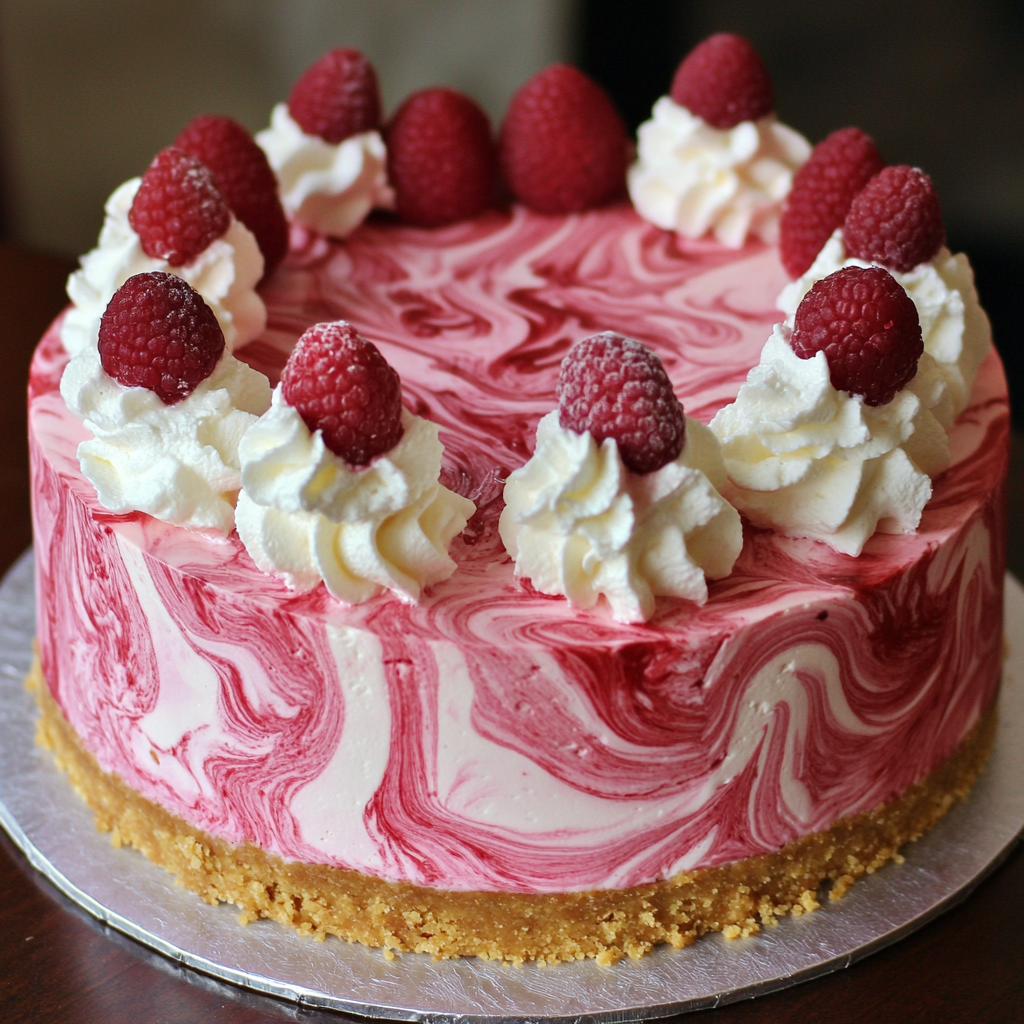
As a passionate home cook, I find joy in creating desserts that not only taste divine but also look stunning. One of my all-time favorites is the Pink Velvet Raspberry Cheesecake. This delightful treat is a feast for the eyes and the palate, combining the rich creaminess of cheesecake with the vibrant flavors of fresh raspberries. The moment I first made this cheesecake, I knew I had stumbled upon something special. It’s like a sweet hug on a plate, perfect for any occasion!
Ingredients for Pink Velvet Raspberry Cheesecake Recipe
Before we embark on this delicious journey, let’s gather all the ingredients needed for the Pink Velvet Raspberry Cheesecake. I always find that having everything prepped and ready makes the cooking process smoother and more enjoyable. It’s like setting the stage for a beautiful performance! Here’s what you’ll need:
- 2 cups chocolate cookie crumbs
- 1/2 cup unsalted butter, melted
- 3 (8 oz) packages cream cheese, softened
- 1 cup granulated sugar
- 1 teaspoon vanilla extract
- 3 large eggs
- 1 cup sour cream
- 1/2 cup heavy cream
- 1 cup white chocolate chips, melted and slightly cooled
- 2 cups fresh raspberries
- 1/4 cup raspberry jam
Each ingredient plays a vital role in creating the perfect cheesecake. The chocolate cookie crumbs form a delightful crust that adds a rich flavor, while the cream cheese provides that classic creamy texture we all love. The white chocolate chips? They’re like the cherry on top, adding a sweet twist that complements the tartness of the raspberries beautifully.
As I gather these ingredients, I can’t help but feel excited. The thought of mixing them together and watching the transformation into a luscious cheesecake fills me with anticipation. It’s like magic in the kitchen! So, let’s get ready to whip up something extraordinary. Next, we’ll explore the tools you’ll need to make this cheesecake a reality.
Tools Needed for Pink Velvet Raspberry Cheesecake Recipe
Now that we have our ingredients lined up like eager performers waiting for their cue, it’s time to gather the tools that will help us create this delightful Pink Velvet Raspberry Cheesecake. Just like a painter needs brushes and a canvas, I believe that having the right kitchen tools makes all the difference in the world. Here’s what you’ll need:
- 9-inch springform pan
- Medium mixing bowl
- Large mixing bowl
- Electric mixer or whisk
- Rubber spatula
- Measuring cups and spoons
- Microwave-safe bowl (for melting chocolate)
- Oven mitts
- Cooling rack
- Plastic wrap or aluminum foil (for refrigerating)
Each tool plays a crucial role in our cheesecake-making adventure. The springform pan is essential for easy removal of the cheesecake, allowing it to shine like a star on your dessert table. I remember the first time I used one; it felt like unwrapping a present! The electric mixer helps achieve that smooth, creamy texture we all crave, while the rubber spatula ensures that not a single drop of that luscious batter goes to waste.
As I gather my tools, I can almost hear the sweet symphony of mixing and baking in my kitchen. It’s a joyful process, and I can’t wait to dive into the next steps. With everything ready, we’re one step closer to creating a dessert that will leave everyone asking for seconds. Let’s move on to the step-by-step preparation of our Pink Velvet Raspberry Cheesecake!
Step-by-Step Preparation of Pink Velvet Raspberry Cheesecake Recipe
Now that we have our ingredients and tools ready, it’s time to roll up our sleeves and dive into the delightful process of making the Pink Velvet Raspberry Cheesecake. I always find that following a step-by-step approach not only makes the task easier but also adds to the excitement of creating something delicious. So, let’s get started!
Step 1: Preparing the Crust
The first step in our cheesecake adventure is to prepare the crust. This is where the magic begins! In a medium bowl, I combine the chocolate cookie crumbs with the melted butter. The aroma of melted butter mixed with chocolate is simply irresistible. I mix them together until the crumbs are well-coated, creating a sandy texture that holds everything together.
Next, I press this mixture firmly into the bottom of my greased 9-inch springform pan. It’s like laying the foundation for a beautiful cake! I use the back of a measuring cup to ensure it’s even and compact. Once it’s all set, I pop it into the fridge to chill while I prepare the cheesecake filling. This helps the crust firm up, making it easier to slice later. Trust me, this step is worth it!
Step 2: Making the Pink Velvet Cheesecake Batter
With the crust chilling, it’s time to whip up the cheesecake batter. In a large mixing bowl, I beat the softened cream cheese and granulated sugar together until it’s smooth and creamy. The texture should be like a fluffy cloud! I can’t help but sneak a taste; it’s so good! Then, I add in the vanilla extract, which adds a lovely depth of flavor.
Next, I crack in the eggs, one at a time, making sure to beat well after each addition. This is where the batter starts to come together beautifully. I then blend in the sour cream and heavy cream, creating a rich and velvety mixture. The combination of these ingredients is like a symphony of flavors, and I can already imagine how delicious it will be!
Step 3: Incorporating the Raspberry Flavor
Now comes the fun part—adding the raspberry flavor! I gently stir in the melted white chocolate, which adds a touch of sweetness and creaminess. Then, I fold in the fresh raspberries, being careful not to crush them too much. I love seeing those vibrant red berries peeking through the batter; it’s like adding little jewels to my creation!
At this point, the batter is a beautiful pink hue, and I can hardly contain my excitement. It’s like a work of art waiting to be baked! I pour the cheesecake batter over the chilled crust in the springform pan, smoothing the top with a rubber spatula. It’s time to bake this beauty!
Step 4: Baking the Cheesecake
I preheat my oven to 325°F (163°C) and carefully place the springform pan inside. The aroma of baking cheesecake fills my kitchen, and it’s heavenly! I bake it for about 55-60 minutes, or until the center is just set and the top looks slightly dry. It’s important not to overbake, as we want that creamy texture to shine through.
As the cheesecake bakes, I can’t help but peek through the oven door. The anticipation builds, and I can already imagine the smiles on my family’s faces when they taste it. Once the time is up, I turn off the oven and leave the cheesecake inside with the door slightly ajar for an hour. This gentle cooling helps prevent cracks from forming on the surface.
Step 5: Cooling and Setting the Cheesecake
After an hour, I take the cheesecake out of the oven and let it cool completely on a cooling rack. Once it’s at room temperature, I cover it with plastic wrap and pop it into the refrigerator for at least 4 hours, or preferably overnight. This waiting period is the hardest part, but it’s essential for the cheesecake to set properly.
When I finally take it out of the fridge, I can hardly contain my excitement. The cheesecake is firm, yet still creamy, and the pink color is simply stunning. I can’t wait to add the finishing touches before serving!

Serving Suggestions for Pink Velvet Raspberry Cheesecake Recipe
After all the hard work and anticipation, it’s finally time to serve the Pink Velvet Raspberry Cheesecake! This is the moment I love most, where I get to share my creation with family and friends. The vibrant pink hue and the luscious texture make it a showstopper on any dessert table. But how can we elevate this delightful cheesecake even further? Let me share some of my favorite serving suggestions!
Ideal Pairings and Garnishes
When it comes to serving the Pink Velvet Raspberry Cheesecake, I like to think of it as a canvas ready for beautiful garnishes. Here are some of my go-to ideas:
- Fresh Berries: A handful of fresh raspberries on top not only adds a pop of color but also enhances the fruity flavor. You can even sprinkle some blueberries or strawberries for a mixed berry medley!
- Whipped Cream: A dollop of freshly whipped cream is like a fluffy cloud on top of the cheesecake. It adds a lightness that balances the richness of the cheesecake.
- Chocolate Drizzle: A drizzle of melted chocolate over the top can add a touch of elegance. It’s like dressing up the cheesecake for a fancy occasion!
- Mint Leaves: A few fresh mint leaves can add a refreshing touch. They not only look beautiful but also provide a burst of flavor that complements the cheesecake.
- Raspberry Sauce: If you want to take it up a notch, serve the cheesecake with a side of raspberry sauce. It’s easy to make by blending fresh raspberries with a bit of sugar and straining it for a smooth finish.
As I plate the cheesecake, I love to arrange the garnishes artfully. It’s like creating a masterpiece! The vibrant colors and textures make each slice look irresistible. I remember the first time I served this cheesecake with a drizzle of raspberry sauce and a sprinkle of mint leaves. My guests were in awe, and it made the dessert even more special.
So, whether you’re hosting a gathering or enjoying a quiet evening at home, these serving suggestions will surely impress. The Pink Velvet Raspberry Cheesecake is not just a dessert; it’s an experience that brings joy and sweetness to every occasion. Now, let’s move on to some tips for perfecting your cheesecake!
Tips for Perfecting Your Pink Velvet Raspberry Cheesecake Recipe
As I’ve journeyed through the delightful process of making the Pink Velvet Raspberry Cheesecake, I’ve learned a few tips and tricks that can help elevate your cheesecake game. After all, every great chef has a few secrets up their sleeve! Here are some insights I’ve gathered along the way, ensuring that your cheesecake turns out perfectly every time.
Common Mistakes to Avoid
Even the most seasoned bakers can run into a few hiccups. Here are some common mistakes I’ve encountered and how to avoid them:
- Overmixing the Batter: It’s tempting to keep mixing until everything is perfectly smooth, but overmixing can introduce too much air into the batter. This can lead to cracks during baking. I always mix just until combined, and it works like a charm!
- Not Using Room Temperature Ingredients: Cold ingredients can lead to a lumpy batter. I always make sure my cream cheese, eggs, and sour cream are at room temperature before I start. It makes a world of difference!
- Skipping the Cooling Step: Allowing the cheesecake to cool gradually in the oven helps prevent cracks. I learned this the hard way! So, resist the urge to rush it out of the oven.
- Not Chilling Long Enough: Patience is key! I’ve found that chilling the cheesecake overnight yields the best results. It allows the flavors to meld beautifully and ensures a perfect texture.
- Using a Non-Springform Pan: A springform pan is essential for easy removal. I remember the first time I used a regular pan, and it was a disaster! Invest in a good springform pan; it’s worth it.
By keeping these tips in mind, you’ll be well on your way to creating a stunning Pink Velvet Raspberry Cheesecake that will impress everyone!
Storage Tips for Leftover Cheesecake
Now, if you’re lucky enough to have leftovers (which is rare in my house!), here’s how to store your cheesecake properly:
- Refrigeration: Always cover the cheesecake with plastic wrap or aluminum foil before placing it in the fridge. This helps keep it fresh and prevents it from absorbing any odors from other foods.
- Freezing: If you want to save it for later, you can freeze slices of cheesecake. Just wrap each slice tightly in plastic wrap and then in aluminum foil. It can last up to 2 months in the freezer!
- Thawing: When you’re ready to enjoy your frozen cheesecake, simply transfer it to the fridge for a few hours or overnight to thaw. Avoid using the microwave, as it can change the texture.
- Serving Leftovers: I love to serve leftover cheesecake with a fresh garnish of berries or a drizzle of sauce to make it feel special again. It’s like giving it a second chance to shine!
With these storage tips, you can savor the deliciousness of your Pink Velvet Raspberry Cheesecake long after it’s been made. Now, let’s move on to some frequently asked questions about this delightful dessert!
FAQs about Pink Velvet Raspberry Cheesecake Recipe
Can I use frozen raspberries for the Pink Velvet Raspberry Cheesecake?
Absolutely! While I love using fresh raspberries for their vibrant flavor and beautiful appearance, frozen raspberries can work just as well. Just keep in mind that they may release more moisture during baking. To avoid a soggy cheesecake, I recommend thawing the frozen raspberries first and draining any excess liquid. This way, you can still enjoy that delightful raspberry flavor without compromising the texture of your Pink Velvet Raspberry Cheesecake!
How do I know when the cheesecake is done baking?
Ah, the age-old question! Knowing when your cheesecake is perfectly baked can be tricky. I always look for a few key signs. The edges should be set, while the center will still have a slight jiggle. It’s like a gentle wave in the ocean! If the top appears slightly dry and the edges are firm, you’re on the right track. Remember, the cheesecake will continue to set as it cools, so it’s better to err on the side of underbaking than overbaking. Trust me, you want that creamy texture to shine through!
Can I make the Pink Velvet Raspberry Cheesecake ahead of time?
Yes, indeed! In fact, I often make this cheesecake a day in advance. It allows the flavors to meld beautifully and ensures a perfect texture. Just be sure to cover it well with plastic wrap or aluminum foil before refrigerating. This way, it stays fresh and ready to impress your guests. When it’s time to serve, simply add your favorite garnishes, and you’re all set for a delightful dessert experience!
What can I substitute for cream cheese in the Pink Velvet Raspberry Cheesecake Recipe?
If you’re looking for a cream cheese alternative, there are a few options you can try. Mascarpone cheese is a fantastic substitute, offering a similar creamy texture with a slightly sweeter flavor. Greek yogurt can also work, but it may alter the taste and texture a bit. For a dairy-free option, consider using cashew cream or a vegan cream cheese alternative. Just keep in mind that these substitutes may change the overall flavor profile of your Pink Velvet Raspberry Cheesecake, but they can still yield delicious results!
Conclusion on Pink Velvet Raspberry Cheesecake Recipe
As I wrap up this delightful journey of creating the Pink Velvet Raspberry Cheesecake, I can’t help but feel a sense of accomplishment and joy. This recipe is more than just a dessert; it’s a celebration of flavors, colors, and the love of cooking. Each step, from preparing the crust to adding the finishing touches, is filled with anticipation and excitement. I hope that as you embark on this culinary adventure, you find the same joy and satisfaction that I do.
Print
Pink Velvet Raspberry Cheesecake: A Must-Try Delight!
- Total Time: 5 hours 30 minutes (including chilling time)
- Yield: 12 servings 1x
- Diet: Vegetarian
Description
A delightful Pink Velvet Raspberry Cheesecake that combines rich creaminess with vibrant raspberry flavors, perfect for any occasion.
Ingredients
- 2 cups chocolate cookie crumbs
- 1/2 cup unsalted butter, melted
- 3 (8 oz) packages cream cheese, softened
- 1 cup granulated sugar
- 1 teaspoon vanilla extract
- 3 large eggs
- 1 cup sour cream
- 1/2 cup heavy cream
- 1 cup white chocolate chips, melted and slightly cooled
- 2 cups fresh raspberries
- 1/4 cup raspberry jam
Instructions
- Prepare the crust by mixing chocolate cookie crumbs with melted butter and pressing into a greased 9-inch springform pan. Chill in the fridge.
- In a large mixing bowl, beat cream cheese and sugar until smooth. Add vanilla extract, then eggs one at a time, mixing well after each addition. Blend in sour cream and heavy cream.
- Stir in melted white chocolate and fold in fresh raspberries gently. Pour the batter over the chilled crust.
- Preheat the oven to 325°F (163°C) and bake for 55-60 minutes until the center is set. Leave the cheesecake in the oven with the door slightly ajar for an hour.
- Cool completely on a rack, then refrigerate for at least 4 hours or overnight before serving.
Notes
- For best results, use room temperature ingredients.
- Chill the cheesecake overnight for optimal texture.
- Garnish with fresh berries, whipped cream, or raspberry sauce before serving.
- Prep Time: 30 minutes
- Cook Time: 60 minutes
- Category: Dessert
- Method: Baking
- Cuisine: American
Nutrition
- Serving Size: 1 slice
- Calories: 350
- Sugar: 25g
- Sodium: 300mg
- Fat: 22g
- Saturated Fat: 12g
- Unsaturated Fat: 8g
- Trans Fat: 0g
- Carbohydrates: 30g
- Fiber: 2g
- Protein: 5g
- Cholesterol: 80mg
Keywords: Pink Velvet Raspberry Cheesecake, cheesecake recipe, dessert, raspberry dessert
")
")
")
")