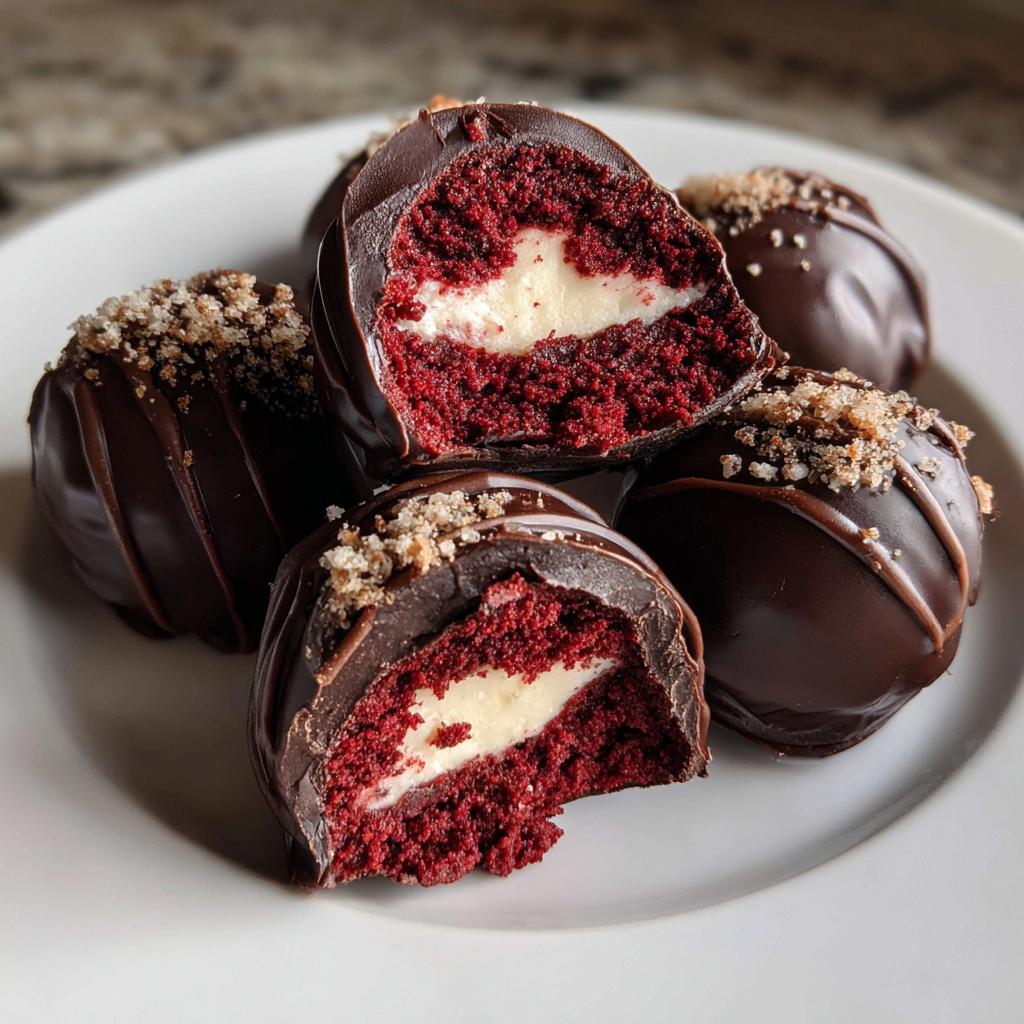
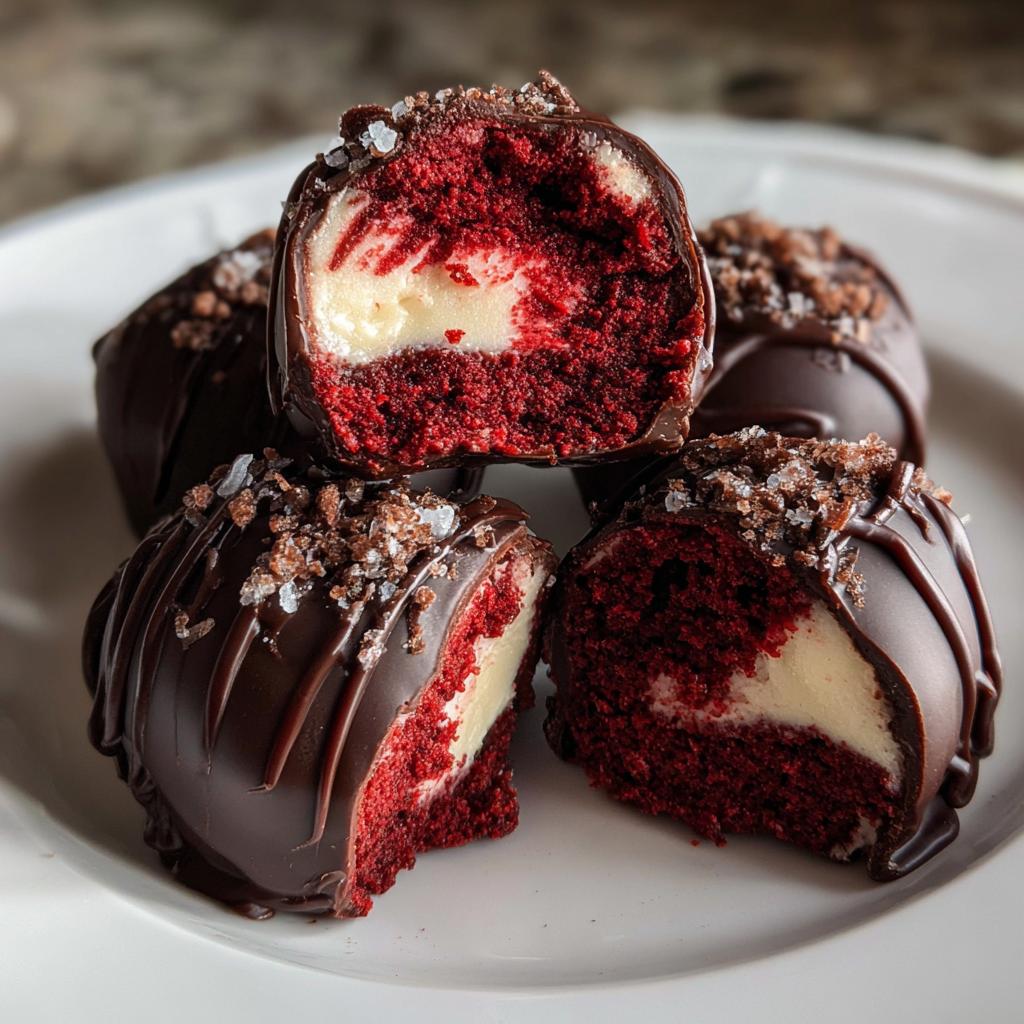
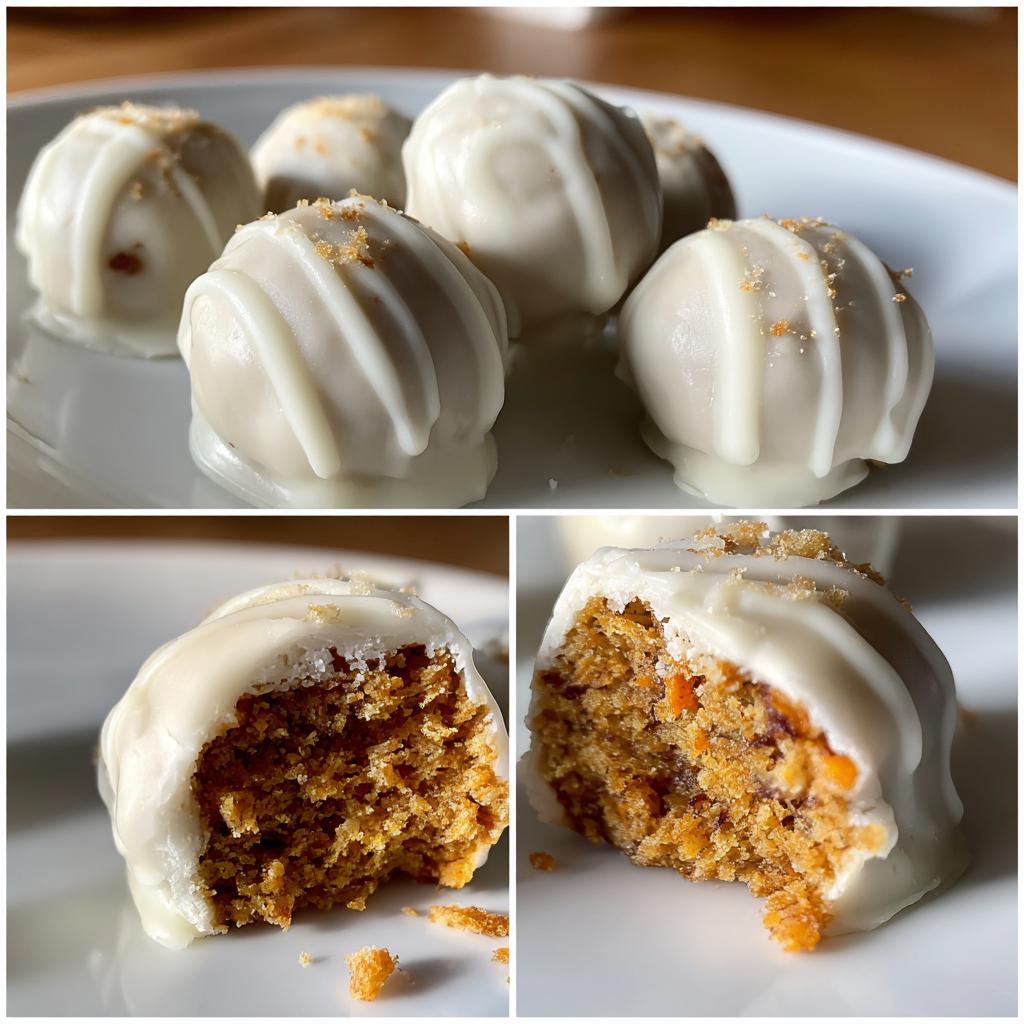
Oh my goodness, have you ever had one of those days where you just NEED a little bite of chocolatey heaven? That’s exactly why I fell in love with making Red Velvet Cake Truffles. Picture this: moist red velvet cake crumbs mixed with creamy frosting, all rolled into perfect little balls and dipped in silky chocolate. I’ve been making these for years – ever since my cousin’s baby shower where I needed a last-minute dessert that would wow everyone. The best part? They look fancy but are secretly so simple to make. Whether you’re using leftover cake (my sneaky trick!) or baking a fresh batch, these truffles always disappear faster than I can make them. Trust me, once you try that perfect combo of tangy cream cheese and rich chocolate coating, you’ll be hooked just like I am!
Why You’ll Love These Red Velvet Cake Truffles
Let me tell you why these little bites of joy have become my go-to dessert for every occasion:
- Quick magic: From cake mix to truffles in about an hour – perfect when you need something impressive fast!
- No fancy tools: Just your hands, a bowl, and a fork for dipping. My kind of baking.
- Total crowd-pleasers: I’ve never brought these to a party without someone begging for the recipe.
- Holiday chameleons: Change up the sprinkles or chocolate color for any season – red and green for Christmas, pastels for Easter… you get the idea!
- Secret weapon: They freeze beautifully, so you can always have a stash ready for surprise guests (or midnight cravings).
Ingredients for Red Velvet Cake Truffles
Gathering these simple ingredients is half the battle won – and trust me, you probably have most of them in your pantry right now! Here’s what you’ll need:
For the Cake Base
- 1 (15.25 oz) box red velvet cake mix (my go-to is Duncan Hines for that perfect color!)
- 1 cup water
- ½ cup vegetable oil
- 3 large eggs (room temperature works best)
For Binding & Flavor
- 1 (16 oz) can cream cheese frosting (Betty Crocker’s works like a charm)
For the Chocolate Coating
- 12 oz white or dark chocolate melting wafers (I prefer Ghirardelli for that smooth finish)
- 1 tsp vegetable shortening (optional, but makes dipping SO much easier)
Ingredient Substitutions & Notes
Oh, the beauty of this recipe is how flexible it is! Here are my tried-and-true swaps:
- No box mix? Use 4 cups of homemade red velvet cake crumbs instead – just make sure it’s completely cooled.
- Frosting alternatives: If you’re not a cream cheese fan (blasphemy!), vanilla or buttercream work too. Just avoid anything too runny.
- Chocolate options: Almond bark or candy melts work if you can’t find wafers. Skip chocolate chips though – they don’t melt smoothly enough for dipping.
- Shortening hack: A tiny bit of coconut oil does the trick if you’re out of shortening.
One golden rule: whatever you use, make sure your cake is COOLED and your frosting isn’t watery. I learned that the messy way during my first truffle-making adventure – let’s just say it involved chocolate-covered fingers and a lot of laughter!
How to Make Red Velvet Cake Truffles
Alright, let’s get to the fun part – turning that box of cake mix into magical little truffles! I’ve made hundreds of these over the years, and I promise the process is easier than it looks. Just follow these steps, and you’ll be dipping like a pro in no time:
- Bake that cake! Preheat your oven to 350°F (175°C) and prepare your red velvet cake mix with water, oil, and eggs exactly as the box directs. Pour into a 9×13-inch pan and bake until a toothpick comes out clean – about 25 minutes. The smell alone will have your family hovering in the kitchen!
- Cool completely. This is CRUCIAL – I can’t stress it enough. Let the cake cool right in the pan on a wire rack. Trying to crumble warm cake was my first rookie mistake – it turns into a gloppy mess. Wait at least an hour, or better yet, bake the cake the night before.
- Crumble time! Break the cooled cake into a large bowl and get your hands in there! You want fine, even crumbs – no big chunks. This is oddly satisfying therapy after a long day. Pro tip: The finer your crumbs, the smoother your truffle centers will be.
- Mix in the frosting. Start with about ¾ of the can of cream cheese frosting, mixing it in with a spatula or your hands (my preferred method). You’re looking for a dough-like consistency that holds together when squeezed. Add more frosting if needed, but don’t go overboard – too much makes the balls hard to dip later.
- Roll ’em up! Scoop about a tablespoon of mixture and roll between your palms to form 1-inch balls. Place them on a parchment-lined baking sheet. If the mixture gets sticky, damp hands help tremendously. This is when my kids love to “help” – messy but memorable!
- Chill out. Pop the tray in the freezer for 20 minutes or fridge for an hour. This firms them up so they won’t fall apart during dipping. I’ve learned the hard way that skipping this step leads to chocolate-covered cake mush (still tasty, just not pretty).
- Melt your chocolate. In a microwave-safe bowl, melt your wafers with the shortening (if using) in 30-second bursts, stirring between each. Stop when there are just a few unmelted pieces – the residual heat will finish the job. Overheating makes the chocolate seize up, and nobody wants that.
- Dip with confidence! Using a fork (or specialty dipping tools if you’re fancy), lower a chilled ball into the chocolate. Gently tap the fork against the bowl’s edge to remove excess – this gives that perfect smooth coating. Transfer back to the parchment and immediately add sprinkles if desired before the chocolate sets.
- Let them set. Allow the chocolate to harden at room temperature (about 30 minutes) or speed things up with 10 minutes in the fridge. The wait is the hardest part – try not to “test” too many as you go!
Pro Tips for Perfect Truffles
After many batches (and a few disasters), here are my can’t-live-without tips:
- Chill thoroughly – Warm truffles = chocolate that won’t stick properly. If your kitchen is warm, pop them back in the fridge between batches.
- Use a fork with thin tines – Thicker forks leave ugly marks. I keep one special fork just for truffle-making!
- Tap off excess chocolate – Three light taps against the bowl edge gives the perfect coating thickness.
- Parchment is your friend – It prevents sticking and makes cleanup a breeze. Wax paper can sometimes stick – learned that the hard way!
- Work in small batches – Keep most truffles chilled while you dip a few at a time to maintain their shape.
Storing and Serving Red Velvet Cake Truffles
Here’s the beautiful thing about these truffles – they actually get better after a day! Store them in an airtight container in the fridge for up to 5 days (if they last that long). For longer storage, freeze them on a tray first, then transfer to freezer bags for up to 3 months. Just thaw at room temperature for about 30 minutes before serving – the chocolate will lose its shine if served straight from the fridge. I always make extra because they disappear faster than cookies at a bake sale!
Red Velvet Cake Truffles Variations
Oh, the fun you can have with these little gems! Here are my favorite ways to mix things up:
- Double chocolate delight: Use dark chocolate coating and roll the truffles in cocoa powder for an extra rich bite.
- Holiday sparkle: Toss in festive sprinkles right after dipping – red and green for Christmas, pastel nonpareils for Easter.
- Marble magic: Drizzle melted white and dark chocolate over each other for a stunning swirled effect.
- Nutty surprise: Mix chopped pecans into the cake mixture before rolling for a Southern twist.
- Mini cheesecake vibes: Add a tiny bit of lemon zest to the frosting mixture for a bright, tangy kick.
The best part? No matter how you dress them up, they always taste amazing. My kids love helping with the decorating – it’s like edible arts and crafts!
Red Velvet Cake Truffles Nutritional Information
Now, I’ll be honest – we don’t make these for their health benefits! But if you’re curious, here’s the approximate nutrition per truffle (remember, these are estimates and will vary based on your specific ingredients):
- Calories: 120
- Total Fat: 6g
- Saturated Fat: 2.5g
- Carbohydrates: 15g
- Sugar: 10g
- Protein: 1g
My philosophy? Life’s too short not to enjoy these little bites of happiness in moderation! After all, one truffle is the perfect portion to satisfy that sweet craving without going overboard.
Frequently Asked Questions
I get asked these questions ALL the time when I bring my Red Velvet Cake Truffles to parties – here are the answers straight from my years of trial and error!
- Can I use homemade cake instead of a mix? Absolutely! Just make sure it’s completely cooled before crumbling. About 4 cups of cake crumbs will do the trick. My grandma’s homemade red velvet works amazingly, though I won’t tell if you use the box shortcut!
- Why do my truffles crack when I dip them? Oh honey, I’ve been there! This usually means they weren’t chilled enough or your chocolate was too hot. Always freeze for at least 20 minutes and let melted chocolate cool slightly before dipping – it should feel warm, not hot, to the touch.
- What’s the best chocolate for dipping? Hands down, candy melts or chocolate wafers give the smoothest finish. Chocolate chips contain stabilizers that make them stubborn to melt smoothly. If you must use chips, add a teaspoon of shortening per cup to improve the texture.
- Can I freeze these after making them? You bet! They freeze beautifully for up to 3 months. Just thaw at room temperature for about 30 minutes before serving – the chocolate will “sweat” if you thaw them in the fridge.
- Help! My truffles are too soft inside. No worries! This usually means too much frosting was added. Next time, start with ¾ can and add more only if needed. For this batch, just keep them refrigerated until serving – they’ll firm up nicely.
Final Thoughts
Well, there you have it – my not-so-secret secret for the most irresistible Red Velvet Cake Truffles! I can’t wait for you to try these little bites of joy. When you do, snap a pic and tag me – I love seeing your creations! Whether it’s for a party or just because, these truffles never fail to make people smile. Now go get dipping!
Print
Irresistible 30-Minute Red Velvet Cake Truffles Recipe
- Total Time: 1 hour 15 minutes (includes chilling)
- Yield: 36 truffles 1x
- Diet: Vegetarian
Description
Red Velvet Cake Truffles are bite-sized treats made from crumbled red velvet cake mixed with cream cheese frosting, dipped in white or dark chocolate for a rich and indulgent dessert.
Ingredients
- 1 (15.25 oz) box red velvet cake mix
- 1 cup water
- 1/2 cup vegetable oil
- 3 large eggs
- 1 (16 oz) can cream cheese frosting
- 12 oz white or dark chocolate melting wafers
- 1 tsp vegetable shortening (optional, for smoother coating)
Instructions
- Preheat oven to 350°F (175°C). Prepare cake mix with water, oil, and eggs as directed on the box. Bake in a 9×13-inch pan.
- Let cake cool completely. Crumble it into fine pieces in a large bowl.
- Mix in cream cheese frosting until fully combined.
- Roll mixture into 1-inch balls and place on a parchment-lined tray. Freeze for 20 minutes.
- Melt chocolate wafers (with shortening if desired) in a microwave-safe bowl.
- Dip each ball into melted chocolate using a fork, letting excess drip off.
- Return to tray and let chocolate set at room temperature or refrigerate.
Notes
- Use leftover cake for quicker prep.
- Chill balls thoroughly before dipping to prevent crumbling.
- Store in an airtight container for up to 5 days.
- Prep Time: 30 minutes
- Cook Time: 25 minutes
- Category: Dessert
- Method: Baking, No-Bake
- Cuisine: American
Nutrition
- Serving Size: 1 truffle
- Calories: 120
- Sugar: 10g
- Sodium: 85mg
- Fat: 6g
- Saturated Fat: 2.5g
- Unsaturated Fat: 3g
- Trans Fat: 0g
- Carbohydrates: 15g
- Fiber: 0g
- Protein: 1g
- Cholesterol: 15mg
Keywords: red velvet cake truffles, cake balls, dessert bites, chocolate treats
")
")
")
")