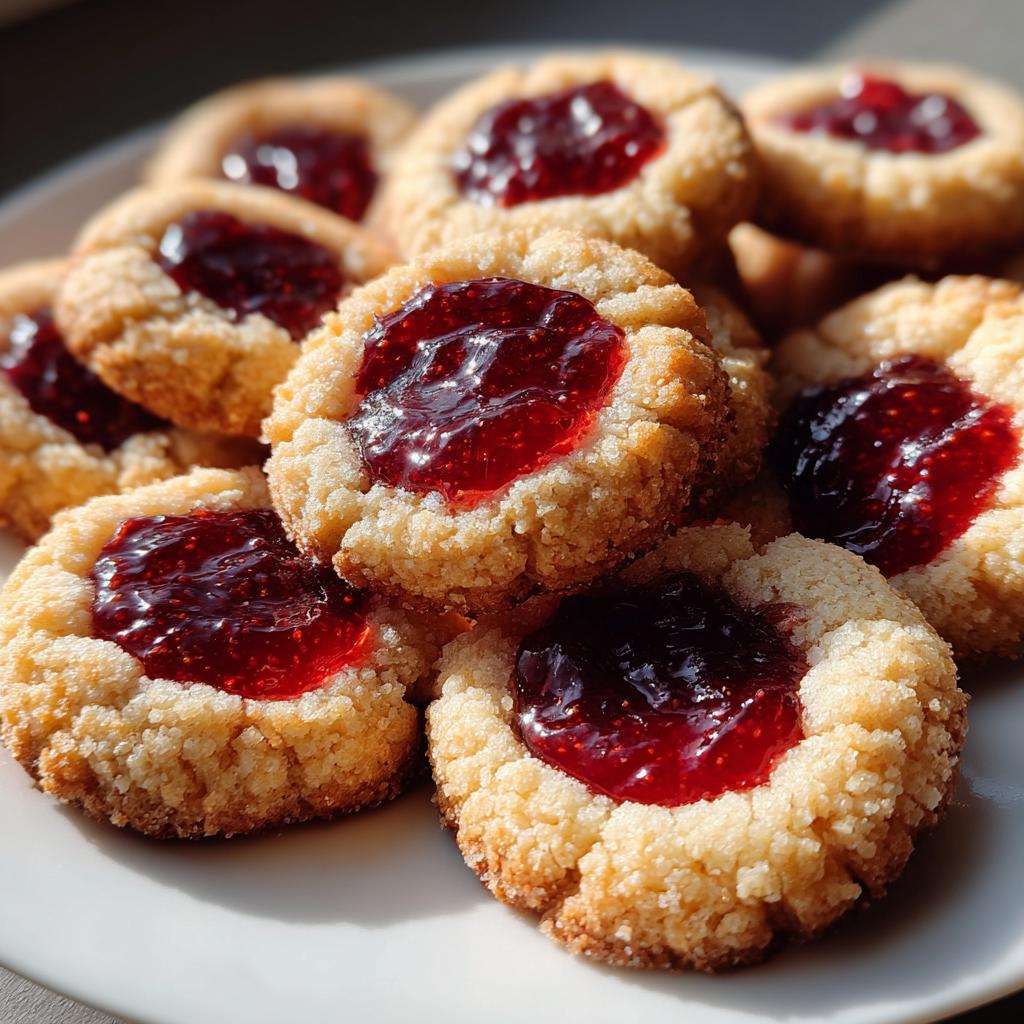
Oh, thumbprint cookies with jam – just saying the name makes me smile! These little buttery gems were my first baking victory as a kid. I remember standing on a stool in my grandma’s kitchen, flour dusting my nose, pressing my tiny thumb into each soft dough ball with total concentration. “Don’t squish too hard!” she’d warn as I giggled, inevitably over-pressing a few. But you know what? Even my lopsided creations tasted magical with that sweet jam center.
Years later, I still make these cookies weekly – they’re that simple and versatile. Rainy afternoon pick-me-up? Thumbprints. Last-minute school bake sale? Thumbprints. Unexpected guests? You guessed it. The dough comes together in minutes, and that jammy center makes everyone feel fancy. My secret? Using whatever jam’s in the fridge – raspberry, apricot, even orange marmalade all work wonders. Trust me, once you master this recipe (and you will immediately), you’ll understand why these cookies have been beloved for generations.
Why You’ll Love These Thumbprint Cookies with Jam
Let me count the ways these little jam-filled wonders will steal your heart:
- Effortless baking magic – No fancy equipment or techniques needed, just your hands and basic pantry staples
- Endless flavor combos – That thumbprint well is like a blank canvas for any jam, jelly or marmalade you adore
- Always a crowd-pleaser – Works for holiday cookie swaps, lunchbox treats, or when you need a quick “I baked these!” moment
- Nostalgia in every bite – That buttery crumb hugging sweet jam tastes like childhood memories made edible
Seriously, I’ve never met anyone who could resist reaching for just one more…
Ingredients for Thumbprint Cookies with Jam
Here’s everything you’ll need for these buttery little miracles – and let me tell you, every ingredient plays a special role:
- 1 cup unsalted butter, softened (yes, truly softened – leave it out for 30 minutes! None of that microwave cheating)
- 2/3 cup granulated sugar (pack it in there when measuring – we’re not dieting today)
- 1/2 teaspoon vanilla extract (the good stuff – your cookies will thank you)
- 2 cups all-purpose flour (spoon and level it, don’t scoop!)
- 1/4 teaspoon salt (just enough to make the flavors pop)
- 1/2 cup jam of choice (more on this exciting decision below…)
The jam is where you can really have fun – my kitchen experiments prove raspberry, apricot, and blackberry work beautifully, but don’t be afraid to try lemon curd or even a spicy pepper jelly for grown-up versions!
Ingredient Substitutions & Notes
Baking with allergies or preferences? No problem:
- Swap in vegan butter 1:1 – just watch the salt content
- Gluten-free flour blends work great (I like the 1:1 kinds)
- Short on jam? Melted chocolate or nut butters make delicious alternative fillings
- For thicker fillings, try stirring a teaspoon of cornstarch into runny jams before baking
Remember – baking is about joy, not perfection. Use what you’ve got!
How to Make Thumbprint Cookies with Jam
Okay, let’s get these beauties in the oven! I promise it’s easier than you think – just follow these steps and you’ll have perfect thumbprint cookies every time:
- Preheat that oven! 350°F (175°C) is the sweet spot. Line your baking sheets with parchment paper – trust me, cleanup will be a breeze.
- Cream butter and sugar until it’s light and fluffy – about 2 minutes with a mixer. This is where the magic starts! Mix in the vanilla until it smells like heaven.
- Add flour and salt gradually. The dough should come together nicely – not too sticky, not too crumbly. If it sticks to your fingers, add a tablespoon more flour.
- Roll into balls about 1-inch in diameter. I use a small cookie scoop for consistency, but eyeballing works too. Place them 2 inches apart on your baking sheet.
Shaping & Filling the Cookies
Here comes the fun part! Use your thumb (clean, of course) to make an indentation in each dough ball. Don’t press all the way through – just enough to hold about 1/2 teaspoon of jam. Pro tip: dip your thumb in flour first to prevent sticking! Fill each well with your chosen jam, being careful not to overfill – those little wells expand in the oven.
Baking Tips for Perfect Thumbprint Cookies
Bake for 12-15 minutes until the edges just start turning golden. The centers might look slightly underdone – that’s perfect! They’ll firm up as they cool. Let them rest on the baking sheet for 5 minutes before transferring to a wire rack. Resist the urge to eat them immediately – that jam gets lava-hot!
Tips for the Best Thumbprint Cookies with Jam
After making hundreds (okay, maybe thousands) of these cookies, here are my can’t-live-without tips:
- Butter temperature is everything – Too cold and your dough won’t cream properly; too warm and your cookies will spread. It should dent slightly when pressed but still hold its shape.
- Roll uniform dough balls – I use a small ice cream scoop for identical cookies that bake evenly. No one wants the sad, overdone runt of the batch!
- Mind your jam thickness – Runny jam? Stir in a pinch of cornstarch. Too thick? Microwave for 5 seconds to loosen. You want it spoonable but not drippy.
- Work in batches – Keep unused dough chilled while baking each tray. Warm dough = flat cookies, and we’re not making jam pancakes here!
Follow these simple tricks, and you’ll have bakery-worthy thumbprints every single time.
Variations of Thumbprint Cookies with Jam
Ready to mix things up? These cookies are begging for your creative spin! Try adding lemon or orange zest to the dough for a citrusy punch. Swap the jam for chopped nuts or chocolate chips before baking – my hazelnut-chocolate combo disappears instantly. For extra decadence, drizzle melted chocolate over cooled cookies. The best part? No two batches ever need to taste the same!
Serving & Storing Thumbprint Cookies with Jam
Patience is key with these cookies – let them cool completely on the wire rack before serving (about 30 minutes). That jam center needs time to set, or you’ll have delicious but messy fingers! For storage, tuck them into an airtight container with parchment between layers. They’ll stay fresh at room temperature for 5 days, though ours never last that long. Want to revive day-old cookies? A quick 5-second microwave zap brings back that just-baked warmth.
Nutritional Information for Thumbprint Cookies with Jam
Here’s the scoop on what’s in these sweet treats (per cookie): about 120 calories, 7g fat, and 8g sugar. But let’s be real – these numbers dance depending on your jam choice and how generously you fill those thumbprints! All values are estimates – your ingredients may vary slightly.
FAQs About Thumbprint Cookies with Jam
Let me answer the questions I get asked most about these little jam-filled wonders:
Can I freeze thumbprint cookies? Absolutely! Freeze baked cookies in a single layer before transferring to an airtight container. They’ll keep for 3 months – just thaw at room temperature. You can also freeze the dough balls before baking – no need to thaw, just add an extra minute to the bake time.
What’s the best jam to use? My rule? Whatever makes your taste buds happy! Thicker jams like raspberry or apricot work beautifully, but even runny homemade preserves can be thickened with a pinch of cornstarch. Avoid super-chunky varieties though – those bits can burn.
How do I prevent cracks around the edges? Two tricks: don’t overmix the dough, and make sure your butter is properly softened (not melted!). If cracks still appear, just call them “rustic charm” – they’ll taste just as delicious!
Share Your Thumbprint Cookies with Jam
I’d love to see your jam-filled creations! Snap a photo and tag me – nothing makes me happier than seeing your baking adventures. Now go make some cookie magic!
Print
Blissful 3-Ingredient Thumbprint Cookies with Jam Perfection
- Total Time: 30 minutes
- Yield: 24 cookies 1x
- Diet: Vegetarian
Description
Thumbprint cookies are buttery, sweet treats with a jam center. They are easy to make and perfect for any occasion.
Ingredients
- 1 cup unsalted butter, softened
- 2/3 cup granulated sugar
- 1/2 teaspoon vanilla extract
- 2 cups all-purpose flour
- 1/4 teaspoon salt
- 1/2 cup jam (any flavor)
Instructions
- Preheat oven to 350°F (175°C). Line a baking sheet with parchment paper.
- In a bowl, cream butter and sugar until smooth. Mix in vanilla.
- Add flour and salt, mixing until dough forms.
- Roll dough into 1-inch balls. Place on baking sheet and press your thumb into the center of each.
- Fill each indentation with jam.
- Bake for 12-15 minutes until edges are lightly golden.
- Cool on a wire rack before serving.
Notes
- Use room temperature butter for smoother dough.
- Try different jam flavors for variety.
- Store in an airtight container for up to 5 days.
- Prep Time: 15 minutes
- Cook Time: 15 minutes
- Category: Dessert
- Method: Baking
- Cuisine: American
Nutrition
- Serving Size: 1 cookie
- Calories: 120
- Sugar: 8g
- Sodium: 25mg
- Fat: 7g
- Saturated Fat: 4g
- Unsaturated Fat: 2g
- Trans Fat: 0g
- Carbohydrates: 14g
- Fiber: 0.5g
- Protein: 1g
- Cholesterol: 18mg
Keywords: thumbprint cookies, jam cookies, easy dessert, buttery cookies


")
")
")
")