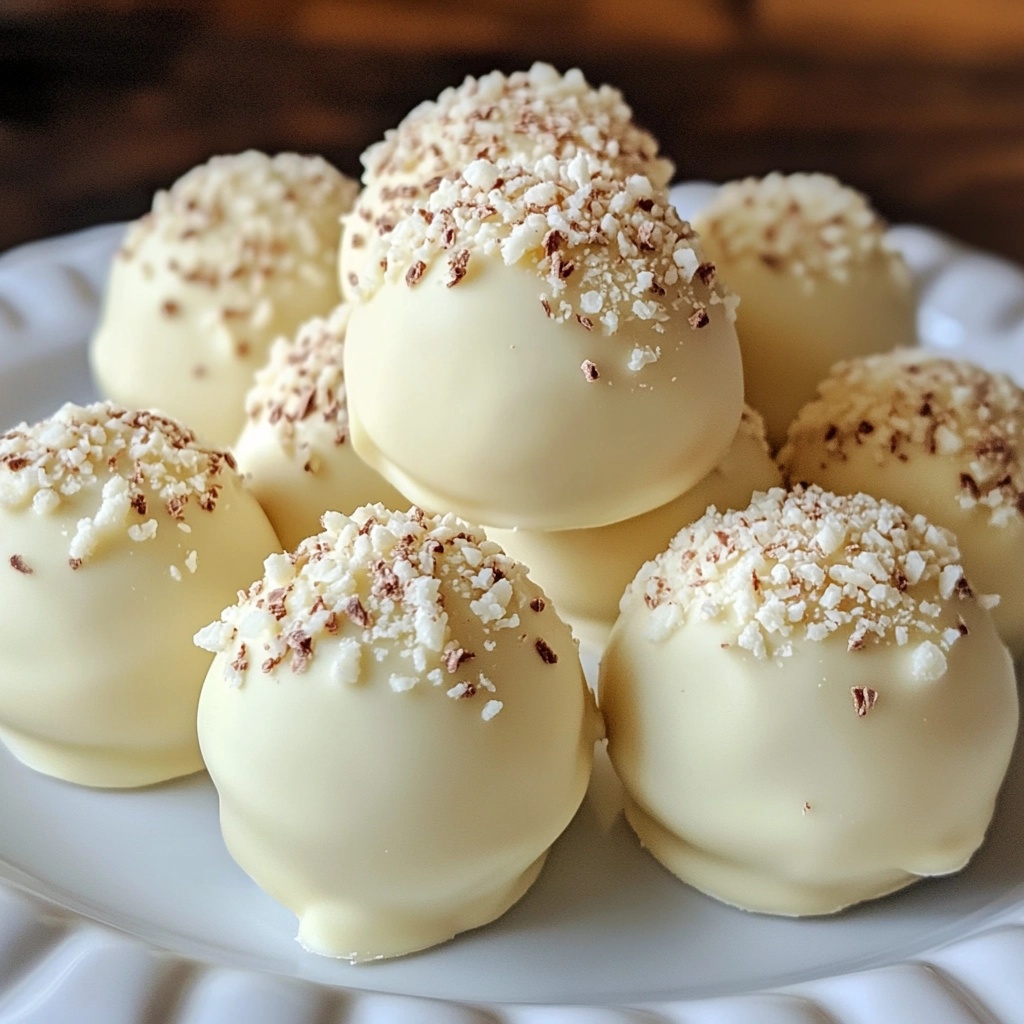
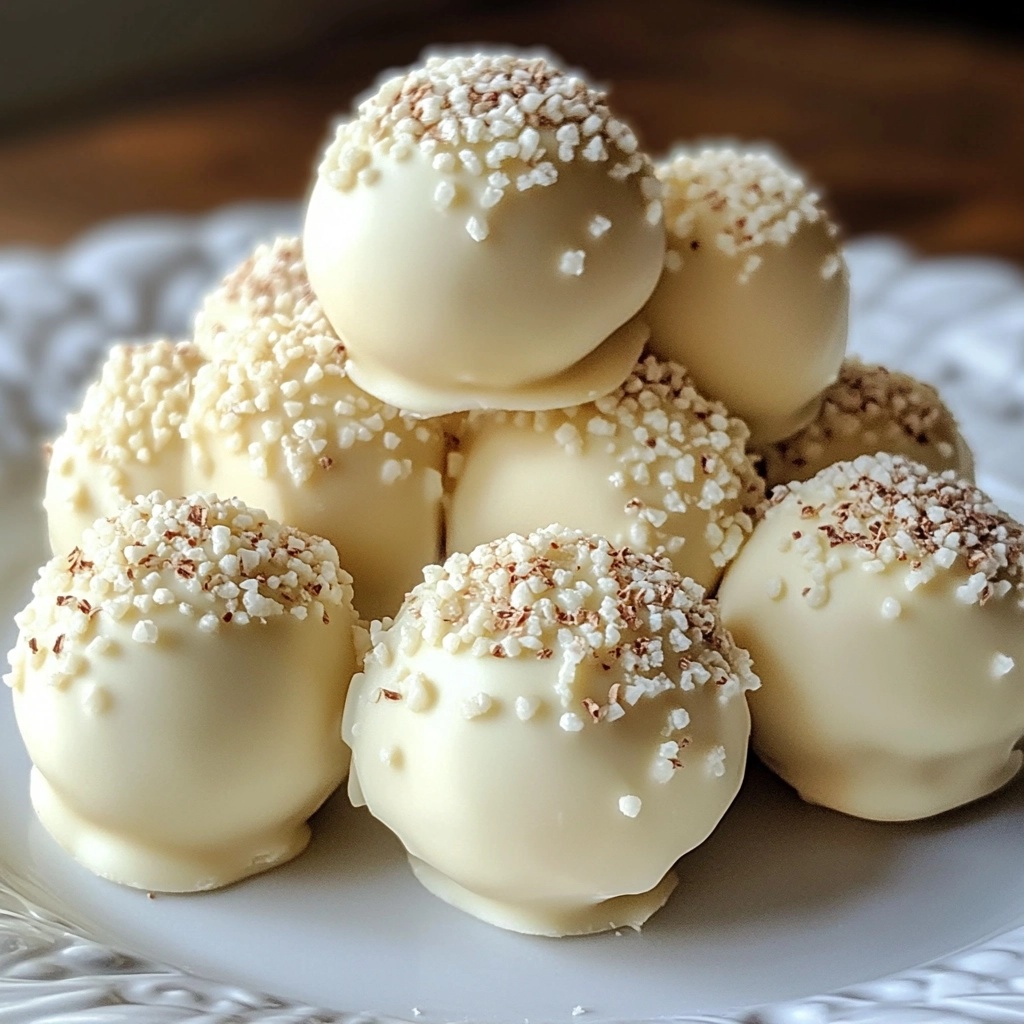
Ah, white chocolate truffles! Just the thought of them makes my heart skip a beat. These little bites of heaven are not your average chocolate treats. They are creamy, rich, and oh-so-decadent. Made primarily from white chocolate and heavy cream, they melt in your mouth like a soft cloud on a sunny day. Unlike traditional truffles, which often use dark or milk chocolate, white chocolate truffles offer a sweet, buttery flavor that’s simply irresistible.
Ingredients for White Chocolate Truffles Recipe
Before we embark on our truffle-making journey, let’s gather our ingredients. I find that having everything ready makes the process smoother and more enjoyable. Here’s what you’ll need to create these delightful white chocolate truffles:
- 🍫 White chocolate – 300 grams (about 10.5 oz), chopped. Choose a good quality white chocolate for the best flavor. I always opt for brands that use real cocoa butter, as it makes a world of difference in taste.
- 🥛 Heavy cream – 150 ml (about 2/3 cup). This is what gives our truffles that luscious, creamy texture. Don’t skimp on the cream; it’s the secret to that melt-in-your-mouth experience!
- 🌿 Vanilla extract – 1 teaspoon. A splash of vanilla adds warmth and depth to the flavor. It’s like a cozy hug for your taste buds!
- 🍫 Cocoa powder – for dusting (about 1/2 cup). This will give our truffles a beautiful finish and a hint of bitterness to balance the sweetness.
- 🌰 Chopped nuts (such as almonds or hazelnuts) – 1/2 cup, for coating. Nuts add a delightful crunch and a nutty flavor that pairs perfectly with the creamy truffles.
As I gather these ingredients, I can’t help but feel excited. Each one plays a vital role in creating the perfect truffle. The white chocolate is the star of the show, while the cream and vanilla work together to create a silky smooth filling. And let’s not forget the cocoa powder and nuts, which add that extra touch of elegance and texture.
Once you have everything ready, you’ll be just a few steps away from indulging in these heavenly treats. So, let’s move on to the tools we’ll need to make this process even more enjoyable!
Tools Needed for White Chocolate Truffles Recipe
Now that we have our ingredients lined up like eager little soldiers, it’s time to gather the tools that will help us create these delightful white chocolate truffles. Having the right equipment makes the process smoother and more enjoyable. Trust me, I’ve learned this the hard way! Here’s what you’ll need:
- 🍽️ Heatproof bowl: This is where the magic begins! A glass or ceramic bowl works best for melting the white chocolate. I love using my favorite glass bowl because it allows me to see the chocolate melt into a silky pool of goodness.
- 🔥 Small saucepan: You’ll need this to heat the heavy cream. A saucepan with a thick bottom helps prevent scorching, which is something I always try to avoid. No one wants burnt cream ruining our truffles!
- 🥄 Spatula or wooden spoon: A sturdy spatula is perfect for stirring the chocolate and cream together. I prefer a silicone spatula because it’s gentle on the bowl and makes scraping every last bit of chocolate a breeze.
- 🍦 Cookie scoop or melon baller: This handy tool helps you form perfectly sized truffles. If you don’t have one, don’t worry! You can use your hands, but be prepared for a bit of chocolatey mess—totally worth it!
- 🧊 Baking sheet: Line this with parchment paper to keep your truffles from sticking. I always keep a few baking sheets on hand, as they come in handy for all sorts of baking adventures.
- 🥣 Measuring cups and spoons: Accurate measurements are key to achieving the perfect truffle. I love my set of colorful measuring spoons; they make the process feel a bit more fun!
As I gather these tools, I can already envision the delightful truffles taking shape. Each piece of equipment plays a role in this sweet symphony. The heatproof bowl and saucepan work together to create that luscious filling, while the cookie scoop ensures each truffle is a bite-sized piece of joy. So, let’s get ready to dive into the step-by-step preparation of our white chocolate truffles!
Step-by-Step Preparation of White Chocolate Truffles Recipe
Step 1: Melting the White Chocolate
Let’s kick off our truffle-making adventure! The first step is melting the white chocolate. I always start by placing the chopped white chocolate in my trusty heatproof bowl. It’s like setting the stage for a grand performance! Next, I bring out my small saucepan and fill it with water, creating a double boiler. This method helps the chocolate melt gently without burning. I place the bowl over the simmering water, stirring occasionally. Watching the chocolate transform from solid to a silky liquid is pure magic! Just be patient; it takes a few minutes, but the result is worth it.
Step 2: Mixing in the Cream
Once the white chocolate is beautifully melted, it’s time to add the heavy cream. I carefully pour the warm cream over the chocolate, letting it sit for a minute. This waiting game allows the chocolate to absorb the cream’s warmth, making it easier to mix. Then, I grab my spatula and gently stir the mixture until it’s smooth and glossy. It’s like creating a creamy river of sweetness! The aroma wafting through the kitchen is heavenly, and I can hardly wait to taste it.
Step 3: Chilling the Mixture
Now comes the hardest part—waiting! I cover the bowl with plastic wrap and pop it into the refrigerator. This chilling step is crucial because it allows the mixture to firm up. I usually set a timer for about two hours, but I often find myself peeking in the fridge, eager to see if it’s ready. The anticipation is half the fun! When the time is up, I check the mixture. It should be firm enough to scoop but still soft enough to mold into truffles. If it’s not quite there yet, I give it a little more time.
Step 4: Forming the Truffles
Once the mixture is perfectly chilled, it’s time to get my hands a little messy! I take my cookie scoop and start forming small balls, about one inch in diameter. If you don’t have a scoop, using your hands works just as well—just be prepared for a bit of chocolate on your fingers! Each truffle feels like a little treasure, and I can’t help but smile as I shape them. I place each ball on my lined baking sheet, ready for the next step.
Step 5: Coating the Truffles
Now for the fun part—coating the truffles! I set up a little assembly line with bowls of cocoa powder and chopped nuts. First, I roll each truffle in cocoa powder, giving it a light dusting. It’s like dressing them up for a fancy party! Then, I roll them in the chopped nuts for that extra crunch. The combination of creamy chocolate and crunchy nuts is simply divine. Once they’re all coated, I place them back on the baking sheet and pop them in the fridge for another 30 minutes to set. The anticipation builds as I imagine the first bite of these delightful treats!
Serving Suggestions for White Chocolate Truffles Recipe
Pairing with Beverages
Now that our white chocolate truffles are ready to dazzle, it’s time to think about how to serve them. One of my favorite ways to elevate the experience is by pairing these sweet bites with the perfect beverages. Imagine sinking your teeth into a creamy truffle while sipping on a warm cup of coffee or tea. The rich flavors complement each other beautifully!
If you’re a coffee lover like me, a smooth cappuccino or a rich espresso makes for a delightful pairing. The bitterness of the coffee balances the sweetness of the truffles, creating a harmonious dance of flavors. I often enjoy this combination during cozy afternoons spent with a good book.
For those who prefer tea, a fragrant chai or a soothing herbal blend can be a wonderful match. The spices in chai add warmth, while herbal teas provide a refreshing contrast. I love serving my truffles with a cup of chamomile tea; it feels like a warm hug on a chilly day!
And let’s not forget about dessert wines! A sweet dessert wine, like a Moscato or a late-harvest Riesling, can enhance the truffle experience. The fruity notes in the wine pair perfectly with the creamy white chocolate, making each bite even more indulgent. So, whether you’re hosting a gathering or enjoying a quiet evening at home, consider these beverage pairings to take your white chocolate truffles to the next level!
Presentation Ideas for White Chocolate Truffles
Presentation is key when it comes to serving these delightful white chocolate truffles. After all, we eat with our eyes first! I love to get creative with how I display them. One of my favorite methods is to arrange the truffles in a beautiful box or a decorative tin. You can line the bottom with colorful tissue paper or even a sprinkle of edible glitter for a touch of whimsy. It’s like giving a gift to your guests, even if it’s just for yourself!
Another fun idea is to use mini cupcake liners. Placing each truffle in its own little liner adds a charming touch and makes them easy to grab. You can mix and match colors to suit the occasion—think pastel liners for spring or bold colors for a festive gathering.
If you’re feeling extra fancy, consider creating a truffle tower! Stack the truffles on a tiered cake stand for a stunning centerpiece. This not only looks impressive but also makes it easy for guests to help themselves. I love watching their eyes light up as they reach for these little bites of joy!
Lastly, don’t forget to add a little garnish. A sprinkle of cocoa powder or a few chopped nuts on top can add a nice finishing touch. You could even drizzle some melted chocolate over the truffles for an extra layer of decadence. With these presentation ideas, your white chocolate truffles will not only taste amazing but also look like a work of art!
Tips for Perfecting Your White Chocolate Truffles Recipe
Choosing the Right White Chocolate
When it comes to making white chocolate truffles, the quality of your white chocolate can make or break the recipe. I’ve learned this lesson through trial and error! Not all white chocolate is created equal. Some brands use vegetable oils instead of cocoa butter, which can lead to a less creamy texture and a waxy taste. I always reach for high-quality white chocolate that lists cocoa butter as one of the main ingredients. Brands like Ghirardelli or Callebaut are my go-tos, as they provide a rich, buttery flavor that truly shines in these truffles.
Another tip is to check the cocoa content. A higher cocoa butter content usually means a smoother melt and a more luxurious mouthfeel. I also recommend avoiding white chocolate chips, as they often contain stabilizers that prevent them from melting smoothly. Instead, opt for bars or blocks of white chocolate. Trust me, your truffles will thank you for it!
Storing Your White Chocolate Truffles
Once you’ve made your delicious white chocolate truffles, you’ll want to store them properly to keep them fresh and tasty. I usually place my truffles in an airtight container, separating layers with parchment paper to prevent them from sticking together. This little trick has saved me from a chocolate disaster more than once!
These truffles can be stored in the refrigerator for up to a week, but I find they rarely last that long in my house! If you want to keep them for a longer period, you can freeze them. Just make sure to place them in a freezer-safe container. When you’re ready to enjoy them, simply take them out and let them thaw in the fridge for a few hours. They’ll taste just as delightful as the day you made them!
Remember, the key to keeping your truffles fresh is to avoid exposing them to moisture. So, keep them away from the fridge door where the temperature fluctuates. With these tips, you’ll be able to savor your white chocolate truffles for days to come!
FAQs About White Chocolate Truffles Recipe
Can I use other types of chocolate for this recipe?
Absolutely! While this recipe is all about the creamy goodness of white chocolate, you can definitely experiment with other types of chocolate. Dark chocolate or milk chocolate can be used instead, and they will create a different flavor profile. I’ve tried making truffles with dark chocolate, and the rich, intense flavor is simply divine! Just keep in mind that the ratios of cream might need slight adjustments, as dark chocolate tends to be less sweet than white chocolate. So, feel free to get creative and find the chocolate that makes your taste buds dance!
How long do white chocolate truffles last?
Once you’ve made your delightful white chocolate truffles, you’ll want to enjoy them as soon as possible! However, they can last in the refrigerator for up to a week when stored properly in an airtight container. I usually find that they disappear much faster in my house, especially when I have friends over! If you want to keep them longer, you can freeze them for up to three months. Just remember to let them thaw in the fridge before indulging. Trust me, they’ll still taste just as heavenly!
Can I add flavors to my white chocolate truffles?
Oh, yes! Adding flavors to your white chocolate truffles is one of the best parts of this recipe. You can get as creative as you like! A few drops of peppermint extract can give your truffles a refreshing twist, while a hint of orange zest adds a lovely citrusy note. I’ve even tried adding a splash of espresso for a coffee-flavored truffle, and it was a hit! Just remember to start with a small amount of flavoring and adjust to your taste. The possibilities are endless, and it’s a fun way to make each batch unique!
What is the best way to store white chocolate truffles?
Storing your white chocolate truffles properly is key to keeping them fresh and delicious. I recommend placing them in an airtight container, separating layers with parchment paper to prevent them from sticking together. This little trick has saved me from a chocolate disaster more than once! Keep the container in the refrigerator for up to a week, or freeze them for longer storage. Just make sure to avoid exposing them to moisture, as that can ruin their creamy texture. With these storage tips, you’ll be able to enjoy your truffles for days to come!
Conclusion on White Chocolate Truffles Recipe
As we wrap up our delightful journey into the world of white chocolate truffles, I can’t help but feel a sense of joy and accomplishment. These little bites of bliss are not just a treat; they are a celebration of creativity, love, and the simple pleasures of life. Whether you’re making them for a special occasion or just to indulge yourself, each truffle carries a piece of your heart.
Print
White Chocolate Truffles Recipe: Indulge in Blissful Bites!
- Total Time: 2 hours 40 minutes
- Yield: Approximately 20 truffles
- Diet: Vegetarian
Description
A delightful recipe for creamy and rich white chocolate truffles, perfect for satisfying your sweet tooth or impressing guests.
Ingredients
- 🍫 White chocolate – 300 grams (about 10.5 oz), chopped
- 🥛 Heavy cream – 150 ml (about 2/3 cup)
- 🌿 Vanilla extract – 1 teaspoon
- 🍫 Cocoa powder – for dusting (about 1/2 cup)
- 🌰 Chopped nuts (such as almonds or hazelnuts) – 1/2 cup, for coating
Instructions
- Melting the White Chocolate: Place chopped white chocolate in a heatproof bowl over a simmering saucepan of water, stirring until melted.
- Mixing in the Cream: Pour warm heavy cream over the melted chocolate, let sit for a minute, then stir until smooth.
- Chilling the Mixture: Cover the bowl with plastic wrap and refrigerate for about two hours until firm.
- Forming the Truffles: Use a cookie scoop to form small balls from the chilled mixture and place them on a lined baking sheet.
- Coating the Truffles: Roll each truffle in cocoa powder and chopped nuts, then refrigerate for another 30 minutes to set.
Notes
- Use high-quality white chocolate for the best flavor.
- Experiment with different flavorings like peppermint extract or orange zest.
- Store truffles in an airtight container in the refrigerator for up to a week.
- Prep Time: 30 minutes
- Cook Time: 10 minutes
- Category: Dessert
- Method: No-bake
- Cuisine: American
Nutrition
- Serving Size: 1 truffle
- Calories: 120
- Sugar: 10g
- Sodium: 5mg
- Fat: 8g
- Saturated Fat: 5g
- Unsaturated Fat: 2g
- Trans Fat: 0g
- Carbohydrates: 12g
- Fiber: 1g
- Protein: 1g
- Cholesterol: 15mg
Keywords: white chocolate, truffles, dessert, no-bake, sweet treats
")
")
")
")